Search icon CANCEL
Arrow left icon
Explore Products
Best Sellers
New Releases
Books
Videos
Audiobooks
Learning Hub
Conferences
Free Learning
Arrow right icon
Arrow up icon
GO TO TOP
WCF 4.0 Multi-tier Services Development with LINQ to Entities

You're reading from   WCF 4.0 Multi-tier Services Development with LINQ to Entities Build SOA applications on the Microsoft platform with this hands-on guide updated for VS2010

Arrow left icon
Product type Paperback
Published in Jun 2010
Publisher Packt
ISBN-13 9781849681148
Length 348 pages
Edition 1st Edition
Languages
Tools
Arrow right icon
Author (1):
Arrow left icon
Mike Liu Mike Liu
Author Profile Icon Mike Liu
Mike Liu
Arrow right icon
View More author details
Toc

Table of Contents (16) Chapters Close

WCF 4.0 Multi-tier Services Development with LINQ to Entities
Credits
About the Author
About the Reviewers
Preface
1. Introducing Web Services and Windows Communication Foundation 2. Implementing a Basic HelloWorld WCF Service FREE CHAPTER 3. Hosting and Debugging the HelloWorld WCF Service 4. Implementing a WCF Service in the Real World 5. Adding Database Support and Exception Handling to the RealNorthwind WCF Service 6. LINQ—Language Integrated Query 7. LINQ to Entities: Basic Concepts and Features 8. LINQ to Entities: Advanced Concepts and Features 9. Applying LINQ to Entities to a WCF Service 10. Distributed Transaction Support of WCF Index

Creating the Data Model


To use LINQ to Entities we need to add a conceptual data model—an Entity Data Model or EDM—to the project. There are two ways to create the EDM: create from a database, or create manually. Here we will create the EDM from the Northwind database. We will add two tables and one view from the Northwind database into our project so that later on we can use them to demonstrate LINQ to Entities.

Adding a LINQ to Entities item to the project

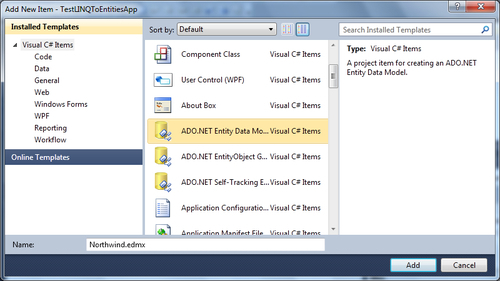
To start with let us add a new item to our project: TestLINQToEntitiesApp. The new item added should be of the ADO.NET Entity Data Model type and named Northwind.edmx, as shown in the following Add New Item dialog window:
After you click on the Add button the Entity Data Model Wizard window will pop up. Follow these steps to finish this wizard:

  1. On the Choose Model Contents page, select Generate from database. Later we will connect to the Northwind database and let Visual Studio generate the conceptual data model for us. If you choose...

lock icon The rest of the chapter is locked
Register for a free Packt account to unlock a world of extra content!
A free Packt account unlocks extra newsletters, articles, discounted offers, and much more. Start advancing your knowledge today.
Unlock this book and the full library FREE for 7 days
Get unlimited access to 7000+ expert-authored eBooks and videos courses covering every tech area you can think of
Renews at $19.99/month. Cancel anytime