


Unity Hub – Choosing the 2D URP template
The Unity Hub makes it simple to manage the installed Unity Editor versions and add or remove modules for installed Editors, and it helps manage your different projects. If you’re entirely new to Unity, then that previous sentence might be a bit confusing. Why would we have to manage different installed Editors? Simply put, software changes. As the Unity Editor evolves, it introduces new features and changes to its scripting API.
Tip
As a general rule of thumb, you should not upgrade the Unity Editor version for your project once you’ve started production. Doing so can have undesirable effects, such as broken renderings or code that no longer compiles. We’ll discuss this more in the following sections when installing the Unity Editor and selecting our project template.
Installing Unity Hub
Let’s get started on our journey by first getting Unity Hub installed. We’ll be using the Unity Personal license throughout this book, which is the free version of Unity. Free here doesn’t mean we will be limited in features or capabilities in building our games. It just means you are only allowed to use this version for free if you fall under the criteria for requiring a paid license (if you earned less than $100K of revenue or funds raised in the last 12 months).
Important note
If you are an eligible student, you may want to check out the Unity Student plan at https://unity.com/products/unity-student. It provides access to Unity Pro, a selection of quality assets, and Unity Gaming Services, such as Cloud Build, that professionals and studios building games use on Unity.
Okay, let’s do this. Perform the following steps to install the Unity Hub:
- Go to https://unity.com/download and select the download link for your OS. This will download
UnityHubSetup.exeto yourDownloadsfolder. - Click on the executable from your web browser, navigate to your
Downloadsfolder, and double-click the executable to launch the installation. - Keep the defaults or change the installation path if you want to install to a different hard drive location (only use local drives and not network drives, as this could cause problems).
- After clicking Install and letting the installation process complete, click Finish to run Unity Hub.
When opening Unity Hub for the first time, you will be prompted to Sign in or Create account if you have not created one already. Your Unity account, known as Unity ID, will be used for licensing. Unity requires an active license to install the Unity Editor. The Personal Edition license is free, and Unity Hub will generate one for you.
With Unity Hub now installed, let’s continue installing the Unity Editor.
Installing the Unity Editor – What version?
We have a new installation of Unity Hub and are now ready to install a Unity Editor version. As previously mentioned, Unity Hub allows you to have multiple versions of the Unity Editor installed to manage the different projects you’ll create over time. Opening Unity Hub without any Editor version installed will default to prompting the latest Unity Editor version in the LTS stream to be installed. LTS simply means long-term support. This is usually the best version choice to lock in and base a new project on because it will be the most stable version available and is guaranteed to be supported for the next two years. To ensure stability with the LTS version, no new features are added to the tooling or scripting API. If you want to create with the latest engine features, you’ll have to choose one of the newer tech streams since no additional tools or technologies will be introduced in the LTS stream.
Okay, simply stated, what does this mean?
- If you’re starting production today or about to ship, and you desire stability and support over the lifetime of your development and release cycle, choose the LTS stream. At the time of writing, this is 2020.3 LTS.
- If you’re starting production today but want to leverage newer tools and technology, and the latest official release version is close to becoming the new LTS stream, choose the latest official release version. At the time of writing, this is 2021.2 (becoming the latest LTS stream when 2021.3 is officially released).
- If you want to create on the cutting edge of the tools and technology available and don’t mind managing potential crashes and bugs, then choose the latest pre-release (beta) version.
Important note
This book is written specifically for Unity 2022. If you have an earlier version of Unity already installed, then the instructions or features may differ, so it may be difficult – or impossible – to follow along. We recommend installing the latest version of Unity 2022 to complete the projects we’ll create in the following chapters.
To gauge your production schedule against the Unity LTS releases, refer to the following timeline:
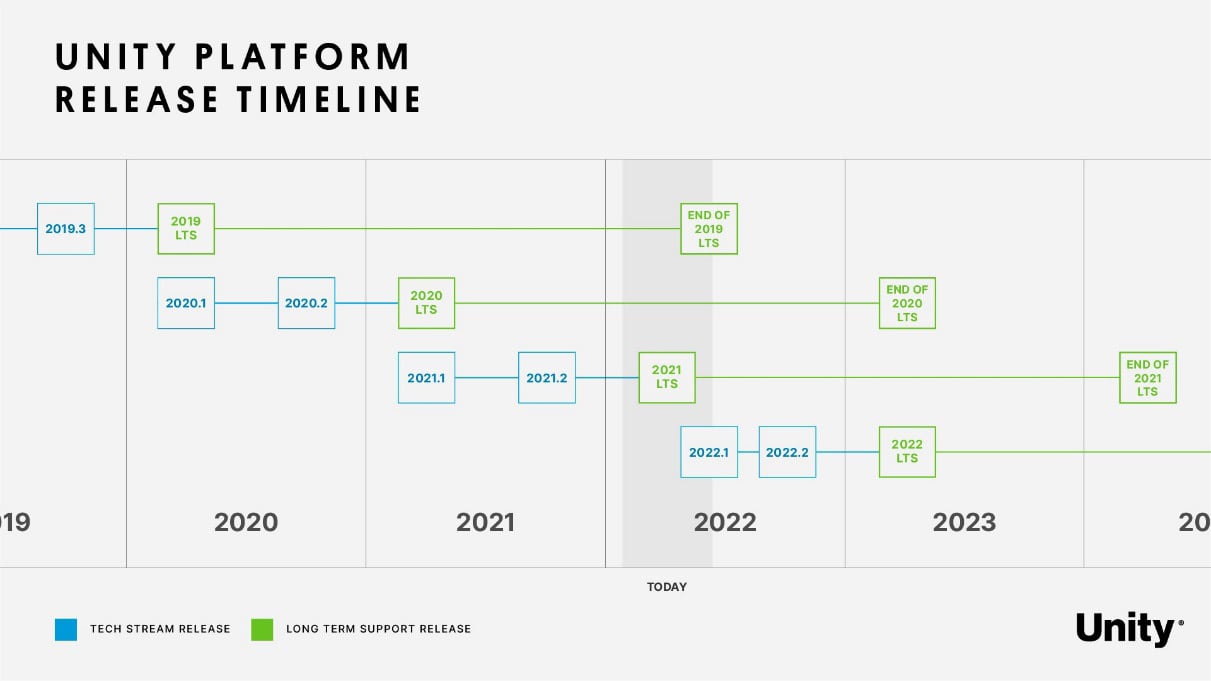
Figure 1.1 – Unity platform release timeline
Unity provides detailed LTS release information on the Unity QA resources page at https://unity3d.com/unity/qa/lts-releases.
Proceed to install the Unity 2022 Editor with the following steps:
- If you’ve just finished installing Unity Hub, you’ll be prompted to install the latest LTS version of the Unity Editor. We want to install a Unity 2022 release specifically, so proceed by clicking Skip installation in the lower-right corner of the dialog, unless, at the time you’re reading this, the 2022 LTS version has been released, in which case you can just install it and skip the remaining steps!
- In the main Unity Hub window, select Installs in the left-side pane.
- Click the Install Editor button in the window’s top-right corner.
- The Official releases tab should be selected by default (the latest beta versions can be found under the Pre-releases tab).
- In the OTHER VERSIONS section below the LONG TERM SUPPORT (LTS) section, find the latest 2022 release version listed and click Install.
- The next screen you’ll be presented with is selecting the dev tools, platforms, and documentation modules. Since we’re assuming you’re installing Unity for the first time, and we don’t currently have any specific requirements for our first project, we’ll just keep the defaults. Click on Continue.
Unity Hub will now download and install the selected version. Depending on your internet connection and hard drive speed, this will take a bit of time – an average base installation requires roughly 3 GB of downloads (temporary files) and approximately 7 GB of free hard drive space for installation.
In this section, we learned about the different Unity Editor versions available and how to install them. In the next section, we’ll learn about render pipelines to determine how to proceed with a new project.
What is a render pipeline?
In the next section, when we create our project, we’ll select a template to base our project on. This requires a bit of explanation to understand the templates’ options fully. We’ll create a 2D game (a two-dimensional game represented by planar images), so selecting a 2D template makes sense, but these are the available template names for 2D: 2D, 2D (URP), and 2D Mobile. We won’t be creating a mobile game, so we can rule out 2D Mobile, but what does (URP) mean?
If you’re unfamiliar with how video games work under the hood, rendering refers to how the 2D graphics or 3D models are drawn to the screen to generate an image. Over time, as Unity evolved its rendering technology to better suit the types of games creators were making, they understood the need to make changes and improve the rendering technology. A performant and customizable render pipeline architecture was introduced to serve creators best called a Scriptable Render Pipeline (SRP). The template named 2D will use Unity’s built-in renderer, whereas 2D (URP) will use the Universal Render Pipeline (Universal RP, or URP). The Universal RP is a default SRP Unity provides as a starting basis for making performant games on the broadest device platforms – this will eventually replace the built-in legacy renderer as the default.
Important note
We’ll discuss the URP feature set relevant to adding renderer features to the projects throughout the book but not compare it directly with the built-in renderer features. A feature comparison table between URP and the built-in renderer can be found at https://docs.unity3d.com/Packages/com.unity.render-pipelines.universal%407.1/manual/universalrp-builtin-feature-comparison.html
This section taught you what a render pipeline is and how to select the correct 2D project template. Now you’ll use what you learned to create our first project!
Creating a project
We’ll be creating our project from scratch using one of the templates Unity Hub provides to make sure everything is set up correctly for our game’s rendering requirements. Since we’ll start by creating a 2D game, we’ll select the 2D (URP) Core template. Core means that the template won’t provide any example assets, samples, or learning content in this context. It will give an empty 2D project with a pre-configured URP 2D renderer setup – perfect, just what we need!
Proceed with the following steps to create a new 2D URP project in Unity Hub:
- With Projects selected in the left-side pane, click the New project button in the window’s top-right corner.
- Verify that the Editor version at the top of the window is set to the installed 2022 version.
- Find the 2D (URP) template in the list and click to select it.
- Next, in the right-side pane, give your project a name by entering it in the Project name field.
- And finally, verify the installation path in the Location field, then click on Create project.
Now you can create your project with the preceding steps while referring to the following screenshot (making sure to have the correct Editor version selected at the top in case you have multiple versions installed already):
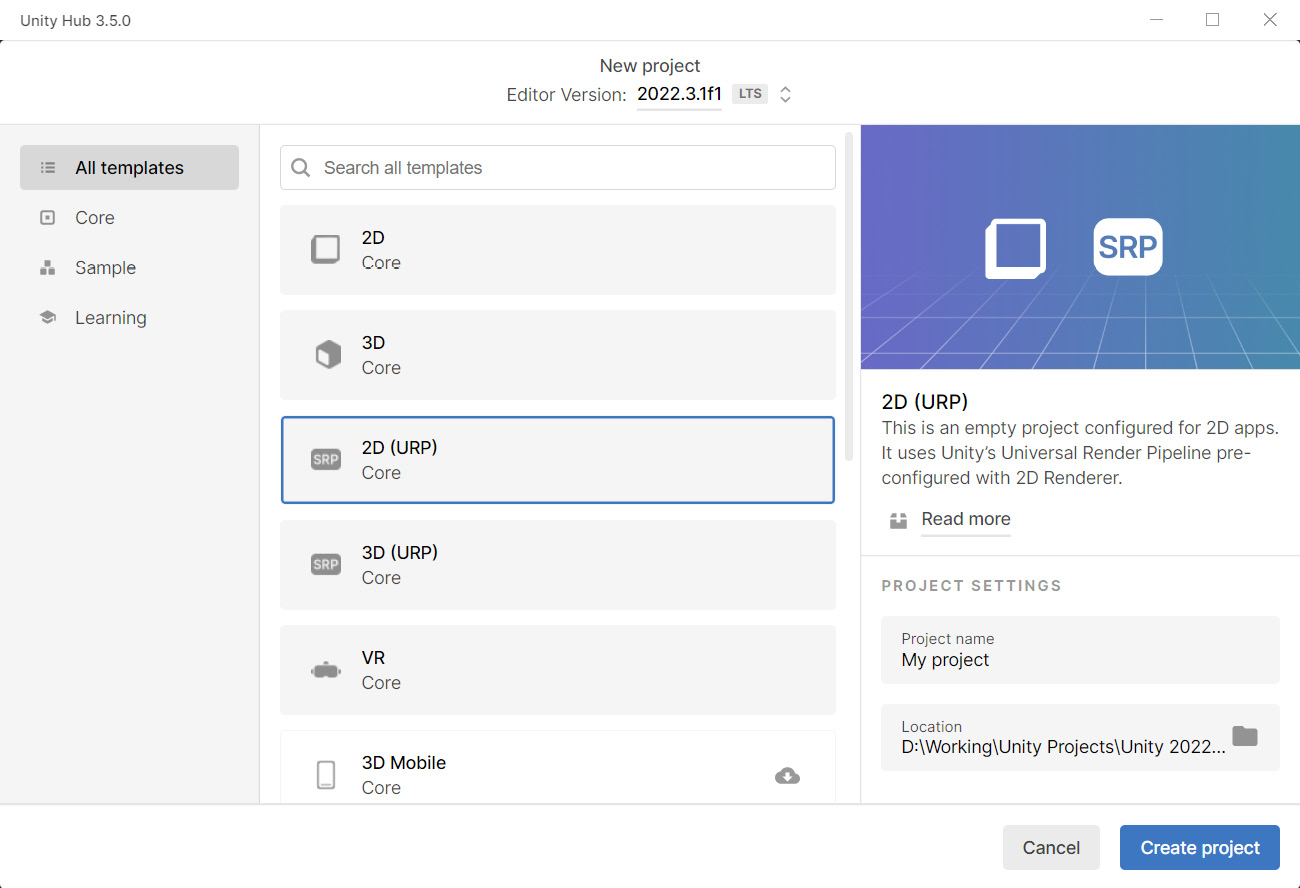
Figure 1.2 – Unity Hub project templates
In this section, you learned how to install the Unity Hub and installed a specific version of the Unity Editor. Then, you learned what a render pipeline is and how that relates to creating a new project. We’ll continue discussing the Unity Editor now by introducing its main features.


