


2D sprites with Sprite Creator – Understanding the Sprite Renderer and draw ordering
Let’s dig right in and put into practice what we just learned about GameObjects by creating a simple sprite-based character we’ll be using as the player in a collection game. This will be our first project in the book! We’ll make the player character from scratch using Unity’s built-in Sprite Creator graphics.
In this section, we’ll create a new scene, add sprites, and learn how to manipulate and layer sprites together to make our player character.
Creating a new scene
First, let’s create a new scene by going to File | New Scene (or using the Ctrl/Cmd + N shortcut). This will open the New Scene dialog and prompt us to select a Scene Template. We’re going to be using the Lit 2D (URP) template since we’ll be working with 2D while also using the Universal RP, and we want to take advantage of all the advanced lighting features URP offers.
Important note
When the scene opens, it’s good practice to save it immediately! Save it now by going to File | Save (or by pressing Ctrl/Cmd + S), selecting a folder in your project (usually Assets/Scenes), and giving it a descriptive name. Now, anytime you make changes and want to save your progress, simply use the Ctrl/Cmd + S shortcut to save. You’ll want to do this regularly and make it a habit – crashes occur when you least expect it, and you don’t want to lose any significant progress that will have to be recreated.
With our new scene being created, let’s add some sprites!
Creating a sprite using Sprite Creator
Next, create a sprite in our scene using the Create menu by right-clicking within the Hierarchy window (or using the + dropdown at the top of the window) and then going to 2D Objects | Sprites | Circle. You should now have a circle visible in your scene View placed at the origin position of (0, 0, 0). Yay!
Let’s parent this to a new empty GameObject to create our player object with a good structure – separating the graphics from the functionality we’ll add as components to the root GameObject. We’ll do this by performing the following steps:
- Create a new empty GameObject by, again, right-clicking within the Hierarchy window (or using the + dropdown at the top of the window) and then selecting Create Empty. Newly created GameObjects will be positioned at the origin position of
(0,0,0). - The default name of a new GameObject, as you guessed it, is GameObject. It is highlighted for editing by default, so you can easily rename it without additional steps. We’ll use the default name for now, so hit the Enter key.
- Create another new GameObject, but this time name it
Graphics. - Now, we’ll set up the player character’s GameObject structure by drag and drop. First, click and drag the Circle object to Graphics, then click and drag the Graphics object to GameObject.
Important note
We could have saved a few steps by first selecting the Circle GameObject in the Scene Hierarchy, right-clicking on it to open the Create menu, then selecting Create Empty Parent. The previous process was essential to demonstrate how GameObjects in the Hierarchy window can be parented and moved to other positions in the Hierarchy. To give this a try now, undo the parenting by going to Edit | Undo (or Ctrl/Cmd + Z) and then redo the parenting of the GameObjects.
- Finally, rename the root object from
GameObjecttoPlayer. First, select it in the Hierarchy window and press the F2 (Windows) or Enter (Mac) key. Alternatively, with the chosen item in the Hierarchy, use the name field at the top of the Inspector window to rename it. You should end up with the following sprite and GameObject setup in your scene:
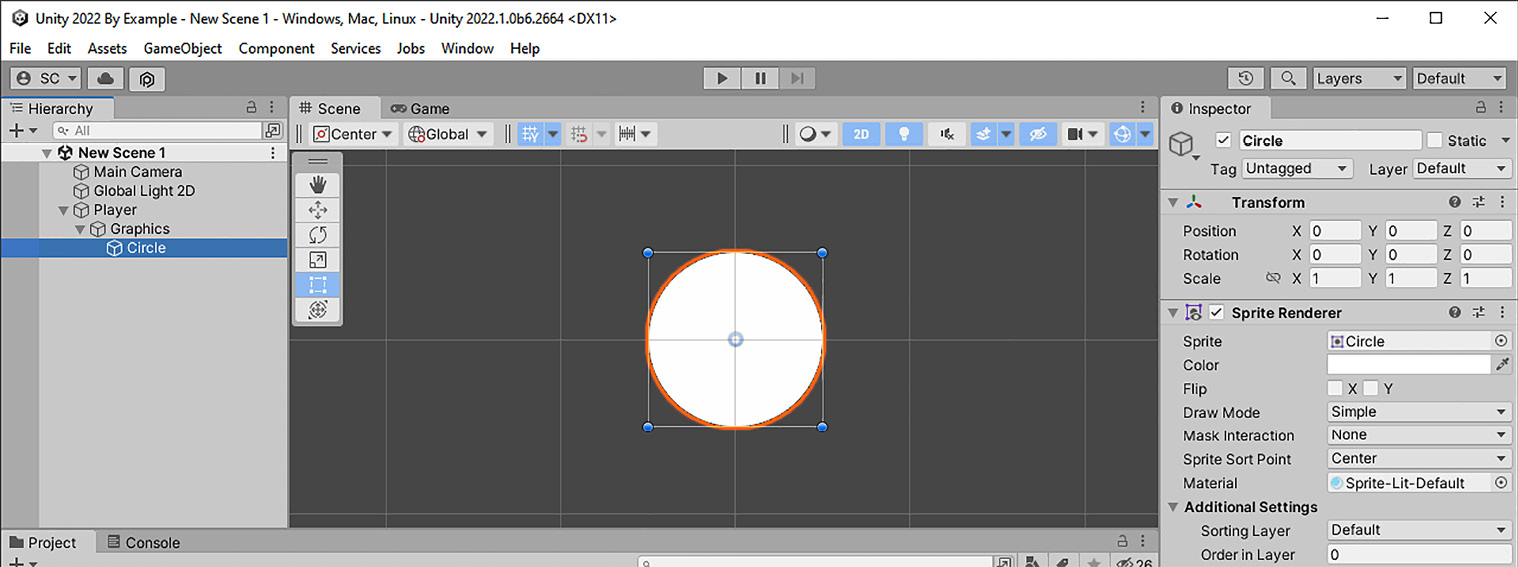
Figure 1.7 – 2D Sprite player character GameObject Hierarchy
You learned how to add a sprite shape to your scene and understand the parenting of GameObjects to create a good structure. Before tapping fully into your arcane artistic talents to create our player character, knowing how to get around in the scene View first will surely be beneficial.
Navigating the scene View
Moving around in the scene View will help your drawing efforts by zooming in/out on details and focusing on the part you’re working on. While in 2D Mode, you’ll exclusively be using both panning and zooming:
- Pan the scene View around by pressing the right-mouse button, using the View Tool (“hand” icon in the Toolbar Overlay) by clicking and dragging, or you can also use the keyboard by pressing the arrow keys.
- Zoom in/out of the scene View by scrolling the mouse wheel.
- Additionally, you can bring focus on an object in the scene View by double-clicking it in the Hierarchy window.
Additional reading | Unity documentation
You can read more about scene View navigation at https://docs.unity3d.com/2022.3/Documentation/Manual/SceneViewNavigation.html
We’re all set to start building our character in the next section.
Creating our player character
We will create a ladybug for the player character in our collection game project. We’ll use Sprite Creator sprites to design our character right inside the Unity Editor! In a later chapter, we’ll be importing original art assets to use as the different sprites in the game. For now, we’ll be limited to using some basic shapes to build out our character design, but with some creativity, the results can look quite lovely. The Transform values for Position, Rotation, and Scale and their corresponding Manipulation Tools (Toolbar Overlay) will be used extensively to draw our character.
Important note
Placeholder graphics created by a programmer during early development – and in some cases, before an artist has finalized artwork – are commonly referred to as “programmer art.” This term is sometimes used negatively to indicate mediocre artwork, but don’t let that stop you from being creative! Games such as Geometry Dash, 140, and VVVVVV all use simple graphics to great effect.
Let’s start by selecting the Circle object (that we previously created) in the Hierarchy window (or double-clicking to bring it into focus in the scene View) – note that we’ll want to keep all our new sprites as children of the Graphics object in the Hierarchy (as seen in Figure 1.8). This will be the ladybug’s body, so let’s give it a nice red color.
The Sprite Renderer component has a field for color just below the Sprite field that indicates we’re using the Circle sprite shape. Clicking the color will pop up the Color Picker dialog (see Figure 1.8). When you have a nice shade of red selected – as indicated in the top-right corner of the dialog – simply click the close button in the dialog’s title bar (the x).
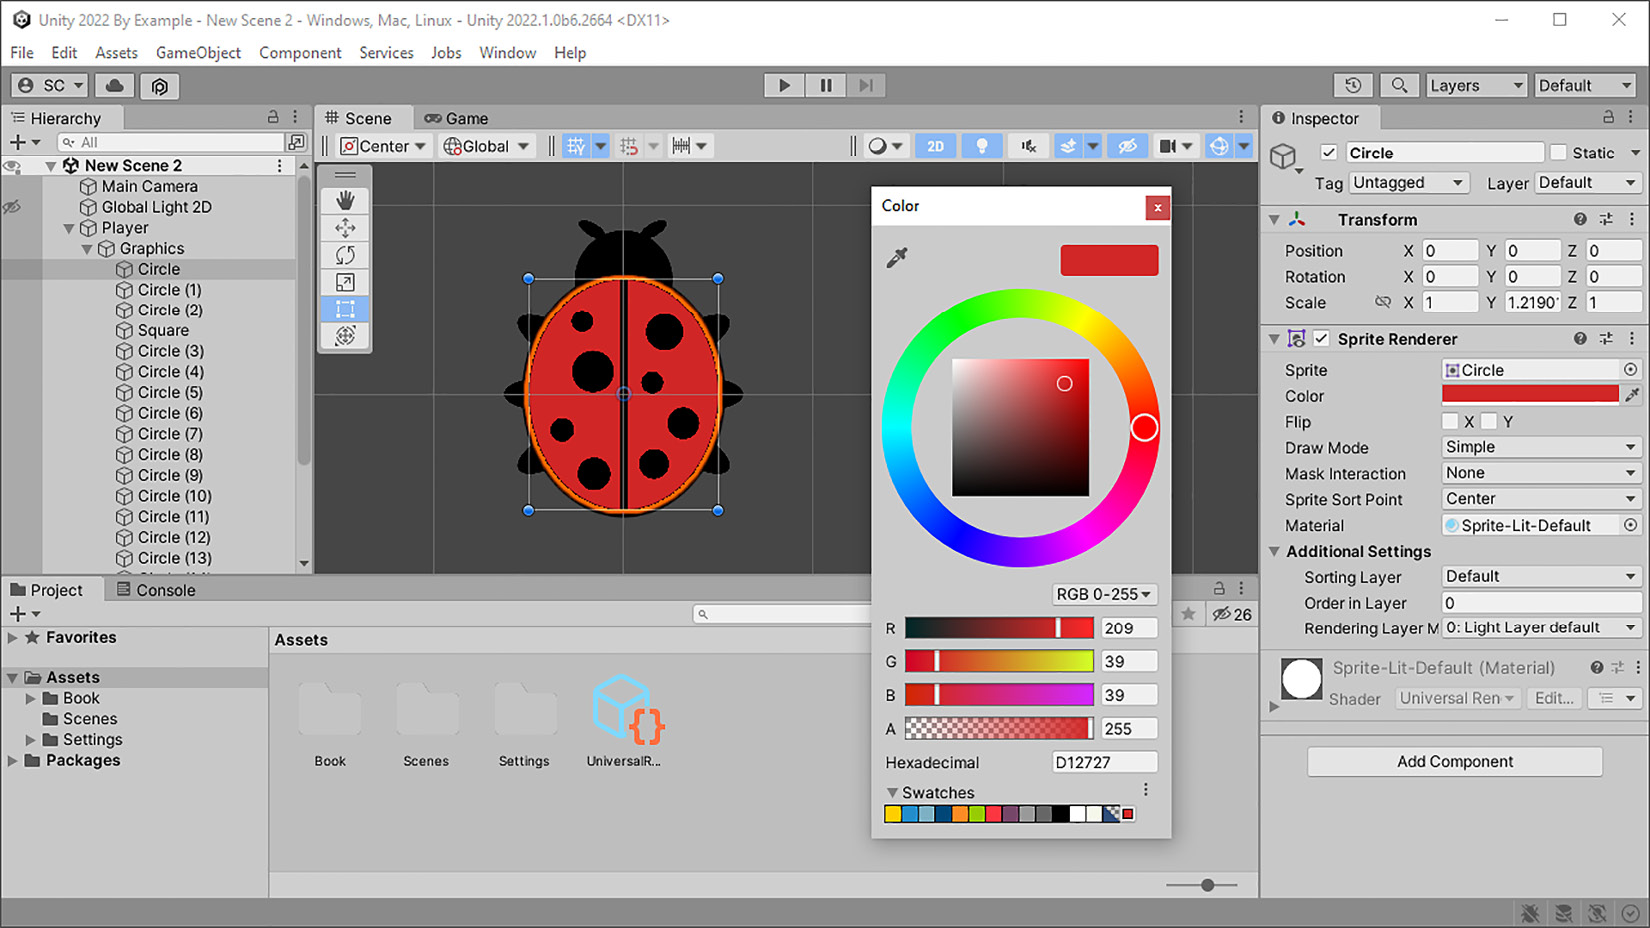
Figure 1.8 – The Ladybug Sprite Renderer component and the Color Picker dialog
With our body sprite having a nice shade of red, we can now shape it by manipulating its Transform in the next section.
Using Manipulation Tools
In Figure 1.8, you can see that we’ve already gone ahead and finished our ladybug character design. Let’s walk through the process of creating it now. You should have a red circle in your scene View, but it needs to be… less circular. Let’s turn it into an ellipse by scaling it on its Y-axis. This can be accomplished by either typing in a value in the Transform | Scale | Y field or adjusting manually using the Rect Tool (selected in the Toolbar Overlay in Figure 1.8, and Scale Tool may also be used).
Important note
The 2D scene View is represented by the X and Y axes for horizontal and vertical values, respectively. The Z-axis would represent depth, but in 2D Mode, we won’t be manipulating the Z-axis value and will be using Sprite Sorting and Ordering in Layers.
While manipulating manually with the Rect Tool, click and drag on the edge (1 axis) or corner (2 axes) of the box surrounding the Circle object to resize it.
Two modifier keys that can help create shapes more easily are the Shift and Alt keys – but keep the keys pressed while dragging, do not press them before doing so.
- To maintain the current aspect ratio while scaling, hold down the Shift key while dragging.
- To scale an object equally on both sides from the center pivot, hold down the Alt key while dragging.
Tip
You can hold both the Shift and Alt keys down while manipulating an object.
When you have a body shape that looks good, let’s move on by creating an outline for it. An outline will help provide a good separation of our player character from the background environment. With the Circle object still selected (you can simply click on shapes in the scene View to select them), press Ctrl/Cmd + D to duplicate it. This will create a copy of the Circle sprite and append a number incrementally to the name for every duplicate made. Set the new shape’s color to black and scale it up uniformly to be slightly larger than the red circle. While performing this action, you’ll likely realize that we now have a problem – the black shape hides the red body. Let’s fix it.
Sprite Layers and Ordering
In Inspector, Additional Settings is a section within the Sprite Renderer component. If the Sorting Layer and Order in Layer fields are not visible directly underneath it, click on Additional Settings to expand it (refer to the bottom of the Inspector window in Figure 1.7). We can change the drawing order of sprites in two ways: 1) by specifying Sorting Layer or 2) by a value specified in the Order in Layer field.
Sorting Layers is a topic we’ll be diving into in the coming chapters since we only need a single Layer for our current purpose – think of Layers as pages in a book where the order in which they are read front to back can be rearranged. Now, working with the Order in Layer field, we enter positive and negative integer values to set the sprites drawing order front to back on its Sorting Layer (currently Default). The default value is 0, putting every shape at the same depth. Since we want the black shape to be in the back of the red shape, set its Order in Layer value to -1. You can now readjust its size to give a nice outline thickness to the red shape.
Tip
You can select multiple shapes and change the Order in Layer value for all at once by holding the Ctrl or Shift key when selecting.
Creating the rest of the ladybug character is just a matter of duplicating a sprite shape already in the scene or creating a new one. The Sprite Creator shapes available are square, circle, capsule, diamond, and hexagon.
Move the shapes into position by simply clicking and dragging on the sprite in the scene View and placing it in position. Hovering the mouse pointer near the corner point (blue dot) will show the rotation cursor. While this cursor is showing, clicking and dragging will rotate it.
Additional reading | Unity documentation
You can read more about positioning GameObjects at https://docs.unity3d.com/2022.3/Documentation/Manual/PositioningGameObjects.html
Go ahead and create your own ladybug player character now. Use all of the Transform fields, Rect Tool with the modifier keys, and the Order in Layer field to draw. You will perform these actions repeatedly throughout creating the projects in the book for not only sprites but also UI elements. Have fun with it!
In this section, you learned how to create a new Scene, add and duplicate sprites, and manipulate those sprites to make our player character with the Order in Layer value. Next, before wrapping up this chapter, we’ll discuss game design.


