iSCSI block storage – Ansible automation playbook creation and usage
We will start the automation portion of working with iSCSI block storage by first installing and configuring the use of Ansible core 2.9 as that is what is used in the EX358 exam. I will not be using the fully qualified collection name (FQCN) as that can sometimes cause errors in a 2.9 environment, which could lead to issues while taking the exam. This we want to avoid at all costs, so we will be using the classic module names, and I will explain the differences to a degree so that you can understand what you will need to use in future versions of Ansible.
First, let’s start by installing Ansible 2.9 on server rhel3 as that is going to be what we consider the workstation server from our yum repository. Depending on your personal preferences, you can make rhel1 your classroom server and rhel2 and rhel3 your test servers, but in our case, we have already set up rhel1 with iSCSI and rhel2.
First, we will enable the needed repos:
[emcleroy@rhel3 ~]$ sudo subscription-manager repos --enable ansible-2.9-for-rhel-8-x86_64-rpms
Repository 'ansible-2.9-for-rhel-8-x86_64-rpms' is enabled for this system.
Next, we will install Python 3:
[emcleroy@rhel3 ~]$ sudo dnf install python3 -y
Then, we will install Ansible 2.9:
[emcleroy@rhel3 ~]$ sudo dnf install ansible -y
Let’s check and ensure that the right version of Ansible is installed:
[emcleroy@rhel3 ~]$ ansible --version
ansible 2.9.27
  config file = /etc/ansible/ansible.cfg
  configured module search path = ['/home/emcleroy/.ansible/plugins/modules', '/usr/share/ansible/plugins/modules']
  ansible python module location = /usr/lib/python3.6/site-packages/ansible
  executable location = /usr/bin/ansible
  python version = 3.6.8 (default, Oct 11 2019, 15:04:54) [GCC 8.3.1 20190507 (Red Hat 8.3.1-4)]
Next, we are going to start writing a playbook using the Yet Another Markup Language (YAML) Ansible language. This is a simple module-based function that will allow you to write up a playbook that will accomplish your task quickly and efficiently. I recommend a good editor when writing up these playbooks. JetBrains' PyCharm is my go-to and is what you will see me write my playbooks in when you see example screenshots of the finished results. Do also note that the finished playbooks can be found in the GitHub repository of this book, as mentioned in the Technical requirements section for each chapter.
The first thing you will want to create is a directory where you want to run the playbooks from:
[emcleroy@rhel3 ~]$ mkdir iscsi_mount
Once in the directory, we will create an inventory file with a default group that will have both the rhel1 and rhel2 servers in them:
[emcleroy@rhel3 ~]$ cd iscsi_mount
[emcleroy@rhel3 ~]$ vi inventory
[defaults]
rhel1 ansible_host=192.168.1.198
rhel2 ansible_host=192.168.1.133
[iscsi_block]
rhel1 ansible_host=192.168.1.198
[iscsi_user]
rhel2 ansible_host=192.168.1.133
As you can see, I added ansible_host and the IP address. This is in case there is no host file set up or the name is not DNS routable. I added the default group with all of the hosts, and there are two additional groups that allow me to limit what my playbooks make changes to. That way, I can tell my playbook to mount the storage on rhel2 using the iscsi_user group.
Next, we are going to write the block storage playbook named mount_iscsi.yml, and I will break it down after showing you what that playbook looks like:
---
- name: Ensure /data is mounted from rhel1 iSCSI target that was created manually onto rhel2
  hosts: iscsi_user
  become: true
  become_method: sudo
  tasks:
    - name: the targetcli package is installed
      yum:
        name: targetcli
        state: present
    - name: the IQN is set for the initiator
      template:
        dest: /etc/iscsi/initiatorname.iscsi
        src: templates/initiatorname.iscsi.j2
        mode: '644'
        owner: root
        group: root
    - name: Create mount directory for /data
      file:
        path: /data
        state: directory
        mode: '0755'
    - name: Restart iscsiadm
      command:
        cmd: systemctl restart iscsid.service
    - name: Mount new drive
      command:
  cmd: iscsiadm -m node –T iqn.2022-05.com.example:rhel1  -p 192.168.1.198 -l
The module name for this instance is yum, and that is used to install the iscsi-initiator-utils package that will install the utilities. Next, we have the different flags of the modules, such as dest: for the destination of the source file that is in your playbook’s templates folder. In the template folder location within your playbook directory, you will have the file/templates/initiatorname.iscsi.j2, which contains the initiator name to pass to the playbook. It will contain the following code:
InitiatorName=iqn.2022-05.com.example:rhel1
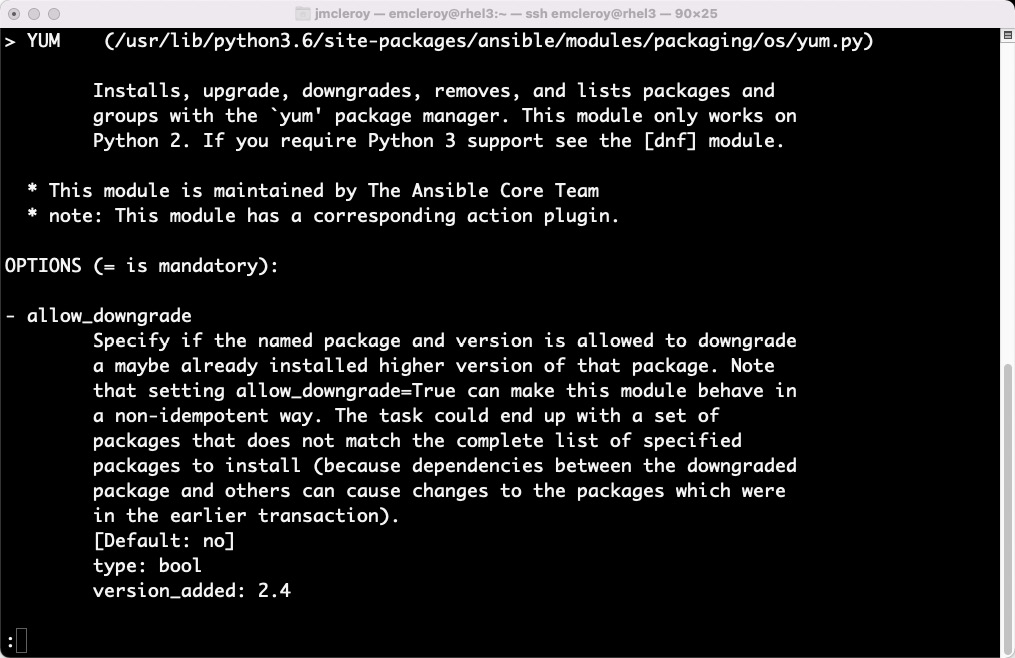
You can find out more about each module that you’re using by looking at the equivalent of a man page, as follows:
[emcleroy@rhel3 ~]$ ansible-doc yum
You can also list the files with the following command, but keep in mind there are thousands of modules, so try to grep the names if possible:
[emcleroy@rhel3 ~]$ ansible-doc –-list
The following screenshot shows what a normal ansible-doc page looks like for the different modules:

Figure 1.19 – Example of the yum module documentation page
We will use the following command to run the ansible-playbook -i inventory mount_iscsi.yml -u emcleroy -k --ask-become –v playbook. This will be executed from the rhel3 server and make changes to the rhel2 server. This concludes our automated approach to mounting a LUN for iSCSI block storage. We learned a little about Ansible and how it works, from modules to templates. We will learn a lot more about Ansible and all of its inner workings in the upcoming chapters in greater detail, so stick around.


