Installation
In four easy steps, you can install phpMyAdmin and get it set up on your system.
Step 1—What do I need?
Before you install phpMyAdmin, you will need to check that you have all of the required elements, as listed below:
phpMyAdmin requires a web server environment that supports PHP, for example Apache (http://httpd.apache.org/) or IIS (http://www.iis.net/).
25MB free (minimum) disk space on the web server. You will require more free space to store your data in MySQL.
phpMyAdmin is written in the PHP scripting language. phpMyAdmin v 3.4.x requires a minimum of PHP v5.2.0.0 to run.
The minimum supported MySQL version is 5.0.x.
You need MySQL account information (username, password)
Step 2—Downloading phpMyAdmin
The recommended way to download phpMyAdmin is as a compressed package from http://phpmyadmin.net/. We suggest that you download the most current stable build.
Pick a file which has an extension for which you have the corresponding extractor program. Moreover, there are packages which contain only the English message files and other packages, marked all-languages, which contain all supported languages. Let's suppose you downloaded phpMyAdmin-3.4.3.1-all-languages.zip and saved it to your local workstation.
After downloading and unpacking this archive, you will be left with a directory called phpMyAdmin-3.4.3.1, containing a number of files and folders.
Step 3—Configuring phpMyAdmin
The main configuration file is named config.inc.php and its normal location is the top-level directory (where index.php is located). A single instance of phpMyAdmin can manage many MySQL servers; therefore, this file can contain sections for more than one MySQL server. It can also contain directives that control the behavior of the interface. All these directives are explained in Documentation.html.
If this file is not found, phpMyAdmin assumes that you want to connect to a MySQL server on localhost—the same host as the web server. This might fit your purpose.
It's recommended to use the sample configuration file, config.sample.inc.php, and copy it over config.inc.php; then, look it over and follow the examples therein.
Step 4—Uploading to your web server
Using the uploading mechanism available on your web server, you should now place the whole folder in your web server documents directory, in which case the tool will be located at http://yourwebserver.com/phpMyAdmin-3.4.3.1. The exact location and URL really depends on your host's policies.
You can rename the folder; however, the final name it should bear depends on a number of factors:
Is there more than one phpMyAdmin version installed on the server?
Is this a multi-user installation, where users are accustomed to call it by a special URL like
http://yourwebserver.com/mysql?
The following examples will assume that the folder was renamed to phpMyAdmin.
And that's it!!
By this point, you should have a working installation of phpMyAdmin and are free to play around and discover more about it.
Further configuration
Now that the folder is in place on the web server, you can use a web-based setup script to refine your configuration. The advantage of configuring this way is that all directives are conveniently regrouped by menus and submenus, such as Features, Navigation frame, and Import.
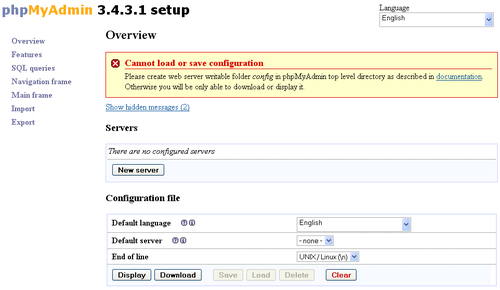
Visiting http://yourwebserver.com/phpMyAdmin/setup displays the following initial screen:

At this point, you are able to use the various menus and buttons—notably the New server button—to explore the configuration possibilities. You'll note that the setup script cannot currently load or save a configuration file. This is because a protection mechanism exists. If anyone could visit this URL and configure phpMyAdmin, your installation would be at risk. Therefore, you need to have access to the folder where you installed phpMyAdmin, to create a subfolder named config which can be used temporarily during the configuration steps. The web server itself must have the rights to write to this folder.
When this subfolder has been created, reload the page; now you can use the Save button and this creates a config.inc.php under the config subfolder.
After configuration is done, you need to do the following:
Copy the newly created
config.inc.phpto the top-level directory this makes it the effective configuration.Change the permissions on the copied
config.inc.phpto ensure that the web server cannot write to it.Delete the
configdirectory (or at least change its permissions to avoid any writing in it)


