OMSTD stands for Open Methodology for Security Tool Developers, it is a methodology and set of good practices in Python for the development of security tools. This guide is intended for developments in Python, although in reality you can extend the same ideas to other languages. At this point, I will discuss the methodology and some tricks we can follow to make the code more readable and reusable.
The OMSTD methodology and STB Module for Python scripting
Python packages and modules
The Python programming language is a high-level and general-use language with clear syntax and a complete standard library. Often referred to as a scripting language, security experts have highlighted Python as a language to develop information-security toolkits. The modular design, the human-readable code, and the fully-developed library set provide a starting point for security researchers and experts to build tools.
Python comes with a comprehensive standard library that provides everything from integrated modules that provide access to simple I/O, to platform-specific API calls. The beauty of Python is the modules, packages, and individual frames contributed by the users. The bigger a project is, the greater the order and the separation between the different parties must be. In Python, we can make this division using the modules concept.
What is a module in Python?
A module is a collection of functions, classes, and variables that we can use from a program. There is a large collection of modules available with the standard Python distribution.
The import statement followed by the name of the module gives us access to the objects defined in it. An imported object becomes accessible from the program or module that imports it, through the identifier of the module, point operator, and the identifier of the object in question.
A module can be defined as a file that contains Python definitions and declarations. The name of the file is the name of the module with the .py suffix attached. We can begin by defining a simple module that will exist in a .py file within the same directory as our main.py script that we are going to write:
- main.py
- my_module.py
Within this my_module.py file, we’ll define a simple test() function that will print “This is my first module”:
 # my_module.py
 def test():
    print("This is my first module")
Within our main.py file, we can then import this file as a module and use our newly-defined test() method, like so:
# main.py
 import my_module

 def main():
    my_module.test()

 if __name__ == '__main__':
    main()
That is all we need to define a very simple python module within our Python programs.
Difference Between a Python Module and a Python Package
When we are working with Python, it is important to understand the difference between a Python module and a Python package. It is important differentiate them; a package is a module that includes one or more modules.
Part of software development is to add functionality based on modules in a programming language. As new methods and innovations are made, developers supply these functional building blocks as modules or packages. Within the Python network, the majority of these modules and packages are free, with many, including the full source code, allowing you to enhance the behavior of the supplied modules and to independently validate the code.
Passing parameters in Python
To develop this task, the best thing is to use the argparse module that comes installed by default when you install Python.
The following is an example of how to use it in our scripts:
You can find the following code in the filename testing_parameters.py
import argparse

parser = argparse.ArgumentParser(description='Testing parameters')
parser.add_argument("-p1", dest="param1", help="parameter1")
parser.add_argument("-p2", dest="param2", help="parameter2")
params = parser.parse_args()
print params.param1
print params.param2
In the params variable, we have the parameters that the user has entered from the command line. To access them, you have to use the following:
params.<Name_dest>
One of the interesting options is that it is possible to indicate the type of parameter with the type attribute. For example, if we want a certain parameter to be treated as if it were an integer, we could do it in the following way:
parser.add_argument("-param", dest="param", type="int")
Another thing that could help us to have a more readable code is to declare a class that acts as a global object for the parameters:
class Parameters:
 """Global parameters"""
    def __init__(self, **kwargs):
        self.param1 = kwargs.get("param1")
        self.param2 = kwargs.get("param2")
For example, if we want to pass several parameters at the same time to a function, we could use this global object, which is the one that contains the global execution parameters. For example, if we have two parameters, we can construct the object in this way:
You can find the below code in the filename params_global.py
import argparse

class Parameters:
 """Global parameters"""

    def __init__(self, **kwargs):
        self.param1 = kwargs.get("param1")
        self.param2 = kwargs.get("param2")

def view_parameters(input_parameters):
    print input_parameters.param1
    print input_parameters.param2

parser = argparse.ArgumentParser(description='Passing parameters in an object')
parser.add_argument("-p1", dest="param1", help="parameter1")
parser.add_argument("-p2", dest="param2", help="parameter2")
params = parser.parse_args()
input_parameters = Parameters(param1=params.param1,param2=params.param2)
view_parameters(input_parameters)
In the previous script, we can see that we obtain parameters with the argparse module and we encapsulate these parameters in an object with the Parameters class.With this practice, we get encapsulated parameters in an object to facilitate the retrieval of these parameters from different points of the script.
Managing dependencies in a Python project
If our project has dependencies with other libraries, the ideal would be to have a file where we have these dependencies, so that the installation and distribution of our module is as simple as possible. For this task, we can create a file called requirements.txt, which, if we invoke it with the pip utility, will lower all the dependencies that the module in question needs.
To install all the dependencies using pip:
pip -r requirements.txt
Here, pip is the Python package and dependency manager whereas requirements.txt is the file where all the dependencies of the project are detailed.
Generating the requirements.txt file
We also have the possibility to create the requirements.txt file from the project source code.
For this task, we can use the pipreqs module, whose code can be downloaded from the GitHub repository at https://github.com/bndr/pipreqs
In this way, the module can be installed either with the pip install pipreqs command or through the GitHub code repository using the python setup.py install command.
https://pypi.python.org/pypi/pipreqs.
To generate the requirements.txt file, you have to execute the following command:
pipreqs <path_project>
Working with virtual environments
When working with Python, it is strongly recommended you use Python virtual environments. Virtual environments help separate the dependencies required for projects and keep our global directory clean of project packages. A virtual environment provides a separate environment for installing Python modules and an isolated copy of the Python executable file and associated files. You can have as many virtual environments as you need, which means that you can have multiple module configurations configured, and you can easily switch between them.
From version 3, Python includes a venv module, which provides this functionality. The documentation and examples are available at https://docs.python.org/3/using/windows.html#virtual-environments
There is also a standalone tool available for earlier versions, which can be found at:
Using virtualenv and virtualwrapper
When you install a Python module in your local machine without using a virtual environment, you are installing it globally in the operating system. This installation usually requires a user root administrator and that Python module is installed for every user and every project.
At this point, the best practice is install a Python virtual environment if you need to work on multiple Python projects or you need a way to work with all associated libraries in many projects.
Virtualenv is a Python module that allows you to create virtual and isolated environments. Basically, you create a folder with all the executable files and modules needed for a project. You can install virtualenv with the following command:
$ sudo pip install virtualenv
To create a new virtual environment, create a folder and enter the folder from the command line:
$ cd your_new_folder
$ virtualenv name-of-virtual-environment
For example, this creates a new environment called myVirtualEnv, which you must activate in order to use it:
$ cd myVirtualEnv/
$ virtualenv myVirtualEnv
$ source bin/activate
Executing this command will initiate a folder with the name indicated in your current working directory with all the executable files of Python and the pip module that allows you to install different packages in your virtual environment.
Virtualenv is like a sandbox where all the dependencies of the project will be installed when you are working, and all modules and dependencies are kept separate. If users have the same version of Python installed on their machine, the same code will work from the virtual environment without requiring any change.
Virtualenvwrapper allows you to better organize all your virtually-managed environments on your machine and provides a more optimal way to use virtualenv.
We can use the pip command to install virtualwrapper since is available in the official Python repository. The only requirement to install it is to have previously installed virtualenv:
$ pip install virtualenvwrapper
To create a virtual environment in Windows, you can use the virtualenv command:
virtualenv venv

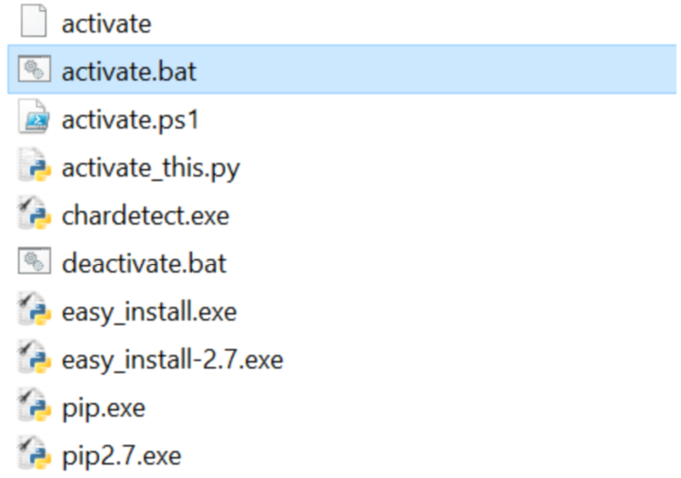
The execution of the virtualenv command in Windows generates four folders:

In the scripts folder, there is a script called activate.bat to activate the virtual env. Once we have it active, we will have a clean environment of modules and libraries and we will have to download the dependencies of our project so that they are copied in this directory using the following code:
cd venv\Scripts\activate
(venv) > pip install -r requirements.txt

The STB (Security Tools Builder) module
This tool will allow us to create a base project on which we can start to develop our own tool.
The official repository of this tool is https://github.com/abirtone/STB.
For the installation, we can do it by downloading the source code and executing the setup.py file, which will download the dependencies that are in the requirements.txt file.
We can also do it with the pip install stb command.
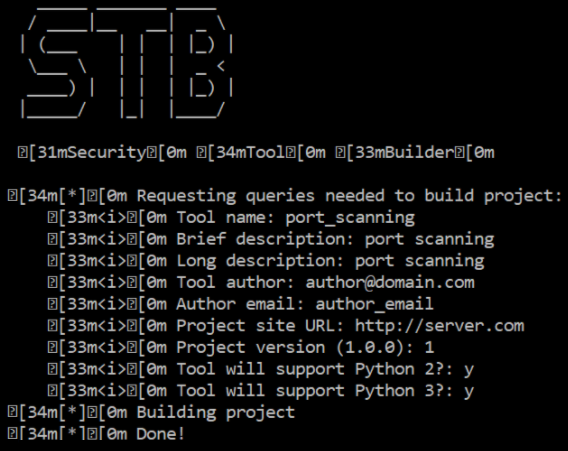
When executing the stb command, we get the following screen that asks us for information to create our project:

With this command, we have an application skeleton with a setup.py file that we can execute if we want to install the tool as a command in the system. For this, we can execute:
python setup.py install
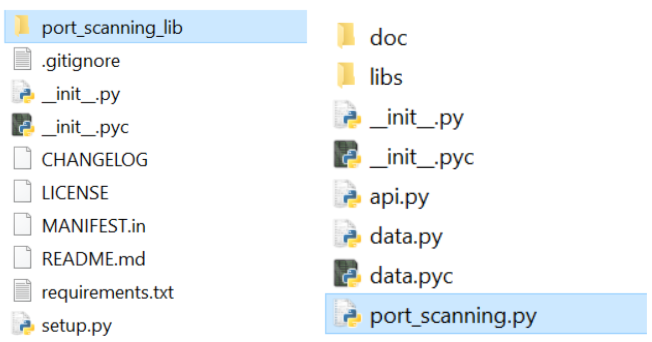
When we execute the previous command, we obtain the next folder structure:

This has also created a port_scanning_lib folder that contains the files that allow us to execute it:
python port_scanning.py –h
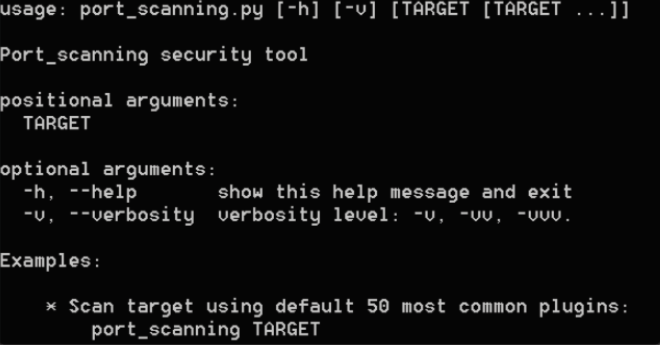
If we execute the script with the help option (-h), we see that there is a series of parameters we can use:

We can see the code that has been generated in the port_scanning.py file:
parser = argparse.ArgumentParser(description='%s security tool' % "port_scanning".capitalize(), epilog = examples, formatter_class = argparse.RawTextHelpFormatter)

# Main options
parser.add_argument("target", metavar="TARGET", nargs="*")
parser.add_argument("-v", "--verbosity", dest="verbose", action="count", help="verbosity level: -v, -vv, -vvv.", default=1)
parsed_args = parser.parse_args()

# Configure global log
log.setLevel(abs(5 - parsed_args.verbose) % 5)

# Set Global Config
config = GlobalParameters(parsed_args)
Here, we can see the parameters that are defined and that a GlobalParameters object is used to pass the parameters that are inside the parsed_args variable. The method to be executed is found in the api.py file.
For example, at this point, we could retrieve the parameters entered from the command line:
# ----------------------------------------------------------------------
#
# API call
#
# ----------------------------------------------------------------------
def run(config):
    """
    :param config: GlobalParameters option instance
    :type config: `GlobalParameters`

    :raises: TypeError
     """
     if not isinstance(config, GlobalParameters):
         raise TypeError("Expected GlobalParameters, got '%s' instead" % type(config))

# --------------------------------------------------------------------------
# INSERT YOUR CODE HERE # TODO
# --------------------------------------------------------------------------
print config
print config.target
We can execute the script from the command line, passing our ip target as a parameter:
python port_scanning.py 127.0.0.1
If we execute now, we see how we can obtain the first introduced parameter in the output:


