Updating a Pass within the Passbook app (Advanced)
Apple provides a mechanism for updating a Pass that has been added to Passbook by a user. This process involves sending a push notification to the user's device, and implementing a REST API that will respond to the device's requests and provide the relevant updated Pass information.
Getting ready
The first stage in updating a Pass is to send a Push Notification to the user's device to prompt the Pass update process. The process for sending Apple Push Notifications (APNs) is outside the scope for this book, and the assumption will made that the facility to send the appropriate APN is available. Further information on APNs can be found in Apple's documentation:
In implementing the required REST API, we will be making use of the GIT source control management tool. If you don't already have GIT installed and setup, follow the GitHub tutorial:
How to do it…
Open Terminal and change the directory to the directory that is to contain the server code.
We will be using the open source example Passbook server built in Ruby on Rails by Mattt Thompson (https://github.com/mattt), so we first need to clone the server code from the repository, with the following command:
git clone https://github.com/keefmoon/passbook_rails_example.gitYou will need to install Xcode command-line tools, you can do this by opening Xcode and on the menu, going to Xcode | Preferences | Download and clicking on Install next to Command Line Tools.
Change to the directory containing the code and prepare the Ruby App:
cd passbook_rails_example
bundle
If you get an error related to Postgres, use the following command to install it separately and run the
bundlecommand again. (This command will require administrator access.)sudo env ARCHFLAGS="-arch x86_64" gem install pgDepending on the version of Ruby installed, you may have an extra command to enter. Mountain Lion comes bundled with Ruby 1.8.7 and will require the extra command, but if you have updated to version 1.9.2 or greater, then the following command is not required. (Administration access will be required.):
sudo gem installrdoc-data
sudo rdoc-data --install
Open
[path to server code]/db/seeds.rbin a text editor. The content in this file will be used to populate the database initially, therefore replace the example data with details that match your previously created Pass, ensure that the pass type identifier and serial number are correct, but change at least one part of the Pass data. In the following example, I have changed Peter Brooke's job title fromChief Pass Creator, toCTO.pass = Passbook::Pass.create(pass_type_identifier: "pass.pro.passkit.example.generic", serial_number: "0000001", authentication_token: "UniqueAuthTokenABCD1234") pass.data = { staffName: "Peter Brooke", telephoneExt: "9779", jobTitle: "CTO", managersName: "Paul Bailey", managersExt: "9673", expiryDate: "2013-12-31T00:00-23:59" } pass.save pass.registrations.create(device_library_identifier: "123456789", push_token: "00000000 00000000 00000000 00000000 00000000 00000000 00000000 00000000")In the
seeds.rbfile, specify a unique authentication token for each Pass you add. in the preceding example UniqueAuthTokenABCD1234 is used, although this would be automatically generated in a real-world use.Deploying this server code to the free Heroku service is the quickest and easiest way to make it available for testing. Visit http://www.heroku.com and sign up for an account.
Download and install the HerokuToolbelt for OSX:

Open Terminal and log in to Heroku. Then create a new Heroku App and push the server code to it. Heroku will generate a name for your App; for example http://frozen-bayou-9500.herokuapp.com/.
heroku create
git push heroku master
heroku run rake db:createdb:migratedb:seed
For the Passes we have previously created to update using the server, we need to include the relevant information in the Pass. (In the following code sample, note that the sample web server has the additional path component of
passbookin thewebServiceURL.) Open thepass.jsonpreviously created and add two top-level keys with the relevant values, reproduce themanifest.json, reproduce thesignaturefile, and re-zip the package files."authenticationToken" : "UniqueAuthTokenABCD1234", "webServiceURL" : "http://frozen-bayou-9500.herokuapp.com/passbook",
How it works…
The server we have implemented above is to facilitate the Pass update process, which involves back and forth communication between the user's device and your server.
When a user adds a Pass to Passbook that contains webServiceURL and authenticationToken keys, the device registers with your server, passing a device library ID that is used to authenticate further communication, the authentication token to authenticate this initial communication, and a push token to be used when sending an APN.
When information contained in the Pass changes, in our example this may be Peter Brooke being promoted, your server sends an APN to the device, using the push token it received. (The sending of this push notification is outside the scope of this book.) This prompts the device to ask your server for a list of all the updated Passes since it last asked. From this list, the device asks for updated information for each of the Passes in turn. Finally, the server responds with the updated Pass information and the updated Pass is presented to the user.
There's more…
Further information on the Pass update process can be found in the Apple documentation:
There is also a full specification for the REST API that the server above implements:
When testing the web service endpoints in a browser, it is necessary to include the following request header in addition to any authorization header described in the specification:
Accept: application/json
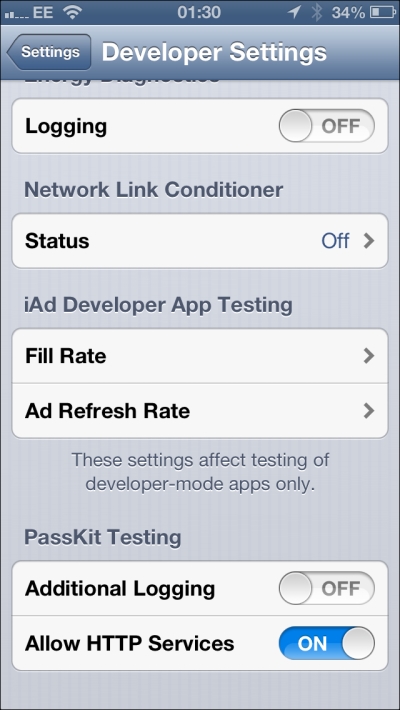
In a live production setting, the web service must use HTTPS, however you can allow Passbook on your device to use HTTP for development testing. If your device has been enabled for development using Xcode, you will have an additional Developer section under the app settings. In the Developer section, under PassKit Testing, switch on Allow HTTP Services:


