Creating a spatial database
In Chapter 1, Introducing the Fundamentals of Geospatial Analytics, maybe you created a database. If you were simply following along, you will need to create a database for working through the examples in the book. As a refresher, let’s create another to hold the data for this chapter. You will use this database to explore the components of working with PostGIS and spatial data.
This is how you do it:
- Simply right-click the database name you created and scroll to Query Tool. Figure 2.1 shows the other options available. You will explore these in later chapters, but for now, Delete/Drop is how you delete a database, Refresh will update the database (important when we add files in QGIS), and View/Edit Data will render a table in your console. If you simply want to see the column headings, a quick look at Properties is helpful:
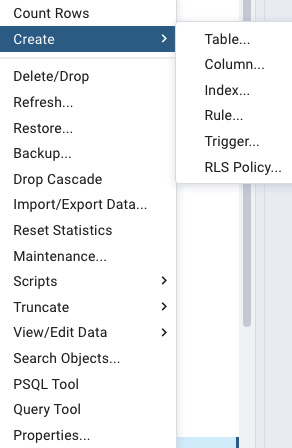
Figure 2.1 – Database options in pgAdmin
- Navigate to your Browser panel and right-click on Databases. You can see the databases listed on the left side of Figure 2.2. Here, you will name the database and select Save. You can create as many as you would like, but for our purposes, one will suffice.
Now, you are able to create a database. Perhaps you’ve already accessed pre-existing databases. If this is the case, you will be including the server address as the host when logging in. Remember, you must enable PostGIS in any database requiring spatial functions. This is achieved with the following command:
CREATE EXTENSION postgis
You write this code into Query Tool, available in each database you create to access spatial functions.
- Run the code within the database you are creating. Installing the extension into a schema will help to keep the functions listed in their own schema (or container), and there will be less information you need to scroll through when working with tables and different databases.
- Name your database for the book or create your own hierarchy of files. I am creating a schema for the data being uploaded for each chapter. You may not require this operational level, but it works when creating files and creating folder access. One distinct advantage of creating unique schemas instead of simply relying on the public schema is accessibility. You won’t need to scroll through your public schema for all of the table instances. Instead, select a specific schema and go directly to your data.
- Right-click on the public schema within the database you are working in. Select Create | Schema and add the new schema. In Figure 2.2, the schema has been added, and we will upload data and run queries inside the schema. The advantage for me is that each schema will hold the data for each chapter in the book.
Figure 2.2 – Setting up a schema
Alternatively, you can create as many databases as you want. I have three but will be working mostly from the bonnymcclain
database. I suggest you pick something more unique to you!
Before we import data into our new database schema, let’s review a few important details about spatial functions. What is the difference between geometry and geography? Let’s find out in the next section.
Options for databases with spatial functions
In Chapter 1, Introducing the Fundamentals of Geospatial Analytics, you learned about the SRID. You are going to start working with different datasets and even different layers within the same dataset, and they must have the same SRS. When importing shapefiles, you noticed that checking the SRID and setting the coordinate reference system (CRS) is an important step when creating maps.
PostGIS distinguishes between geometry and geography—geometry being Cartesian for flat surfaces, and geography adding additional calculations for the curvature of the earth. Think back to working with x- and y-coordinates on a plane. If considering magnitude and direction, we now have a vector. We can also talk about vectors in three-dimensional space by including a z-axis. In general, if you’re dealing with small areas such as a city or building, you don’t need to add in the extra computing overhead for geography, but if you’re trying to calculate something larger where measurements would be influenced by the earth’s curved surface, such as shipping routes, for example, you need to think about geography. It would not be accurate to only consider a planar Cartesian geometry.
This is where spatial PostGIS functions can help us. The data stored in a geometry column is often a string of alphanumeric characters, known as extended well-known binary (EWKB) notation and shown in the geom
column in Figure 2.3:
Figure 2.3 –SPACE EWKB notation for geometry
It is clear in these two instances of geometry (all the data is included on a plane, such as a map) and geography (all the data is included as points on the surface of the Earth and reported as latitude and longitude), the difference becomes relevant depending on our data questions. The location-aware ST_AsText(geom)
function turns binary information into geometry points.
If you want to see the geographic coordinate system (GCS)—actual latitude longitude information—you’ll need to execute SELECT gid, boroname, name, ST_AsText(geom) FROM nyc_neighborhoods
to see the actual latitude/longitude data that’s being rendered on your screen, as shown in Figure 2.4. The new column is now MULTIPOLYGON
:
Figure 2.4 – Looking at the geometries of a single table
You will need to know the types of geometries listed in your database as well as their projections. Every database includes a spatial_ref_sys
table and will define the SRS known for each database. This will matter a little later. There is also a geometry_columns
table or a view that shows all of the features of the f_table_schema
designation on the columns in your database, with the following query:
SELECT * FROM geometry_columns;
Here is how it looks:
Figure 2.5 – Display of geometry types in a single database
Certain functions need to be in a particular format. Mathematical calculations, for instance, require integer or floating-number formats. SQL CASE
statements are useful in addressing mixed-use columns in SQL tables. This is the basic format for CASE
summaries:
SELECT CASE WHEN GeometryType(geom) = 'POLYGON' THEN ST_Area(geom) WHEN GeometryType(geom) = 'LINESTRING' THEN ST_Length(geom) ELSE NULL END As measure FROM sometable;
When joining different tables, this will matter. If the tables are not consistent, you will get an error.
Exploring databases with psql
Commands in a terminal are indicated by \
, followed by a command and any arguments. Although each Postgres server is only able to access a single port at a time, it is possible to manage many databases. There are a few quick commands you can run for meta-commands in the server to list or switch databases on the fly. Chapter 8, Integrating with QGIS provides detailed instruction for creating your conda environment in terminal. Please refer there to set up. Enter the following into your terminal: conda activate sql
. To find the version of psql
, type the following:
(sql) MacBook-Pro-8:~ bonnymcclain$ psql psql (14.4) databasename=# \list
You might be curious about the template0
and template1
databases. These are used by the CREATE DATABASE
command. The postgres
default database is also listed in Figure 2.6:
Figure 2.6 – Creating a database in terminal
To list the tables in your database, enter the \dt
command.
If nothing is returned, you aren’t actually connected to a database, or the database (likely the postgres
default) does not have any tables.
\c
is a shortcut for \connect
, and it allows you to switch to a different database, as illustrated in the following code snippet. Switching to a different database lists the tables and schema for each file in a format similar to what is shown in Figure 2.7, depending on the number of tables:
\c nyc
The output is shown, along with the database where the tables are located:
Figure 2.7 – Listing the files in your database
You are also able to see the schemas connected to your database by writing the following command:
\dn
I tend to rely on terminal for troubleshooting, so these are the most useful commands for my workflow. For example, I had two versions of PostgreSQL in pgAdmin. I forgot that this is absolutely possible but they would need to have different ports. I thought my databases were connected, but checking in terminal, I realized that it was a port issue and was able to update.
Note
If you are interested in more advanced queries, the documentation for PostgreSQL includes a complete list of these options and commands:
https://www.postgresql.org/docs/current/app-psql.html
There are many ways to import data into the database. The next section will present a popular way if you do not have the Windows environment on your computer.