Search icon CANCEL
Subscription
0
Cart icon
Your Cart (0 item)
Close icon
You have no products in your basket yet
Save more on your purchases! discount-offer-chevron-icon
Savings automatically calculated. No voucher code required.
Arrow left icon
Explore Products
Best Sellers
New Releases
Books
Videos
Audiobooks
Learning Hub
Newsletter Hub
Free Learning
Arrow right icon
timer SALE ENDS IN
0 Days
:
00 Hours
:
00 Minutes
:
00 Seconds
Arrow up icon
GO TO TOP
AWS Certified Solutions Architect ??? Associate Guide

You're reading from   AWS Certified Solutions Architect ??? Associate Guide The ultimate exam guide to AWS Solutions Architect certification

Arrow left icon
Product type Paperback
Published in Oct 2018
Publisher Packt
ISBN-13 9781789130669
Length 626 pages
Edition 1st Edition
Tools
Arrow right icon
Authors (2):
Arrow left icon
Stuart Scott Stuart Scott
Author Profile Icon Stuart Scott
Stuart Scott
Gabriel Ramirez Isaias Ramirez Melgarejo Gabriel Ramirez Isaias Ramirez Melgarejo
Author Profile Icon Gabriel Ramirez Isaias Ramirez Melgarejo
Gabriel Ramirez Isaias Ramirez Melgarejo
Arrow right icon
View More author details
Toc

Table of Contents (26) Chapters Close

Preface 1. Introducing Amazon Web Services FREE CHAPTER 2. AWS Global Infrastructure Overview 3. Elasticity and Scalability Concepts 4. Hybrid Cloud Architectures 5. Resilient Patterns 6. Event Driven and Stateless Architectures 7. Integrating Application Services 8. Disaster Recovery Strategies 9. Storage Options 10. Matching Supply and Demand 11. Introducing Amazon Elastic MapReduce 12. Web Scale Applications 13. Understanding Access Control 14. Encryption and Key Management 15. An Overview of Security and Compliance Services 16. AWS Security Best Practices 17. Web Application Security 18. Cost Effective Resources 19. Working with Infrastructure as Code 20. Automation with AWS 21. Introduction to the DevOps practice in AWS 22. Mock Test 1
23. Mock Test 2
24. Assessment 25. Another Book You May Enjoy

Identity and Access Management

Let's discuss the core services to manage security in the AWS account scope. Identity and Access Management (IAM) and CloudTrail. IAM is the service responsible for all the user administration, and their credentials, access, and permissions with respect to the AWS service APIs. CloudTrail will give us visibility on how this accesses are used, since CloudTrail records all the account activity at the API level.

  1. To enable CloudTrail, you must access the AWS console, find CloudTrail in the services pane and then click on Create trail:
  1. The configuration is flexible enough to record events in one region only, or cross-region in the same account, and you can even record CloudTrail events with multiple accounts; it is recommended to choose All for Read/Write events:

It is important to enable this service initially in newly created accounts and always keep it active because it also helps in troubleshooting when configuration problems occur, when there are production service outages, or to attribute actions to IAM users.

CloudTrail is considered a best practice associated with the operation of any AWS account.

User creation

We will create an IAM user and this user can be used by a person for the purpose of everyday operations. But it can also be used by an application invoking service APIs.

  1. Let's navigate to the IAM service in the console, choose the left menu Users, and then Add user:
  1. The user we will create can only access the web console, and for this, we will create credentials that consist of a username and a password:
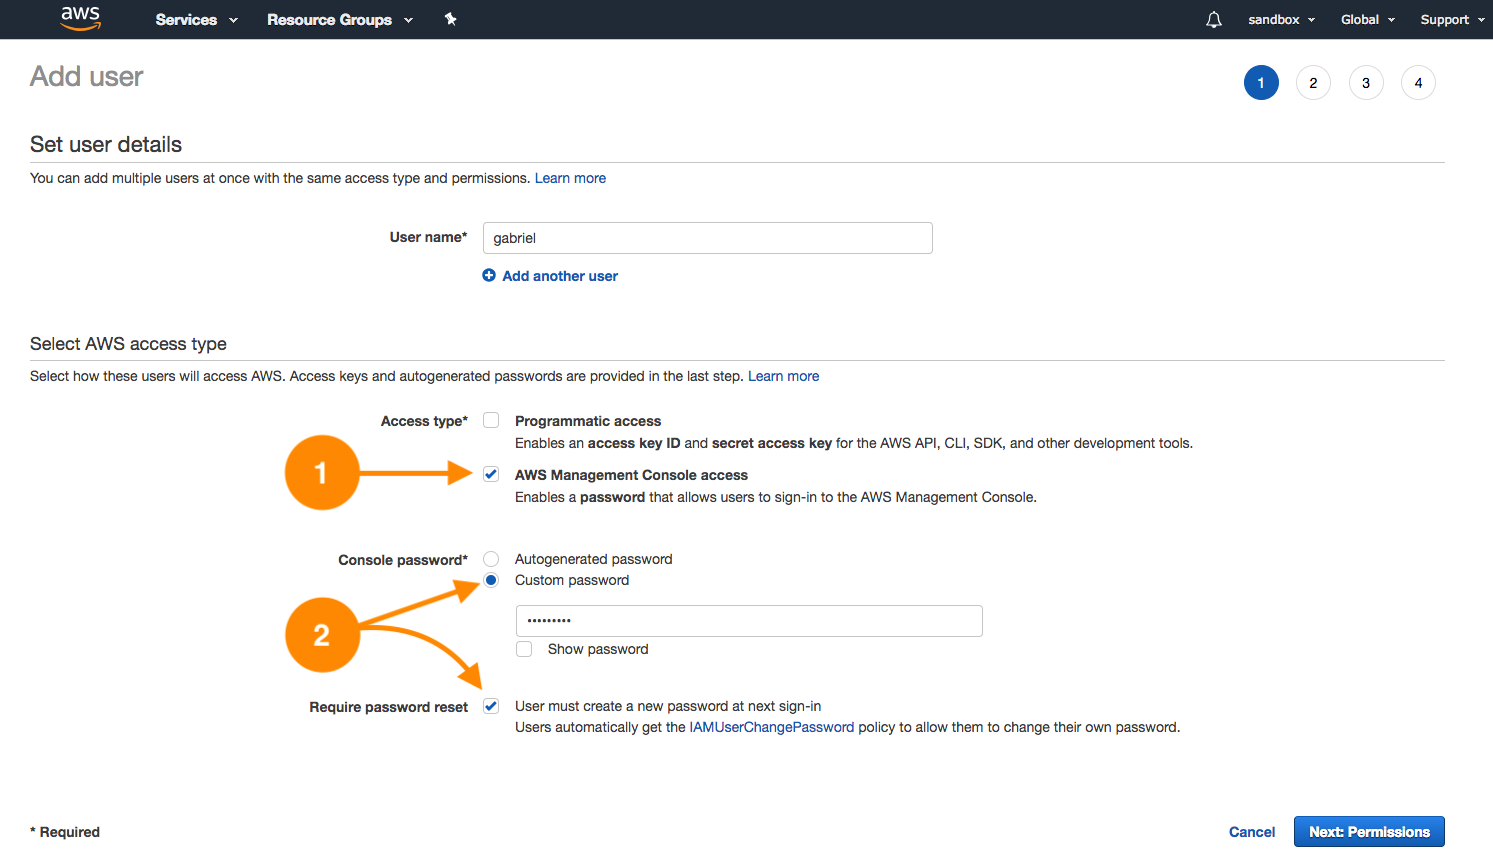
  1. In this case, check the AWS Management Console access (1) as shown in the next screenshot. You have the possibility to assign a custom password for the user or to generate one randomly. It is a good practice to enable password resetting on the next sign-in. This will automatically assign the policy IAMUserChangePassword (2) that will allow the user to change their own password as shown here:
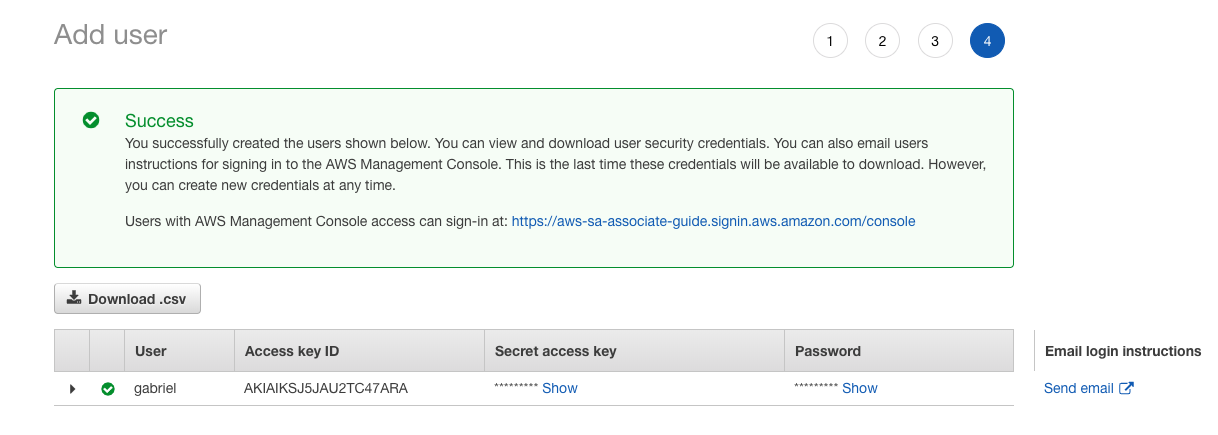
  1. Choose Next: Permissions; on this screen, we will leave it as is. Select Create User to demonstrate the default user level that every new user has. The last screen shows us the login data, such as the URL. This URL is different than root access:

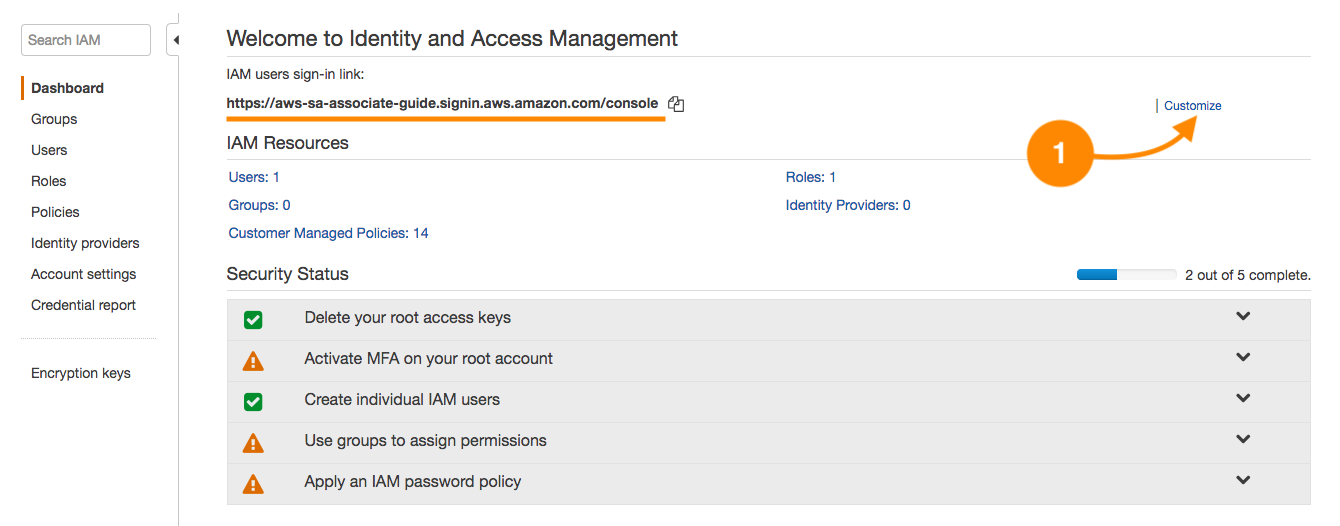
  1. Copy the URL, username, and password shown in the previous screenshot. The access URL can be customized; by default, it has the account number but it is up to the administrator to generate an alias by clicking Customize:
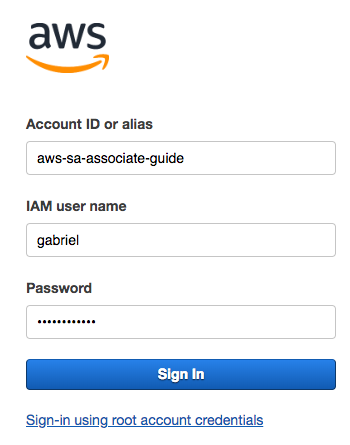
  1. Close your current session and use the new access URL. You will see a screen like the following:
  1. Use your new IAM administrator username and password; once logged in, search for the EC2 services. You will get the following behavior:
  1. Let's validate the current access scope by trying to list the account buckets in S3:

This simple test shows up something fundamental about AWS security. Every IAM user, once created, has no permissions; only when permissions are assigned explicitly will the IAM user be able to use APIs, including the AWS console. Let's close this session and log in again; this time, with the root account to create a secure access structure.

Designing an access structure

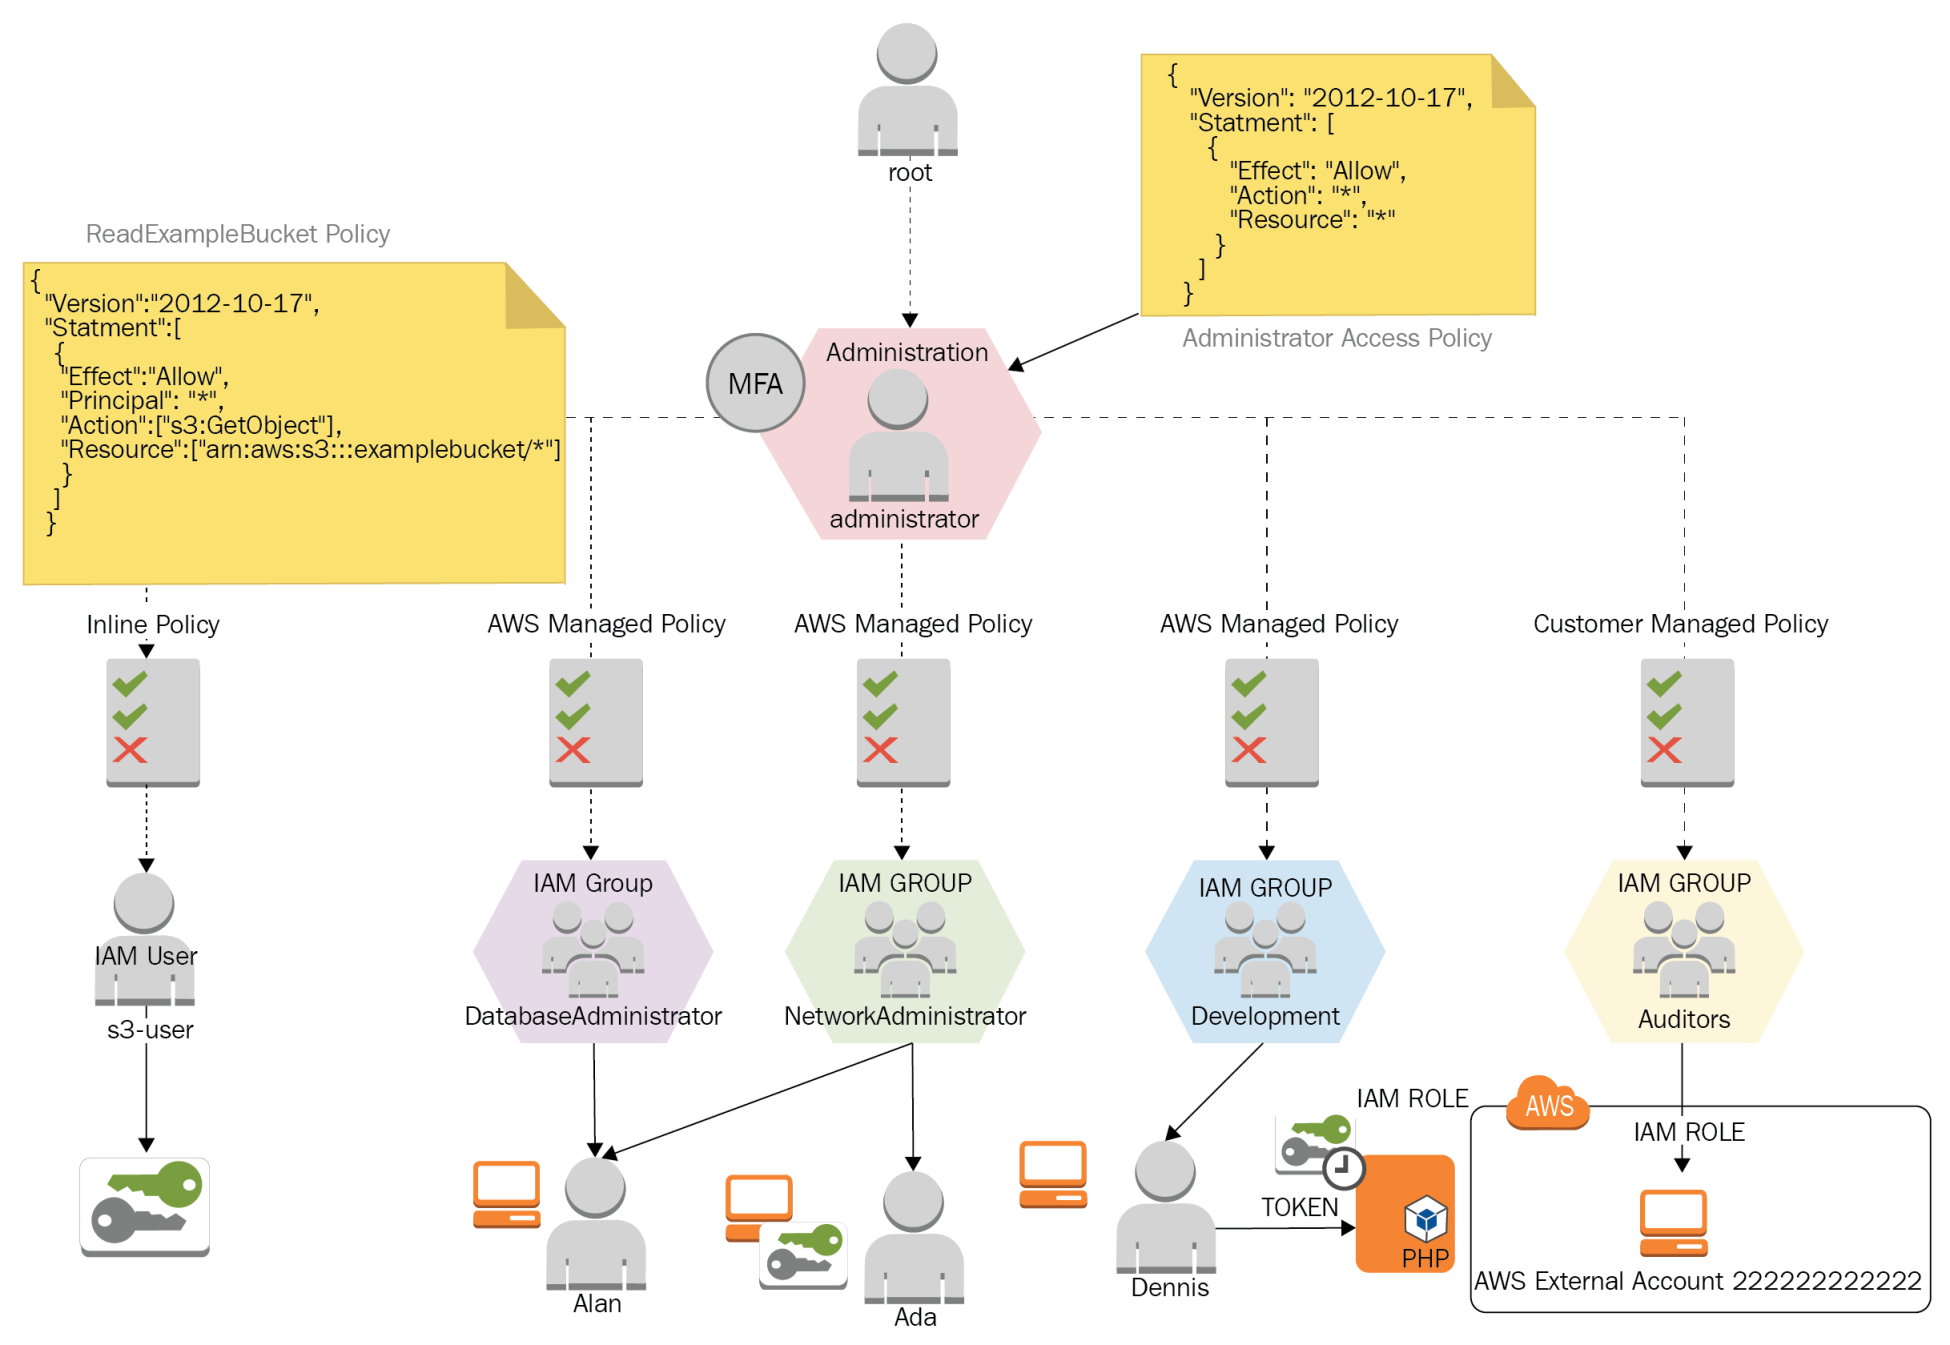
We will work on the access structure using the following model:

This diagram shows different use cases for IAM Users, IAM Groups, IAM Roles, and the IAM Policies for everyone.

Create an administration group

We will create IAM groups solely for administration purposes, and a unique user that has wide access to this account.

  1. Navigate to IAM | Groups and then choose the action Create New Group:
  1. Use the name Administration, and select Next Step. In this screen, we will add an IAM policy. IAM policies are JSON formatted documents that specify granuraly the permissions that an entity has (user, group, role).
  2. In the search bar of the step, write the word administrator to filter some of the options available for administration policies; the policy we need is called Administrator Access. This policy is an AWS-managed policy and is available for every AWS customer for their use when a full administration policy is required for a principle.
  3. Select Next Step. This will lead us to the review screen, where we can visually confirm that the administrator policy has been added. This policy has many AWS resources and has a unique Amazon Resource Name as follows:
arn:aws:iam::aws:policy/AdministratorAccess
  1. Add the group; in the group detail, we can observe that it doesn't have any users in it. Let's add our administrator user. This user must be used instead of the root account.
  2. Choose the left menu IAM users and create a new user with the name administrator; in this case, we will only choose AWS Management Console access, because, at this time, this user won't be using access keys, only the username and the password, to log into the console.
  1. In step 2 of the Add User screen, choose the administration group; this way, the user will inherit the AdministratorAccess IAM policy from the group Administration:
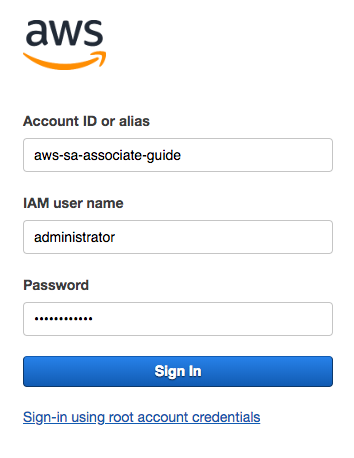
  1. Select Next: Review and Create User. It is now possible to download the comma-separated value (CSV) file with the access data for this user. Again, copy the access URL for this user and close the root session; from now on, we will be using only the administrator user created. The login screen must be similar to this:
  1. Once the login data is entered, we will be required to change the temporary password, guaranteeing confidentiality. Now that we are logged in as an IAM user, we can confirm, because the top bar has changed to administrator@account as shown:

Business case

Ada is a network administrator; part of her activities consist of provisioning virtual networks (VPCs), subnets, configuring route tables, managing hosted zones for domains in Route 53, and managing logs of the network traffic.

Ada supports database and development areas in the provisioning of infrastructure and network resources, but she should not be able to create compute resources as EC2 instances and EBS volumes.

Alan is a DBA, and most of his tasks are performance monitoring, checking database logs, provisioning databases, and performing full database backups on S3. This user must be able to read network parameters for each database instance and troubleshoot issues in production databases.

Alan will work with the AWS console because most of the monitoring operations are made from a web environment and other DBAs just using a vendor-specific driver. We will create a database administrator group, because, this way, the administration is centralized. By doing this, we can control and maintain all the security aspects in one spot; this is a better approach than having to manage tens or hundreds of users independently.

Let's create four groups and three users with the following details:

Function

IAM group name

IAM policy

IAM user

IAM User

DatabaseAdministrator

DatabaseAdministrator

Alan

IAM User

NetworkAdministrator

NetworkAdministrator

Ada

IAM Service Role

Development

-

Dennis

IAM Cross Account

Auditors

SecurityAudit

-

Alan must support Ada's activities temporarily while she is out of the office for vacations, so we need to add Alan to the network administrator group. The set of permissions Alan will have are the union of both groups.

IAM groups allow a user to become a member of one or more groups, as groups exist at the same level. It's impossible to nest a group inside another group.

Dennis is the member of the development team and he must be able to create EC2 instances. He must also be able to create EC2 service roles that permit cross-service access. These IAM roles give the ability to impersonate the access to services and avoid the usage of explicit access keys when applications interact via CLI or programmatically to authenticate APIs. The application Dennis will deploy consists of a .NET application that uses the AWS SDK and accesses an S3 bucket to store and retrieve data. To achieve this, the IAM role S3AccessToEC2Role must be created via IAM. This instance role and profile will internally require temporal credentials via the security token service (STS):

The practice of not using ACCESS_KEY and SECRET_ACCESS_KEY credentials will prevent other parties from using them if they are found in the filesystem or in the application configuration files.

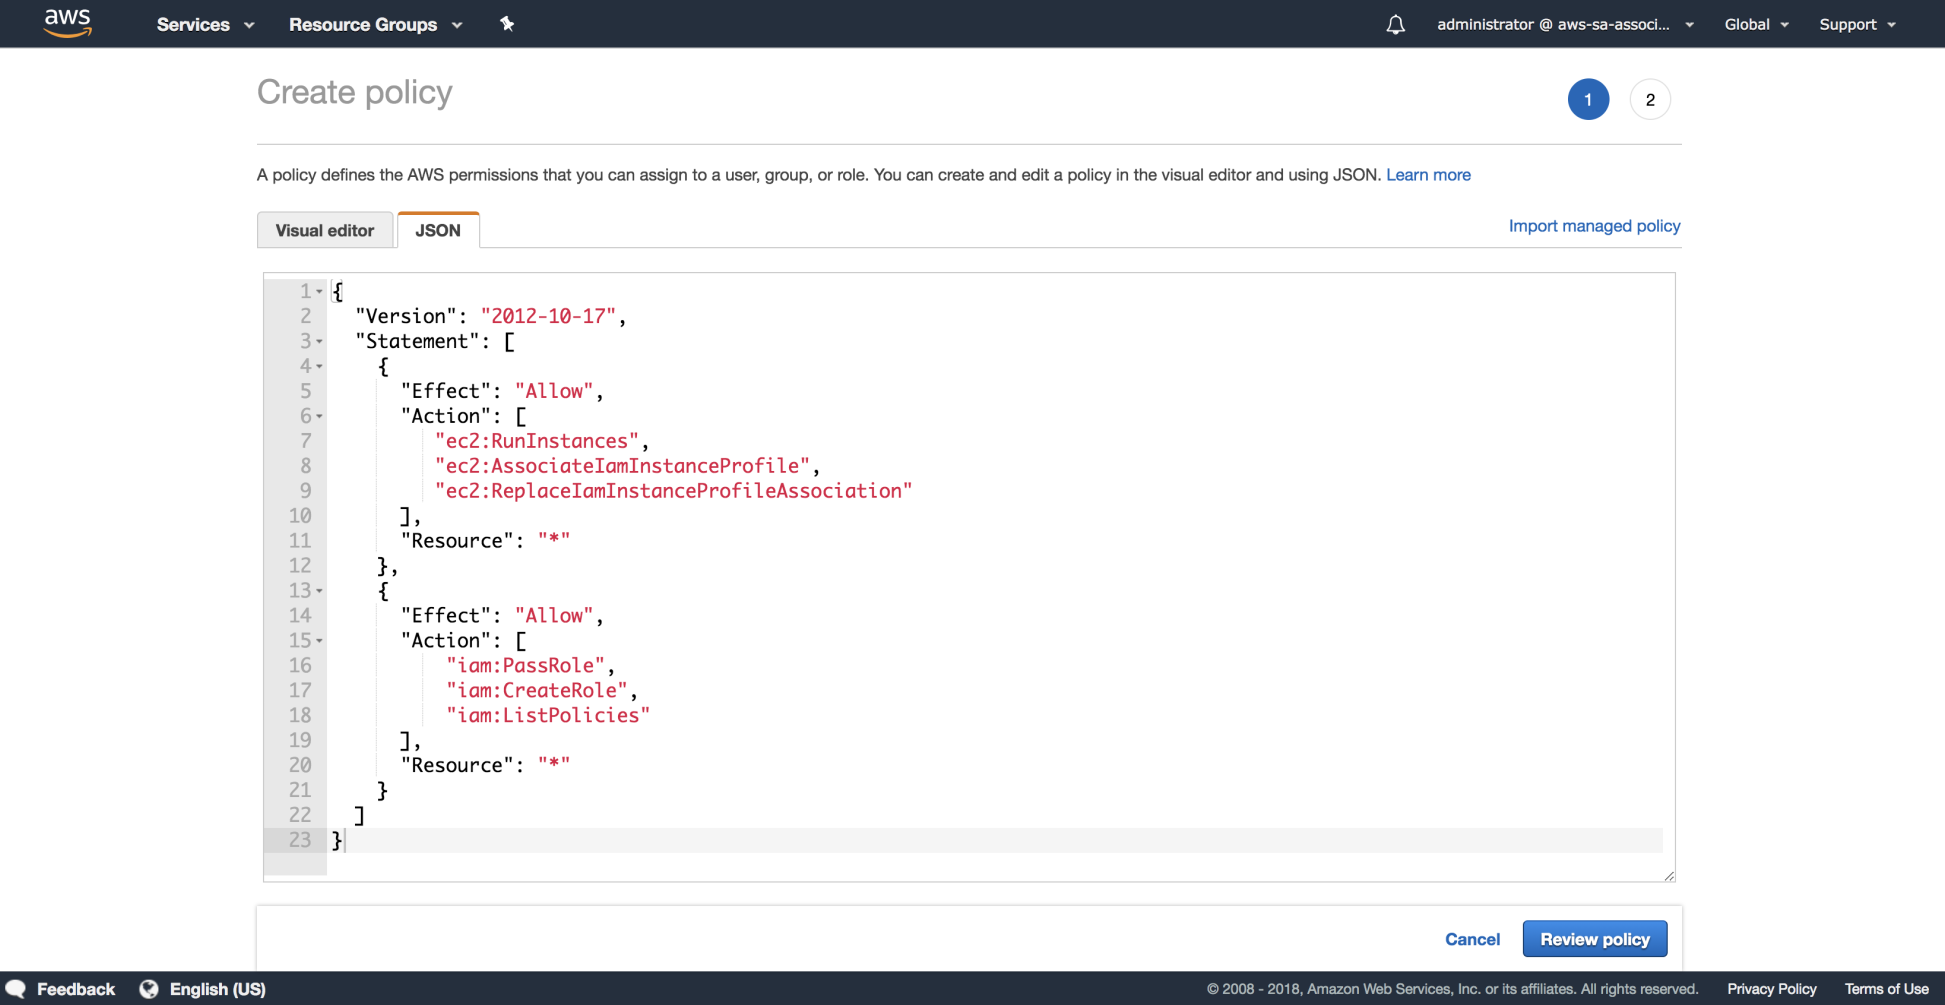
Our user Dennis must be able to create instances and IAM roles for applications. Dennis will make use of an IAM policy inherited via the development group and will be given the permissions needed to create instance roles and pass IAM roles to services. Let's create this policy, so it can be attached to the development group.

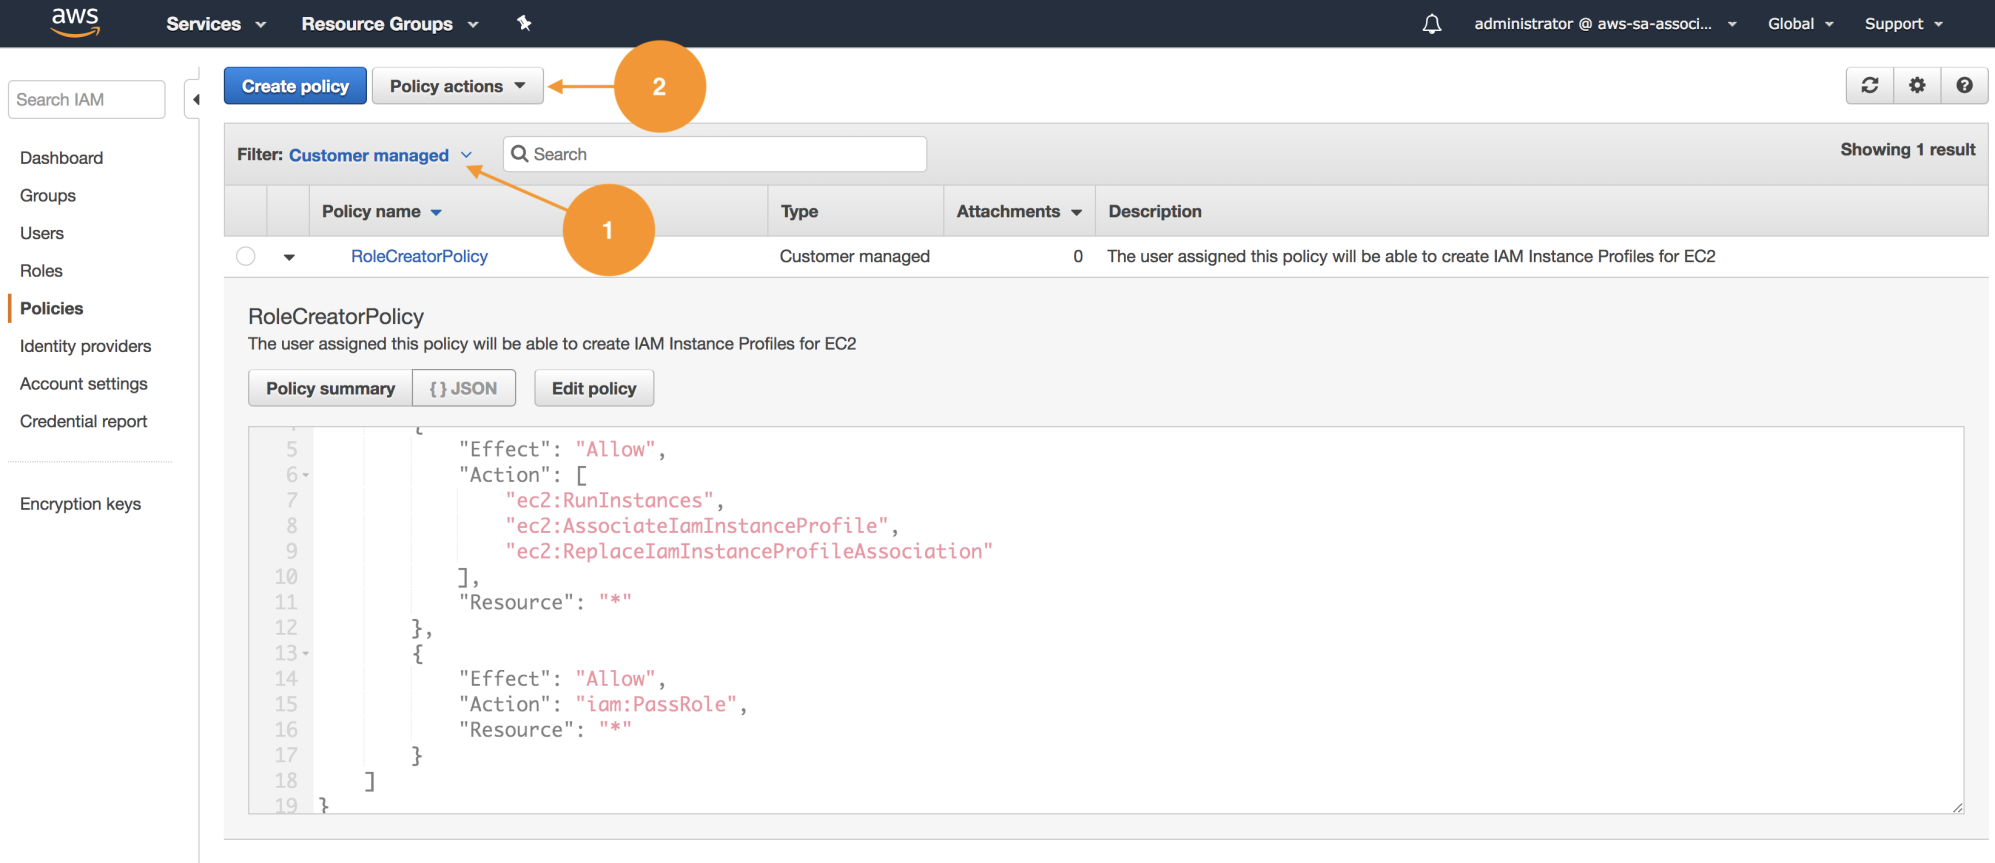
  1. Navigate to IAM | Policies | Create policy and choose the JSON tab and paste the document available under this file: https://github.com/gabanox/Certified-Solution-Architect-Associate-Guide/blob/master/chapter00/RoleCreatorPolicy.json:
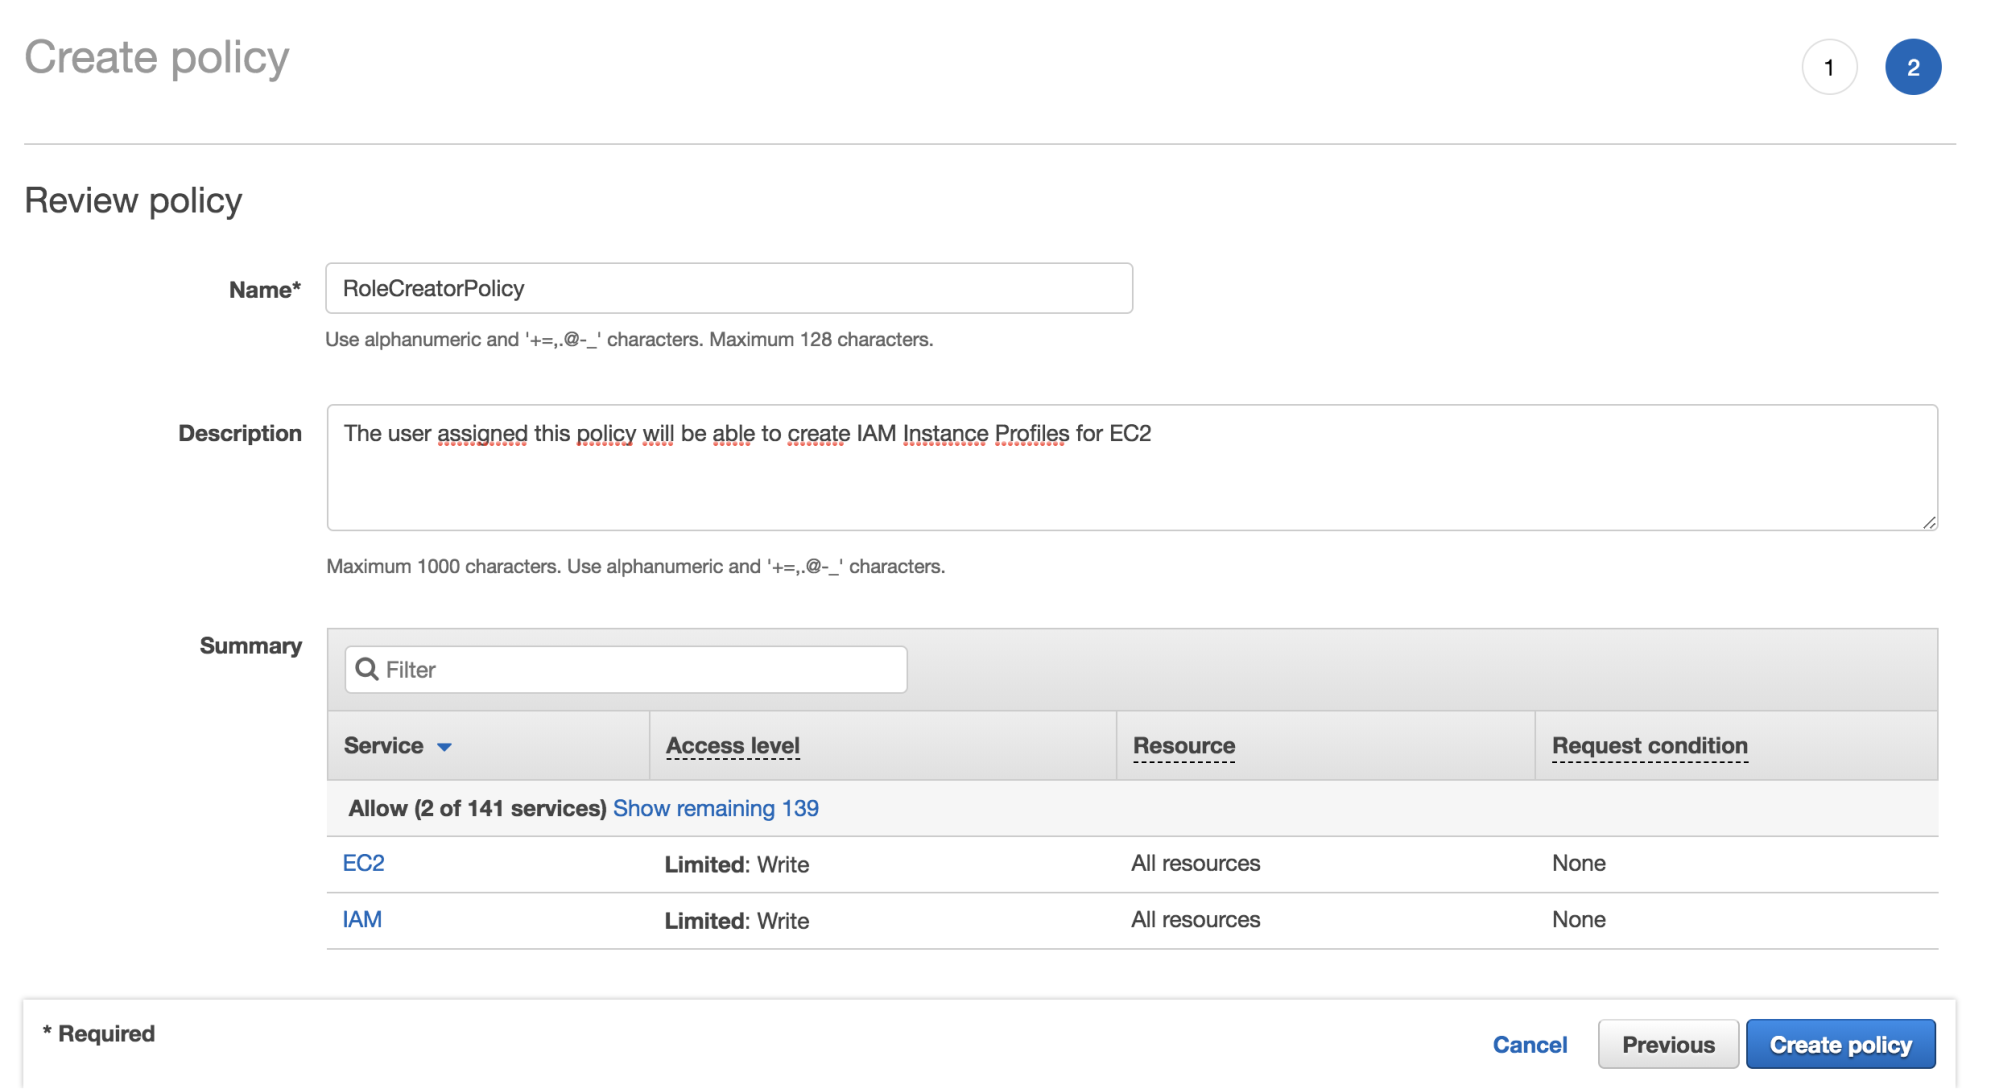
  1. We are required to specify a Name and Description for the new IAM policy:
  1. Once we have created our policy, let's associate it with the development group. On the IAM Policies listing, we have the option to filer by name (1); in this case, this policy was created globally in this account and can be reused. Choose Customer managed or use the search box to find it:
  1. Once we choose the policy, select Policy Actions and use the function attach (2), as shown in the preceding screenshot; this will redirect us to the detail, where we can use attached entities and associate them with the development group as shown:
  1. Again, let's use the policy filter choosing AWS managed until we find AmazonEC2FullAccess. Repeat the process to attach this policy to the development group. This way, Dennis will be able to create EC2 instances and associate the appropriate instance role:
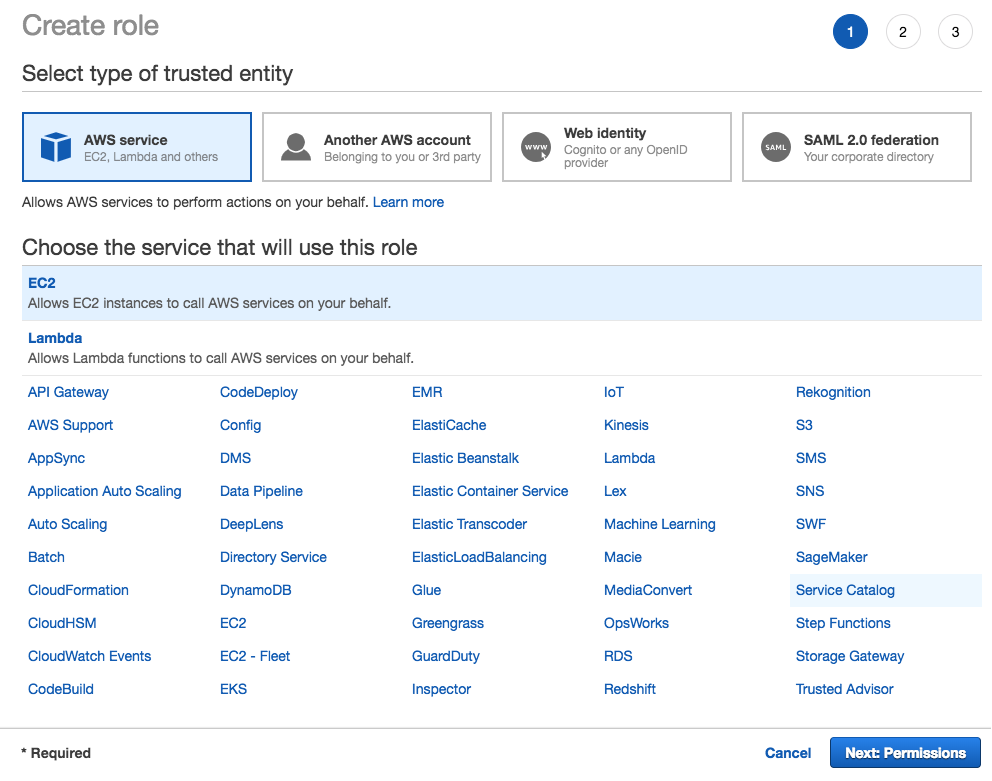
  1. Close the current session and log in with Dennis' credentials. Let's navigate to the IAM section and proceed to create a new role. The service that will use this role is EC2:
  1. Under permissions, search for s3 in the search box and add the policy AmazonS3FullAccess:
  1. Name the role EC2ToS3InstanceRole and click Create:
  1. Spin a new EC2 instance in step 3 of the EC2 wizard, under Configure Instance, and make sure to select EC2toS3InstanceRole:

At this point, if you have some problem creating this users structure, you can run the following script from the command line.

Inline policies

As the administrator, navigate to the S3 service in the console, and create a bucket with a unique name. After that, upload a text file with any kind of content using the upload button.

Write down the bucket name, as you will use it later.

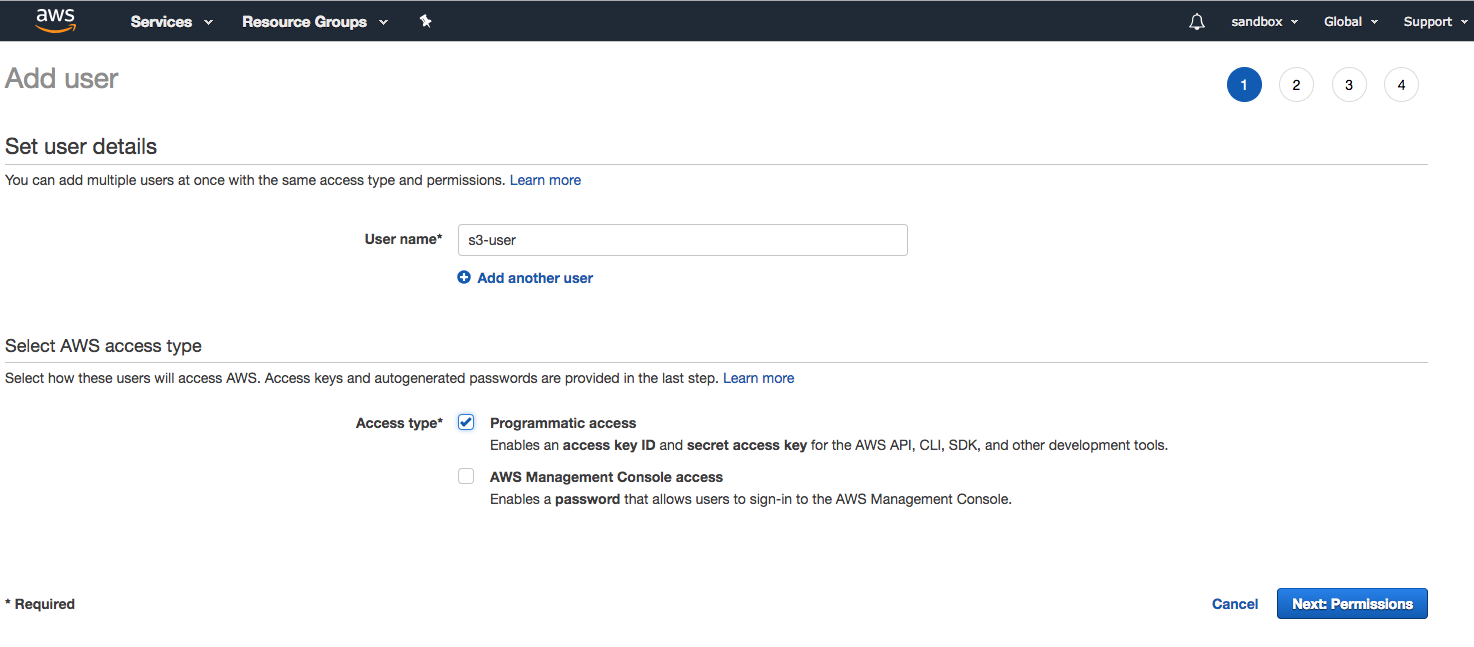
  1. We will create an IAM user with CLI-only access and a policy that only allows reading objects. Use the name s3-user as shown in the next screenshot, and in the fourth step of the Add user wizard, download the access credentials CSV file:
  1. Make sure Programmatic access is enabled; we will create this user without any kind of permissions at first. Once created, the user will be assigned an inline policy; these policies cannot be reused with other users because they are defined only once and attached directly to users and groups.
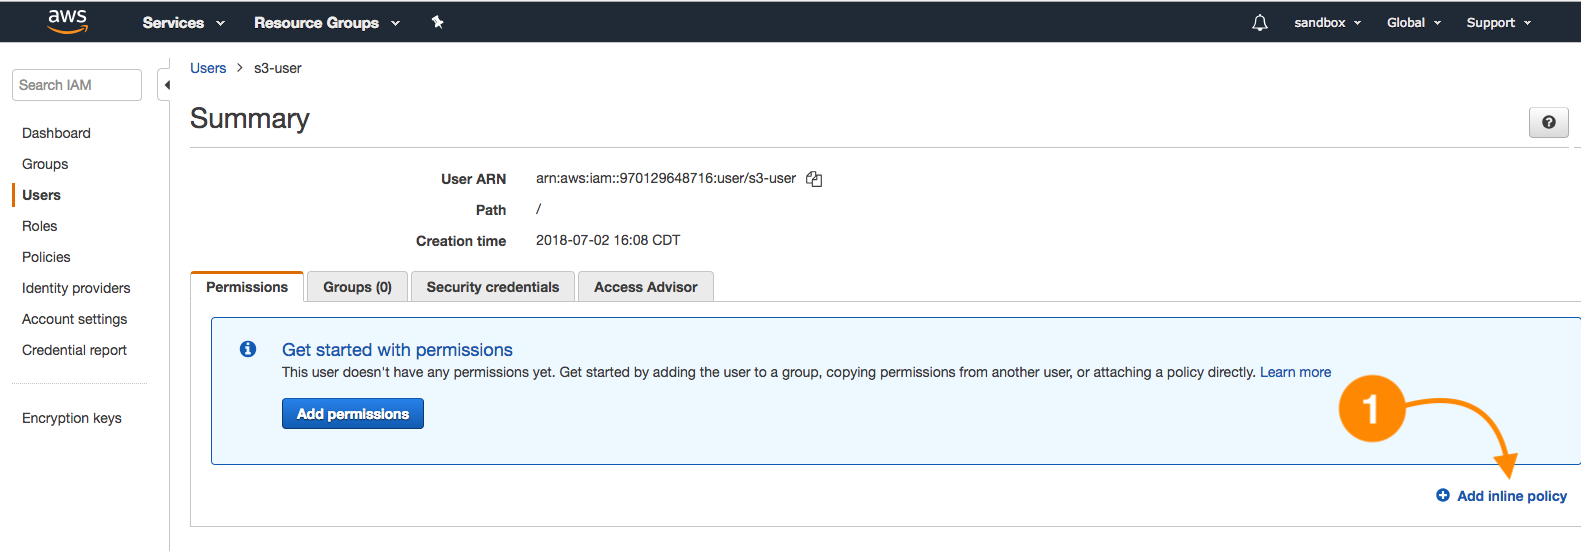
  1. Under the Users section in IAM, select the s3-user and Add inline policy as shown here:
  1. Use the visual editor, in this case by choosing S3 as the service (1). Under Actions, select only GetObject (2), and for the resources section, select Specific and Add ARN (3), writing down the bucket name and the option Any:
  1. To configure the access credentials via CLI, open a terminal and paste the following command replacing the values for aws_access_key_id and _aws_secret_access_key with your own (the s3-user CSV file values):
aws configure set profile.s3-user.aws_access_key_id "AKIAXXXXXXXXXXXXXXXXX"
aws configure set profile.sqs-user.aws_secret_access_key "ZuEVD4DDyK1TsmNp/Pa6toR/Qf3FfUN0t/XXXXXX"
  1. The following command will allow the download operation (a read) to the local filesystem:
aws s3 cp s3://example-bucket-20180602/test-object.txt --profile s3-user .

The structure of this command is as follows:

aws s3 cp <LocalPath> <S3Uri> or <S3Uri> <LocalPath> or <S3Uri> <S3Uri> ...

This way, we are using the copy subcommand and validating that the S3 user has read-only access to objects.

IAM cross-account roles

An external auditors group requires read-only access to the account so they can inspect API activity on the account. These auditors are a company that has an AWS account, but to follow the less-privileged principle, we will use a role with an AWS Managed Policy called SecurityAudit, plus the AWSCloudTrailReadOnlyAccess. This way, there won't be a necessity to create an additional user in the audited account, but this account can define the level of permissions necessary to let external auditors perform their task.

This task requires an additional AWS account, so this is only demonstrative. Also, take into account that only IAM users are allowed to perform the AssumeRole action.

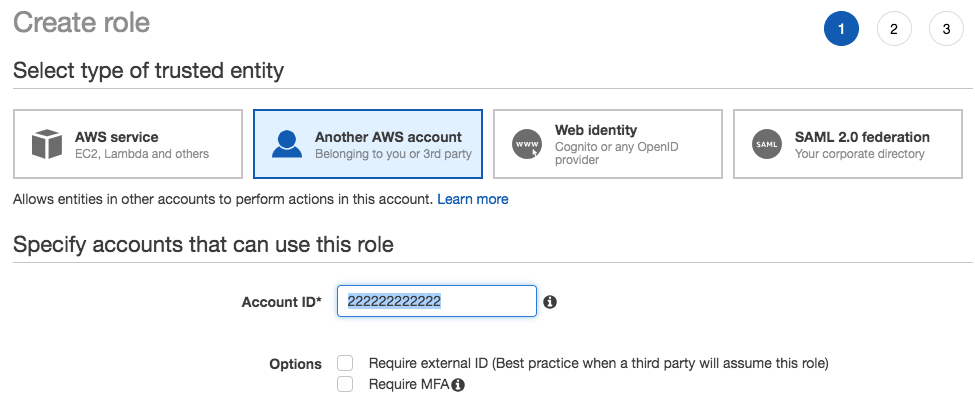
  1. As an administrator, navigate to IAM and create a role. On the type of trusted entity, choose Another AWS account. For this demo, I will use a hypothetical account number. The IAM role used in this scenario is called delegation:

We have two accounts, the Production Account (11111111111), which will have the cross-account role created, and the access policy for this external audit user, and the Sandbox Account (222222222222), the one that will assume the external role to access AWS APIs; in this case, Cloud trail.

  1. The next step is to create the cross-account role in the production account. The type of trusted entity is Another AWS account, and we will specify the trusted account number (sandbox):

External auditors will also have read-only access to Cloud trail:

  1. Select the role created to review the details; by default, it is configured to allow broad access using the root principal as the trusted entity.
  2. Edit this trust relationship as shown next, and specify our IAM user in this case administrator (it could be a member of the audit group):

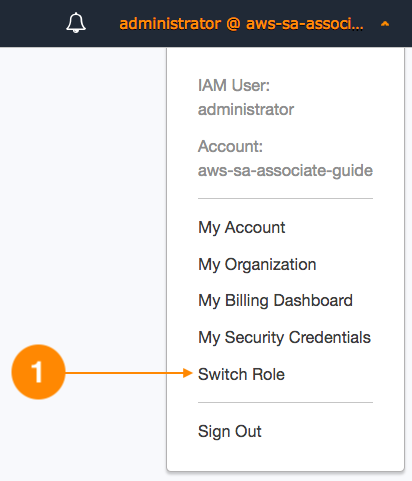
Now, in the sandbox account, we need to configure the audit-role this account will assume. This can be done in the current user upper menu as follows:

In the next screen, you will be prompted to specify the requested account (production), the name of the external role to assume, and a friendly name:

  1. Now, we can see our role-friendly name listed under Role History; once we assume this identity, our web console will display the production account data and the top menu will change to display the current assumed role:
  1. To end this lesson under Cloud trail, it is possible to see all the API events since logging was activated for the account:

As a complementary activity, it is recommended to enable Multi-Factor Authentication (MFA); you can provision this 2FA by downloading Google Authenticator from your mobile app store.

For detailed information check the documents here: https://aws.amazon.com/iam/details/mfa/.
You have been reading a chapter from
AWS Certified Solutions Architect ??? Associate Guide
Published in: Oct 2018
Publisher: Packt
ISBN-13: 9781789130669
Register for a free Packt account to unlock a world of extra content!
A free Packt account unlocks extra newsletters, articles, discounted offers, and much more. Start advancing your knowledge today.
Unlock this book and the full library FREE for 7 days
Get unlimited access to 7000+ expert-authored eBooks and videos courses covering every tech area you can think of
Renews at $19.99/month. Cancel anytime
Banner background image