Adding a learning game to your course
Articulate Quizmaker gives you the capability of creating extensive quizzes and other interactive activities; however, there is also a built-in capacity for creating interactive learning games that is a part of Articulate Presenter. This capability gives you the ability of creating three different learning games right in your Articulate presentation. Having this capability allows you to make the lesson more interactive and ask questions to the learner.
Putting a learning game into your presentation can do a lot to help engage the learners in the training being provided. This will help them grasp the material that is being presented better and retain it longer.
How to do it…
The learning games provided directly in Articulate Presenter are much simpler than those that can be created in Quizmaker. However, when something quick and simple is needed, this is much easier than creating a quiz and importing it into a presentation.

The learning games are accessed off the Articulate ribbon in PowerPoint by clicking on the Learning Games button:
Clicking on the button opens a dialog box that will allow you to select between adding a new learning game and editing an existing one. Since we have not yet added a learning game to our presentation, the edit option will be grayed out, leaving our only option to Add a new learning game slide.

Note
It should be noted that any time that you add a learning game, it will be added to your presentation as a new slide immediately following the currently selected slide. Of course, like any other slide in a PowerPoint presentation, it can be moved through the order of the presentation by clicking and moving its thumbnail to the left-hand side pane of the work area.
There are three types of learning games that you can choose for your presentation, namely Choices, Word Quiz, and Sequence. We're going to do the Choices type. The others are done in a very similar manner.

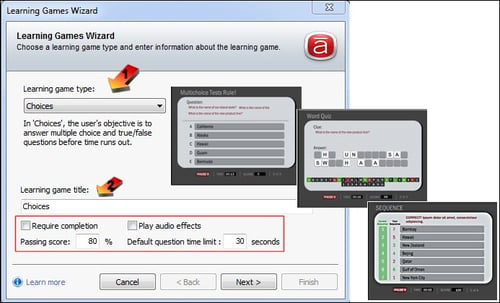
The Learning Games Wizard dialog will show Choices as the default Learning game type.
Select the Require completion checkbox in the lower part of the dialog box. This will ensure that the viewer must complete the game before continuing on to the next art of the presentation.
In the Passing score textbox, input
70for a required passing grade of 70 percent to move on to the rest of the presentation.Click on the Next button at the bottom of the wizard's dialog box. Here you can type in any custom message to be displayed before the game starts. Type in
Answer the questions about Mary's Lambin the text area. Be sure to check the checkbox so that the message will be displayed.
In the Instructions section select Display instructions. If you do not wish to provide instructions to the user, click on Don't display instructions.
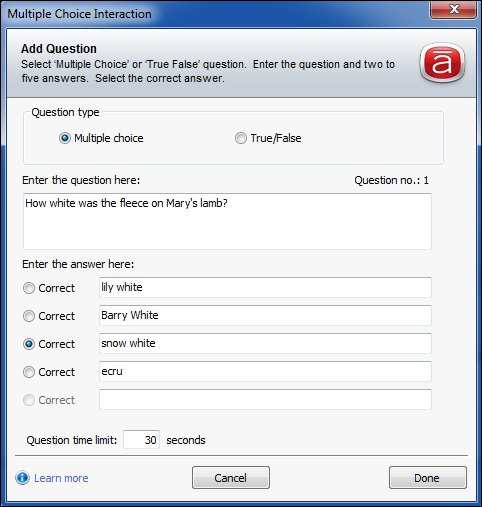
Click on the Next button to insert the questions. Click on the Add button to type in a new question. Add the questions shown in the screenshot.
The questions will appear in a list, allowing you to reorder them as you choose. To reorder them, use the buttons outlined in red in the following screenshot:

Note
At this point, the dialog box is going to be context specific for the type of learning game you are creating. Regardless of which type of learning game you are creating, you will be adding one question and its answers in the same dialog box. You can continue adding as many questions as you like to the game. However, for each game, you'll need to supply the correct answer. In the case of multiple choice, you'll need to supply the correct answer and as many as four false answers.
Once you have finished inserting and checking your questions and answers, click on the Next button to create any custom feedback for the learner.
Once the feedback is inserted, click on the Next button to create the learning game.
Articulate will add a placeholder slide in the order of the slide thumbnails on the left-hand side pane of your PowerPoint screen. You will not be able to see the learning game unless you preview or publish it. To preview the game, click on the Preview button in the Publish section of the Articulate ribbon.

It will take the program a moment to render your game in a functioning, viewable version. This will show you exactly how it will look when you view it in the final presentation. It will also allow you to test the game, making sure that the questions and answers function correctly and that you are satisfied with how it looks.
How it works…
The learning games are added to the presentation via a wizard, which creates the game from the information you fill in. The Learning Game Wizard, which opens once you click on the OK button of the previous dialog box, walks you through the process of creating the game.
Although you can fully customize the content of your learning game, you can't customize the appearance of it. Within Articulate Presenter, you are limited to the default game style. If you would like to be able to further customize your game, create it in Articulate Quizmaker. We will discuss how to do this in Chapter 3, Preparing Your Player.
One last detail about your learning game. Now that you've created a learning game in your presentation, when you click on the Learning Games button on the ribbon, you now have the option of editing previously created learning games. To do this, click on the Edit an existing learning game slide radio button, and then use the drop-down menu to select from the various learning games that you have in your presentation.
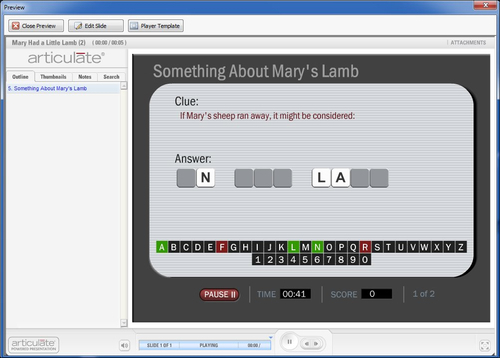
To preview the learning game, click on the Preview tab in the Articulate ribbon and you will see the following screenshot:

There's more…
There are three types of learning games included in Articulate, as follows:
Choices: This creates a multiple choice or true/false quiz
Word Quiz: This creates a "Hangman" or "Wheel of Fortune" type of game
Sequence: This is where the learner puts things in order

The Choices game allows you to select between Multiple choice and True/False. In both cases, you enter the question and your answers. You must also tell the wizrd which answer is the correct one.
The Word Quiz game allows you to enter only the question and the answer. The answer will be what they are trying to guess the letters for.
The Sequence game allows you to enter up to seven items, which the learner must put in order. You enter them in the correct order and the program randomizes them for you.
The following screenshot is for adding Multiple choice questions to the Choices learning game. Please note that towards the bottom you can select the amount of time given to the learner to select the correct answer. This option exists with all the games, for all types of questions. The default will be whatever you selected for the game back in the first step of the Learning Game Wizard dialog box. However, you can customize the length of the time that will be allowed for each question.

You can select the type of game you want from the learning game type drop-down menu on the Learning Games Wizard dialog box. Selecting a game type changes the thumbnail in the dialog box, providing visual recognition of the type of game you have selected. You can also input the name for your game in the area Learning game title. In the lower part of the dialog box, there are selections available for the customization of the gameplay:
Require completion: Selecting this radio button prevents the learner from moving on until they have successfully completed the learning game.
Play audio effects: Selecting this radio button plays built-in sound effects for the game. The sound effects are built into the program and cannot be changed.
Passing score: The default for this is 80%, but it can be changed to any figure you want.
Default question time limit: The default for this is 30 seconds for the Choices game and 60 seconds for the other types. However, it can be changed to any time you want.


