LED blink
That wasn't too bad but it isn't cool enough. This little section will enlighten you, literally.
Open up a new sketch.
Go to File | Examples | 01. Basics | Blink.
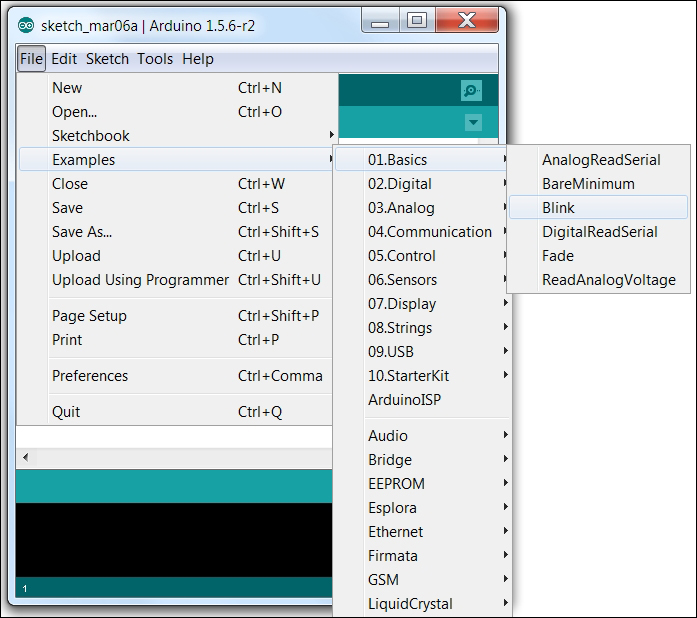
Blink example
Before we upload the code, we need to make sure of one more thing. Remember the LED that we spoke about in the prerequisites? Let's learn a bit about it before plugging it in, as shown in the following image:
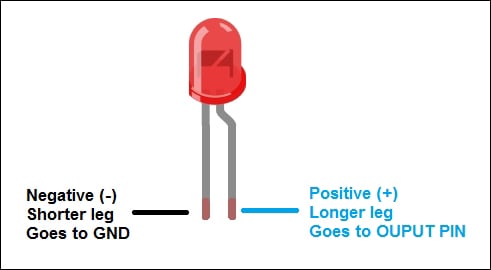
LED basics
We will make use of it now. Plug in the LED such that the longer leg goes into pin 13 and the shorter leg goes into the GND pin, as in the following:
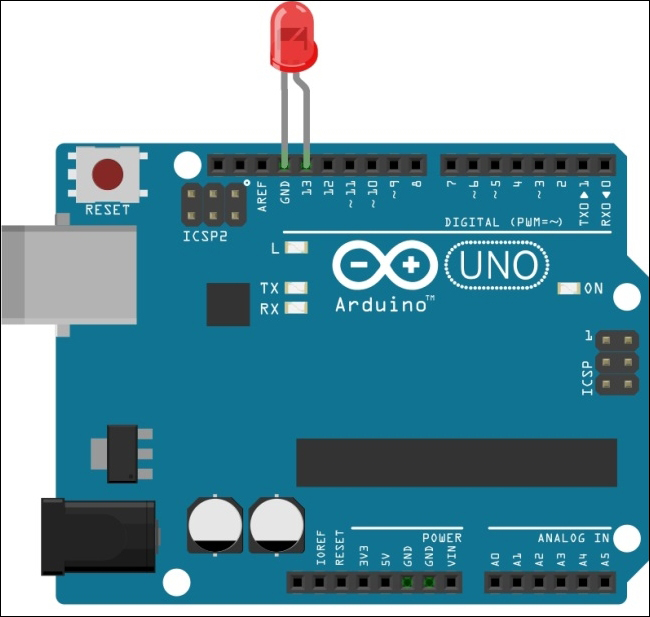
LED blink setup (Fritzing)
Note
This diagram is made using software called Fritzing. This software will be used in future projects to make it cleaner to see and easier to understand as compared to a photograph with all the wires running around. Fritzing is open source software which you can learn more about at www.fritzing.org.
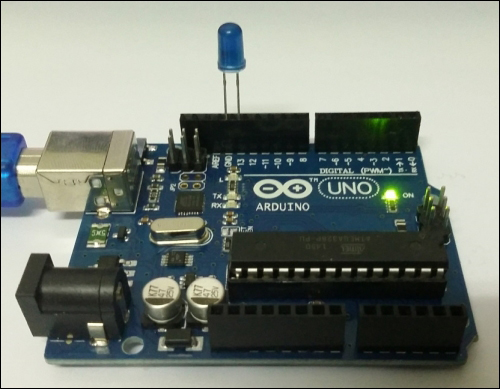
Arduino LED setup
Upload the code. Your LED will start blinking, as shown in the following image.
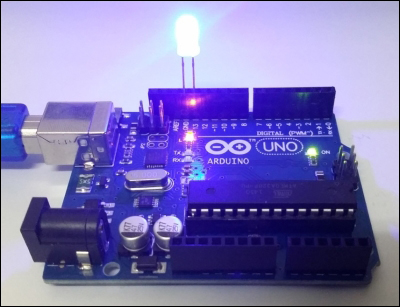
A lit up LED
Isn't it just fascinating? You just programmed your first hardware. There's no stopping you now. Before advancing to the next chapter, let's see what the code does and what happens when you change it.
This is the blink example code that you just used:
/*
Blink
Turns on an LED on for one second, then off for one second, repeatedly.

This example code is in the public domain.
*/

//Pin 13 has an LED connected on most Arduino boards.
//give it a name:
int led = 13;

//the setup routine runs once when you press reset:
void setup() {
// initialize the digital pin as an output.
pinMode(led, OUTPUT);
}

//the loop routine runs over and over again forever:
void loop() {
  digitalWrite(led, HIGH);   // turn the LED on (HIGH is the voltage level)
  delay(1000);               // wait for a second
  digitalWrite(led, LOW);    // turn the LED off by making the voltage LOW
  delay(1000);               // wait for a second
}
We have three major sections in this code. This format will be used for most of the projects in the book.
int led = 13;
This line simply stores the numerical PIN value onto a variable called led.
void setup() {
// initialize the digital pin as an output.
pinMode(led, OUTPUT);
}
This is the setup function. Here is where you tell the Arduino what is connected on each used pin. In this case, we tell the Arduino that there is an output device (LED) on pin 13.
void loop() {
digitalWrite(led, HIGH);   // turn the LED on (HIGH is the voltage level)
delay(1000);               // wait for a second
digitalWrite(led, LOW);    // turn the LED off by making the voltage LOW
delay(1000);               // wait for a second
}
This is the loop function. It tells the Arduino to keep repeating whatever is inside it in a sequence. The digitalWrite command is like a switch that can be turned ON (HIGH) or OFF (LOW). The delay(1000) function simply makes the Arduino wait for a second before heading to the next line.
If you wanted to add another LED, you'd need some additional tools and some changes to the code. This is the setup that you want to create.
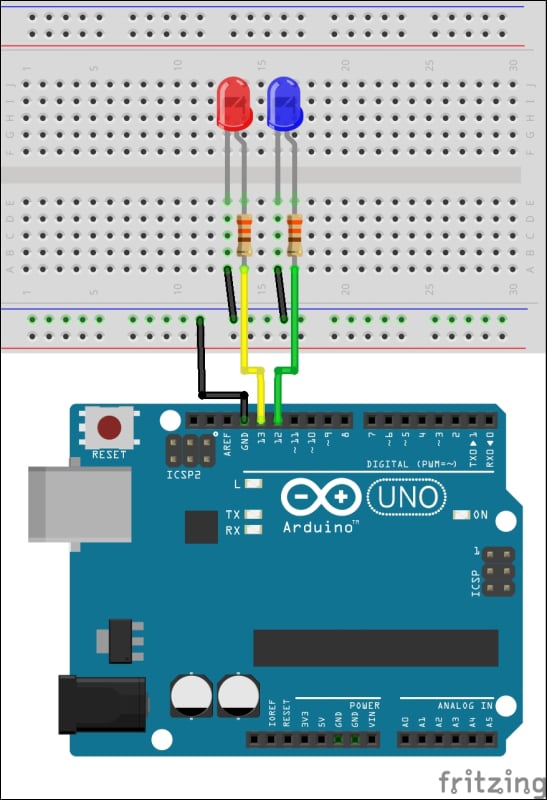
Connecting two LEDs to an Arduino
If this is your first time using a breadboard, take some time to make sure all the connections are in the right place. The colors of the wires don't matter. However, GND is denoted using a black wire and VCC/5V/PWR is denoted with a red wire. The two resistors, each connected in series (acting like a connecting wire itself) with the LEDs, limit the current flowing to the LEDs, making sure they don't blow up.
As before, create a new sketch and paste in the following code:
/*
Double Blink
Turns on and off two LEDs alternatively for one second each repeatedly.

This example code is in the public domain.
*/

int led1 = 12;
int led2 = 13;

void setup() {
// initialize the digital pins as an output.
pinMode(led1, OUTPUT);
pinMode(led2, OUTPUT);

// turn off LEDs before loop begins
digitalWrite(led1, LOW);   // turn the LED off (LOW is the voltage level)
digitalWrite(led2, LOW);   // turn the LED off (LOW is the voltage level)
}

//the loop routine runs over and over again forever:
void loop() {
digitalWrite(led1, HIGH);   // turn the LED on (HIGH is the voltage level)
digitalWrite(led2, LOW);    // turn the LED off (LOW is the voltage level)
delay(1000);                // wait for a second
digitalWrite(led1, LOW);    // turn the LED off (LOW is the voltage level)
digitalWrite(led2, HIGH);   // turn the LED on (HIGH is the voltage level)
delay(1000);                // wait for a second
}
Once again, make sure the connections are made properly, especially the positive LEDs (the longer one to OUTPUT PIN) and the negative (the shorter to the GND) terminals. Save the code as DoubleBlink.ino. Now, if you make any changes to it, you can always retrieve the backup.
Upload the code. 3… 2… 1… And there you have it, an alternating LED blink cycle created purely with the Arduino. You can try changing the delay to see its effects.
For the sake of completeness, I would like to mention that you could take this mini-project further by using a battery to power the system and decorate your desk/room/house. More on how to power the Arduino will be covered in subsequent chapters.


