Search icon CANCEL
Subscription
0
Cart icon
Your Cart (0 item)
Close icon
You have no products in your basket yet
Save more on your purchases! discount-offer-chevron-icon
Savings automatically calculated. No voucher code required.
Arrow left icon
Explore Products
Best Sellers
New Releases
Books
Videos
Audiobooks
Learning Hub
Newsletter Hub
Free Learning
Arrow right icon
timer SALE ENDS IN
0 Days
:
00 Hours
:
00 Minutes
:
00 Seconds
Arrow up icon
GO TO TOP
3D Printing with SketchUp

You're reading from   3D Printing with SketchUp Real-world case studies to help you design models in SketchUp for 3D printing on anything ranging from the smallest desktop machines to the largest industrial 3D printers with this book and ebook

Arrow left icon
Product type Paperback
Published in May 2014
Publisher
ISBN-13 9781783284573
Length 136 pages
Edition Edition
Concepts
Arrow right icon
Author (1):
Arrow left icon
Meir Gottesman Meir Gottesman
Author Profile Icon Meir Gottesman
Meir Gottesman
Arrow right icon
View More author details
Toc

Table of Contents (16) Chapters Close

3D Printing with SketchUp
Credits
About the Author
About the Reviewers
www.PacktPub.com
Preface
1. Concepts Every 3D Printing Designer Needs to Know FREE CHAPTER 2. Setting Up SketchUp for 3D Printing 3. From 2D Drawing to 3D Model 4. Understanding Model Resolution 5. Using Existing Models 6. Designing a Phone Cradle 7. Importing Terrain and Printing in Color 8. Modeling Architecture for 3D Printing Resources for Your 3D Printing Success Index

Modeling a vase


Modeling a vase can be a simple, rewarding exercise to help us understand wall thickness, model resolution (versus layer resolution), and build on our knowledge of overhangs. Adding handles will demonstrate how to use the Outer Shell command to combine several solids into a single manifold shell. Follow along in SketchUp as I walk through the steps and thought process I used when creating this vase.

Creating a profile

While there are several ways to model a vase, the easiest is using the Follow Me tool. The first step is to create the profile of one half of the vase, as shown in the following figure:
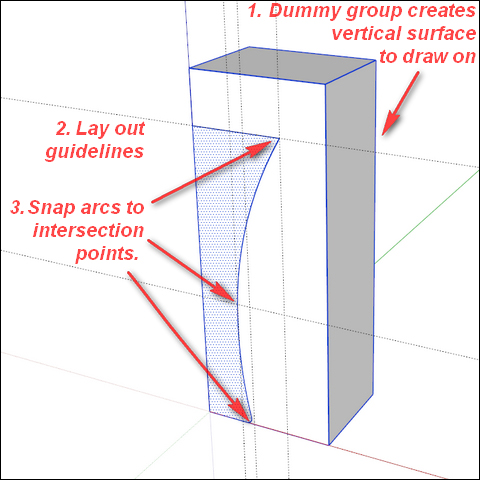
Let's break this figure down. The first thing I did was create a temporary rectangular box larger than the vase profile and make it into a group. I did this so that I had a vertical surface to draw on, making certain the profile is perfectly aligned with the red and blue axes. The box is grouped so the new geometry doesn't stick to it, and I can also use the edges of the box to...

lock icon The rest of the chapter is locked
Register for a free Packt account to unlock a world of extra content!
A free Packt account unlocks extra newsletters, articles, discounted offers, and much more. Start advancing your knowledge today.
Unlock this book and the full library FREE for 7 days
Get unlimited access to 7000+ expert-authored eBooks and videos courses covering every tech area you can think of
Renews at $19.99/month. Cancel anytime
Banner background image