Adding pre-made animations in the Level Sequencer
We have briefly looked at the Level Sequencer before, but you never really got to understand it in detail. Starting with this chapter, the Level Sequencer is going to be your best friend. So, let’s get to know it better.
Exploring Unreal Engine’s Level Sequencer
Unreal Engine’s Level Sequencer (or just Sequencer) is a powerful and flexible tool that allows developers and content creators to create complex, interactive, and visually appealing cinematic sequences, cutscenes, and in-game events without the need for extensive programming knowledge. It offers a timeline-based interface that simplifies the process of sequencing and blending various assets, animations, camera movements, and audio.
Let’s learn about the interface’s basics so that we can start using it:

Figure 9.2: The Level Sequencer interface
Let’s break down Figure 9.2:
- Toolbar (1): The toolbar consists of various tools, options, and settings we will be using throughout this chapter (I will be pointing them out as we create our cinematics).
- Outliner (2): The Outliner will be populated with Actors we need to animate, such as cameras, Static Meshes, Skeletal Meshes, audio, and particle effects.
- Timeline (3): The values of the properties of the Actors in the Outliner will be manipulated in the timeline using keyframes. The playback can be scrubbed back and forth using the playhead. The range of the timeline is set using the green (start) and red (end) vertical bars.
- Playback controls (4): Just like any other video editing application, these are the playback controls for toggling playing, pausing, jumping to previous and next keyframes, and looping playback.
While exploring the interface, it’s worth noting that MetaHumans take up a lot of processing power – plus we have a huge landscape – so your system might get sluggish when adding them into your scene. Follow these steps to make things go a little faster:
- Temporarily disable real-time rendering by opening the Viewport menu and clicking on the Realtime checkmark (or by pressing Ctrl + R):

Figure 9.3: Disabling Realtime rendering
- In the top-right corner of the interface, click the Settings button and change Engine Scalability Settings to High or Medium. You will lose some slight resolution, but it will help speed things up:
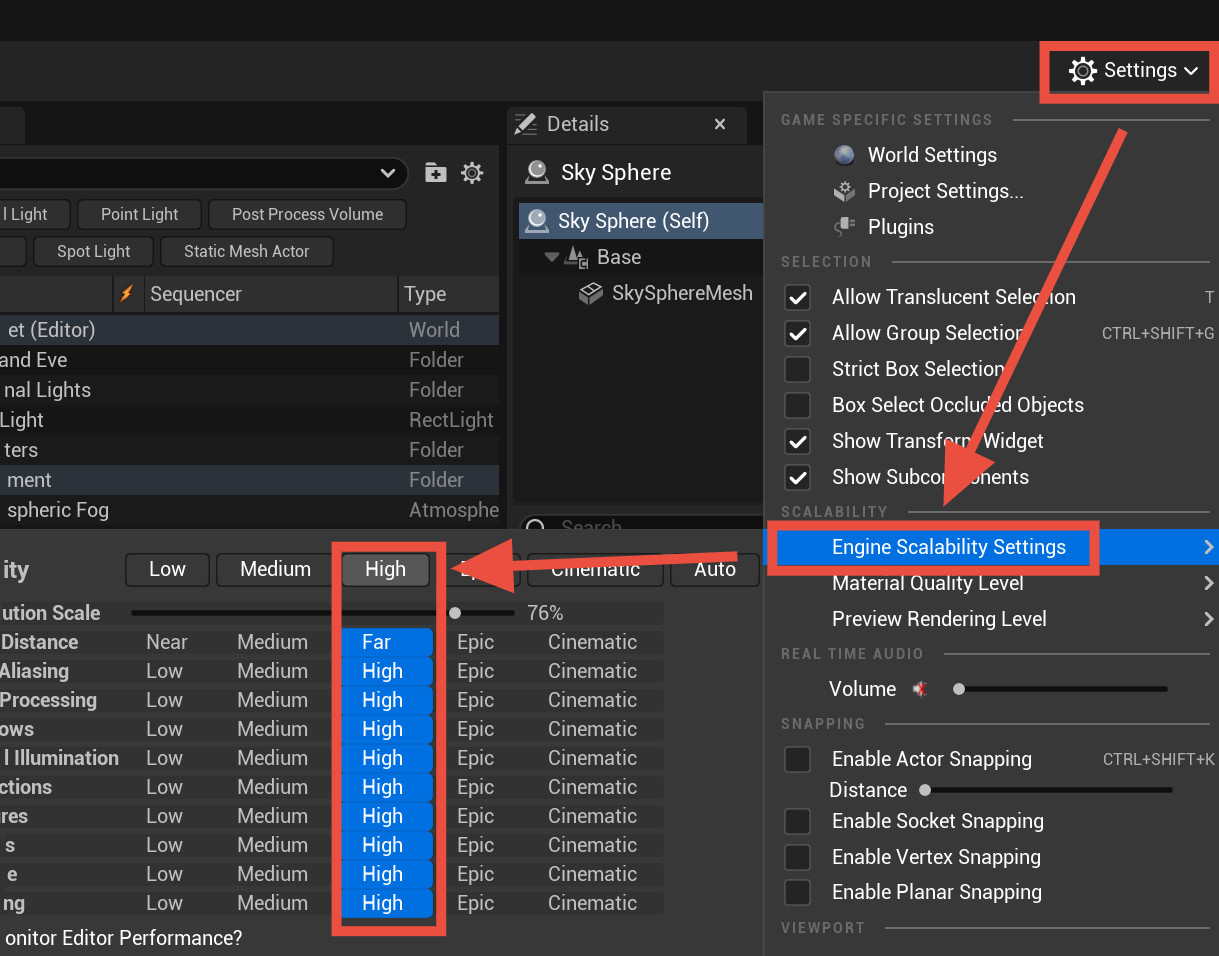
Figure 9.4: Changing Engine Scalability Settings
Note
Before we start using the Sequencer, I suggest having a quick look through the Sequencer Hotkeys documentation by Epic Games: https://docs.unrealengine.com/5.2/en-US/Sequencer-hotkeys-in-unreal-engine/. Using these hotkeys can be very productive. I’ll also highlight some useful ones as we start animating our characters.
In the next section, you’ll learn how to migrate (transfer) assets from one Unreal Engine project to another.
Migrating assets from another project
To add continuity and authenticity to our story, I wanted our characters to still be in their spacesuits when they leave their shuttle, to show their eagerness to experience the new world. Due to the complexity of setting this up, I’ve gone ahead and done this for you, but they are in a different Unreal Engine project. I’d like to take this opportunity to show you how you can migrate assets between projects in Unreal Engine:
- From the downloaded project files, unzip
Book_Project_Files.zipand double-click it to open the Book_Project_Files Unreal Engine project. - Once opened, in the Content Browser, locate the Book_Project_Files folder.
- Right-click on Book_Project_Files and choose Migrate...:
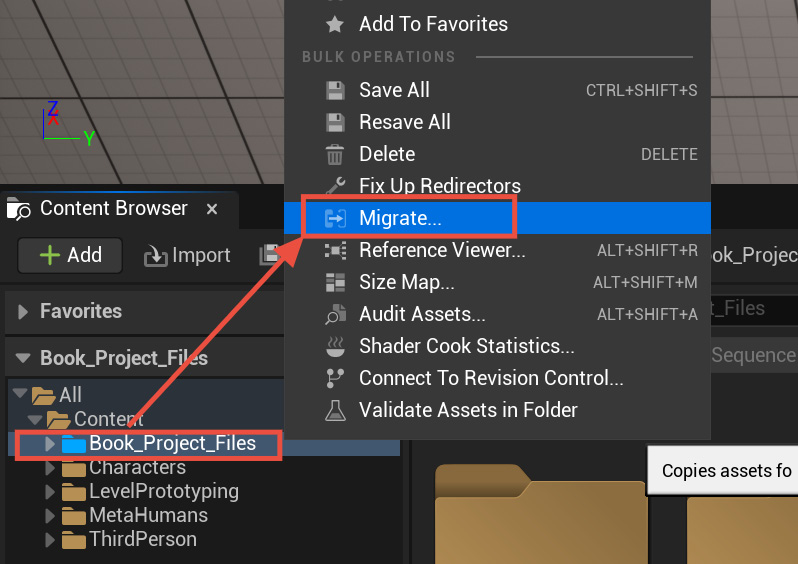
Figure 9.5: Migrating assets from another project
- The Asset Report popup will show a list of all associated files to be migrated. Click OK:
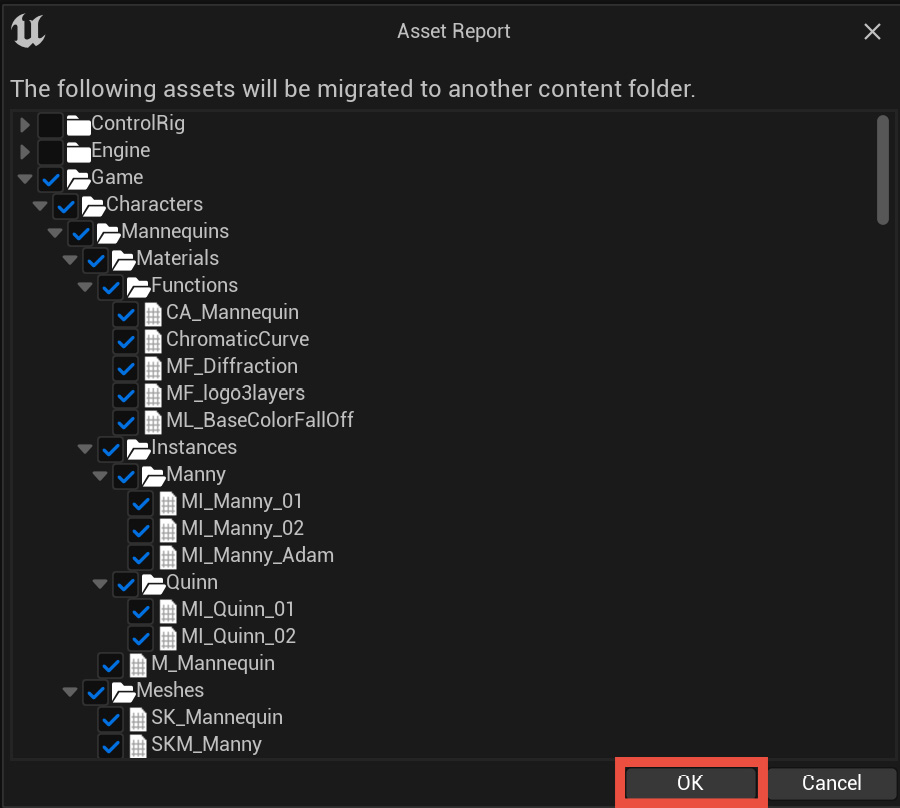
Figure 9.6: The Asset Report popup
- In the next popup, browse to the A_New_Beginning project file folder, select the Content folder, and then click Select Folder:
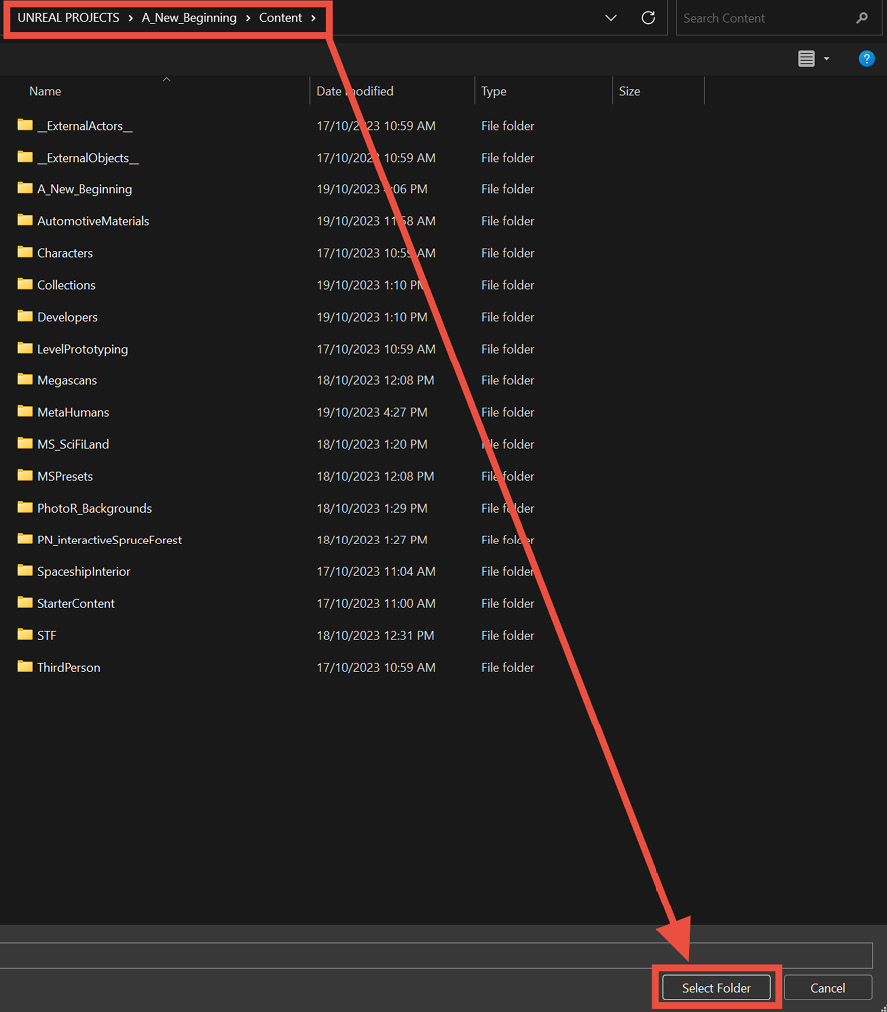
Figure 9.7: Selecting the Content folder
- If you get a warning message, as shown in Figure 9.8, this is Unreal Engine’s way of making sure you do not overwrite files in the destination folder. In this case, it’s okay to do so. Check Apply to All and click Yes:

Figure 9.8: Warning message popup
- After a few moments, the Book_Project_Files folder will be fully migrated to our main project. Once finished, close the Book_Project_Files Unreal Engine project.
You’ve successfully migrated a folder from one project to another. You can carry out the same steps for any assets you wish to migrate from one Unreal Engine project to another. In the next section, we will continue where we left off with our main project.
Note
The folder you just migrated consists of some assets we are going to use in the upcoming chapters, including Particle FX and Materials.
Adding MetaHumans to the Level Sequencer
In this section, we will create a new Level Sequence, add the two MetaHuman characters, and animate them. Let’s proceed:
- Open the A_New_Beginning project.
- In the Levels folder, open the EXT_Planet Level. In Chapter 5, we added the space shuttle and two Mannequins as stand-ins. You can now delete the Mannequins from the scene.
- From the Content Browser, in the Book_Project_Files | MetaHumans | Adam_and_Eve_Spacesuit folder, drag the migrated BP_Spacesuit_Adam and BP_Spacesuit_Eve into the Viewport and place them on the ground, as shown in Figure 9.9. Position Adam using the following values:
- Location: X = -58411, Y = -78191, Z = -3387
- Rotation: X = 0, Y = 0, Z = 160
Then, position Eve beside Adam, like so:
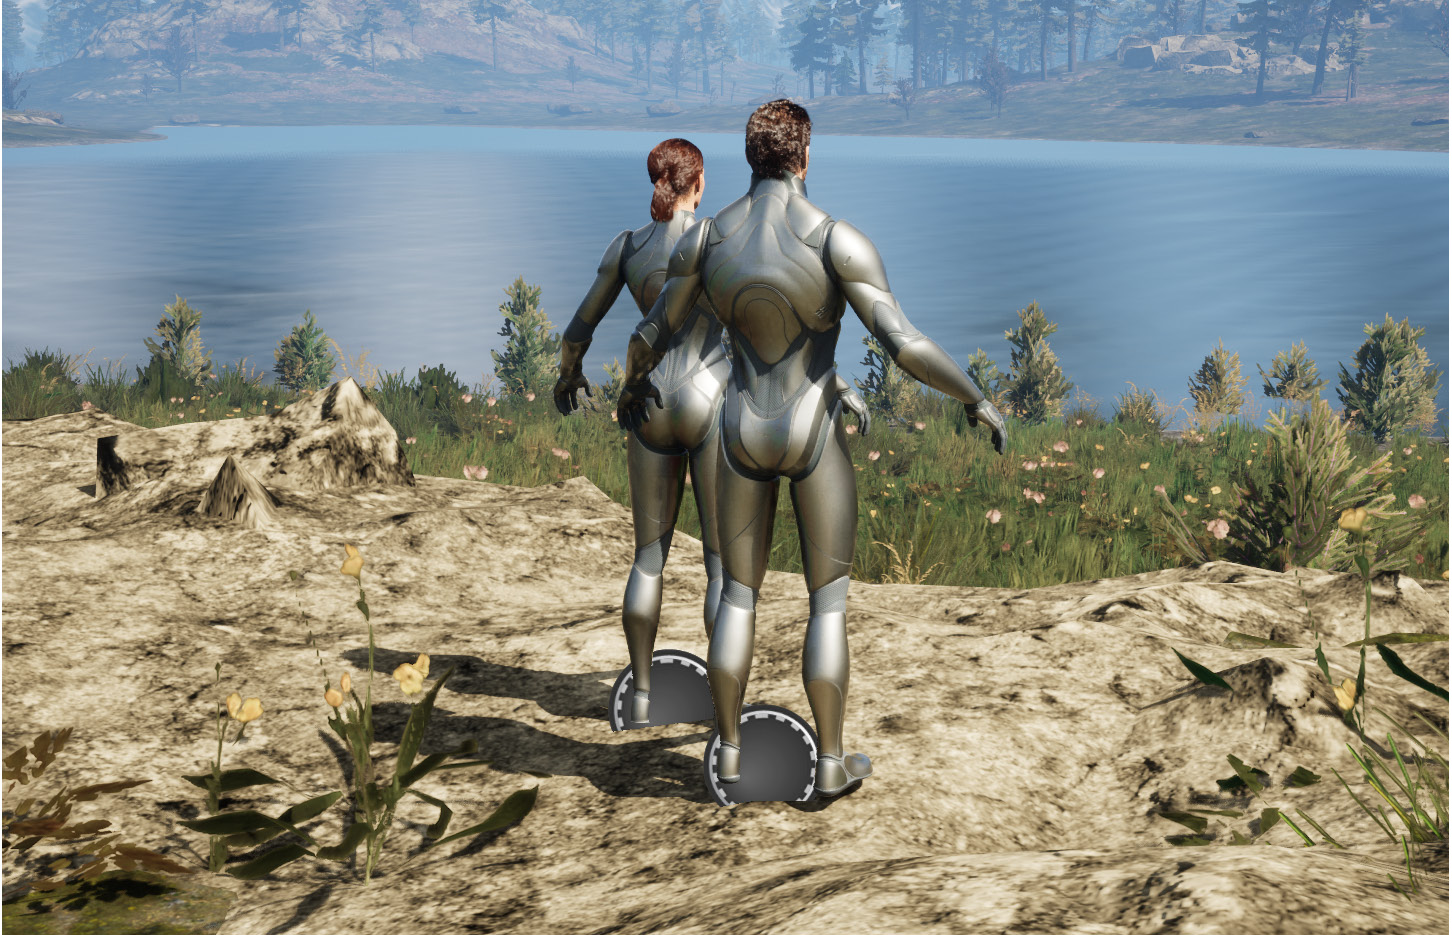
Figure 9.9: Placing the MetaHuman characters on the ground
For Shot_08, I’ve positioned them here, facing toward the edge of the water body, which they will walk up to before stopping. This would be a good point to save, and then continue with the following steps.
- Create a bookmark here using Ctrl + 3.
- Before going any further, in the Outliner, duplicate BP_Spacesuit_Adam and BP_Spacesuit_Eve (Unreal Engine will add a suffix of 2 on the duplicated Actors). I will explain why we’re doing this at the end of this section.
- Hide both BP_Spacesuit_Adam2 and BP_Spacesuit_Eve2 by selecting them in the Outliner and pressing H (Hide). We will use them in Shot_09 later:
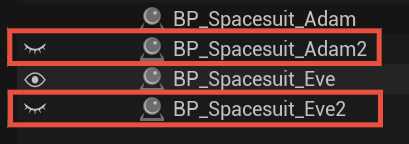
Figure 9.10: Hiding Actors in the Outliner with the H keyboard shortcut
- In the A_New_Beginning folder, create a new folder, and rename it
Cinematics. - Open the Cinematic folder, right-click inside it, then choose Cinematics | Level Sequence. When prompted for a name, type
Shot_08. Then, double-click it to open the Level Sequencer. - From the Outliner, drag BP_Spacesuit_Adam into the Level Sequencer. As soon as you do that, the interface will change to Animation mode. In the Level Sequencer, you’ll notice the CR_Mannequin_Body and Face_ControlBoard_CtrlRig tracks, as shown in Figure 9.11:
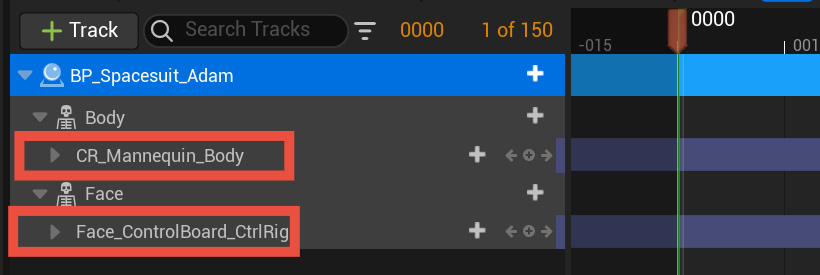
Figure 9.11: New tracks available in the Level Sequencer
- In the Level Sequencer, right-click on the CR_Mannequin_Body track and select Mute. This will temporarily disable the Control Rig so that we can add the mocap animation to the Adam character (we will come back to this in the next section):
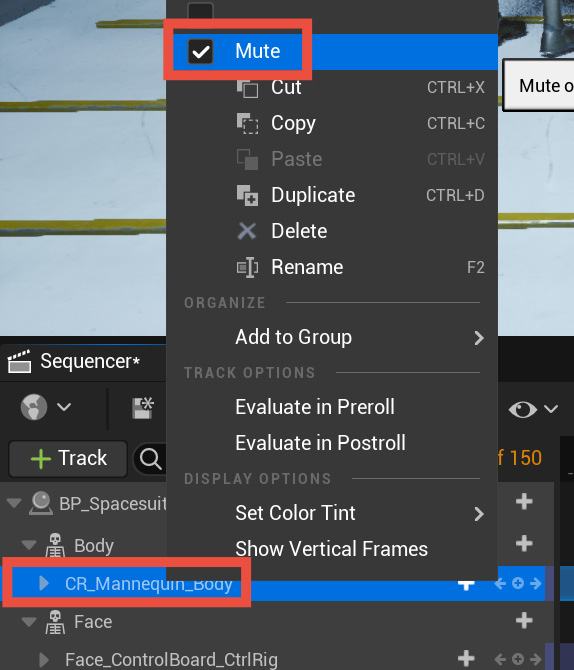
Figure 9.12: Muting/disabling the Control Rig
- Repeat step 10 for the Face_ControlBoard_CtrlRig track.
- Now, drag and drop BP_Spacesuit_Eve into the Level Sequencer, and repeat the same process of muting the two tracks for the Eve MetaHuman track.
- Switch back to Selection mode (Shift + 1) and save your project.
The Level Sequencer should now look as shown in Figure 9.13:

Figure: 9.13: The Level Sequencer with both characters added and tracks muted
In this section, you successfully created a Level sequence and added the two MetaHuman characters, Adam and Eve, and disabled/muted the Body and Face Control Rigs in preparation for the next step – adding the walking animation.
Note
Before we proceed with the next section, I’d like to talk about possessables and spawnables. This is an important part of the Level Sequencer workflow and the reason why we duplicated Adam and Eve in step 5 of this section. Since both Adam and Eve appear in Shot_08 and Shot_09 with different animations, converting them into spawnables is the only way to get around it. Let me explain further.
A possessable in the Level Sequencer refers to an Actor or object in your Level that can be controlled and animated within the Level Sequencer timeline. You can think of a possessable as an Actor that can be possessed or animated by the Level Sequencer. When you add an Actor as a possessable in the Level Sequencer, it means you can create animation and keyframe sequences to control that Actor’s properties and behavior over time. This can include things such as changing an Actor’s location, rotation, scale, or visibility. When dragging or adding any Actors from the Outliner into the Level Sequencer, the Actors become possessable.
A spawnable, on the other hand, refers to an Actor or object that can be dynamically created and placed into the Level during a Level Sequencer animation. It allows you to instantiate Actors at specific points in time within your cinematic sequence. A spawnable Actor is useful when you have multiple Actors or shots taking place in the same scene.
Posseable Actors will always be listed in the Outliner, whereas spawnable Actors are removed or destroyed when the sequence ends.
More details about this feature can be found here: https://docs.unrealengine.com/5.2/en-US/spawn-temporary-actors-in-unreal-engine-cinematics/. We will also use the spawnable workflow after adding the walk animations.
Adding the walk animations
Now that we have both characters in the Level Sequencer, we can start adding the walk animations:
- From the downloaded Chapter_08 folder, drag both
Man Walk Stop.fbxandFemale Walk Stop.fbxinto the From_Mixamo folder. In the FBX Import Options popup, click Import All. Both animations will be imported simultaneously. - Then, in the From_Mixamo folder, open the
RTG_MannyIK Retargeter file. In the Asset Browser area, you’ll now have theFemale_Walk_StopandMan_Walk_Stopanimation files. Select both files and click the Export Selected Animations button. Save the animation in the Exported_Mixamo_Animations folder:

Figure: 9.14: Adding the walk animations
- In the Level Sequencer, ensure that the playhead is at the beginning of the sequence (use the up arrow shortcut key). Then, select the Body track of the Adam character and click + Track | Animation. From the search bar, choose the Man_Walk_Stop animation sequence:
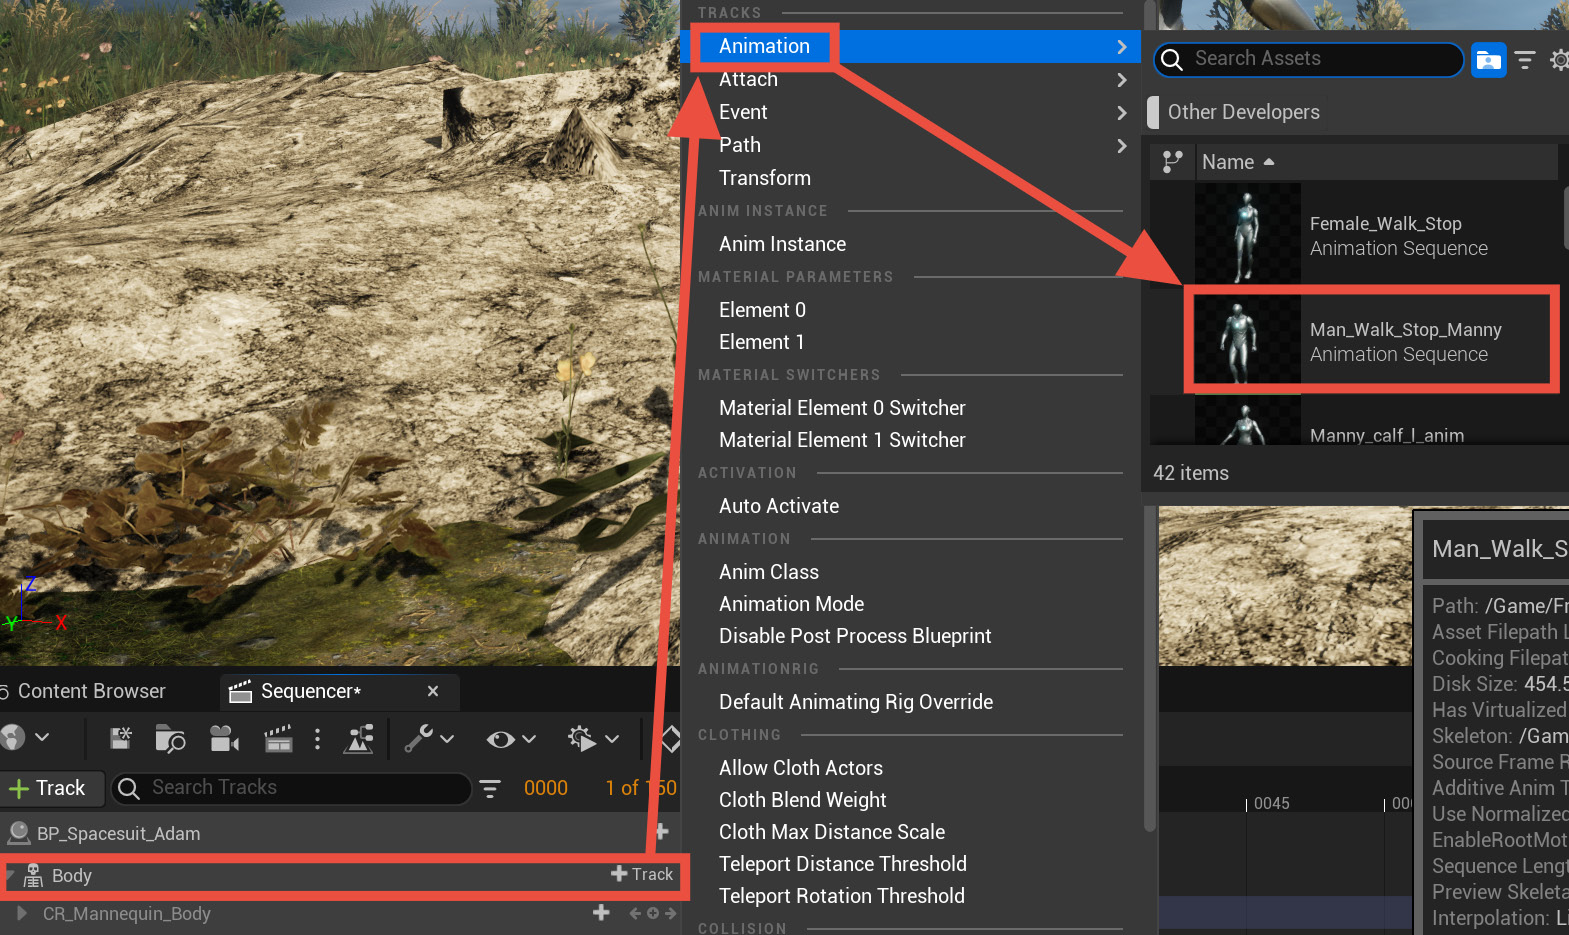
Figure 9.15: Adding the walk sequence to the Adam character
- The Level Sequencer will now have the walk Animation track (in purple). Scrub the playhead to see the walk animation – you’ll see Adam walking forward and stopping.
Note
If you don't see the Animation track (purple line), just close the Sequencer and re-open it.
- We will need to make this sequence five seconds long. Drag the playhead to frame 150 and press the right bracket key (]). This will mark the end of the sequence indicated by a red vertical bar.
- When playing back the animation, you’ll notice Adam resetting to his original position. To remedy this, right-click on the Man_Walk_Stop purple track and click Properties. From there, change the When Finished dropdown to Keep State. This will keep the current state of Adam at the end of the animation:
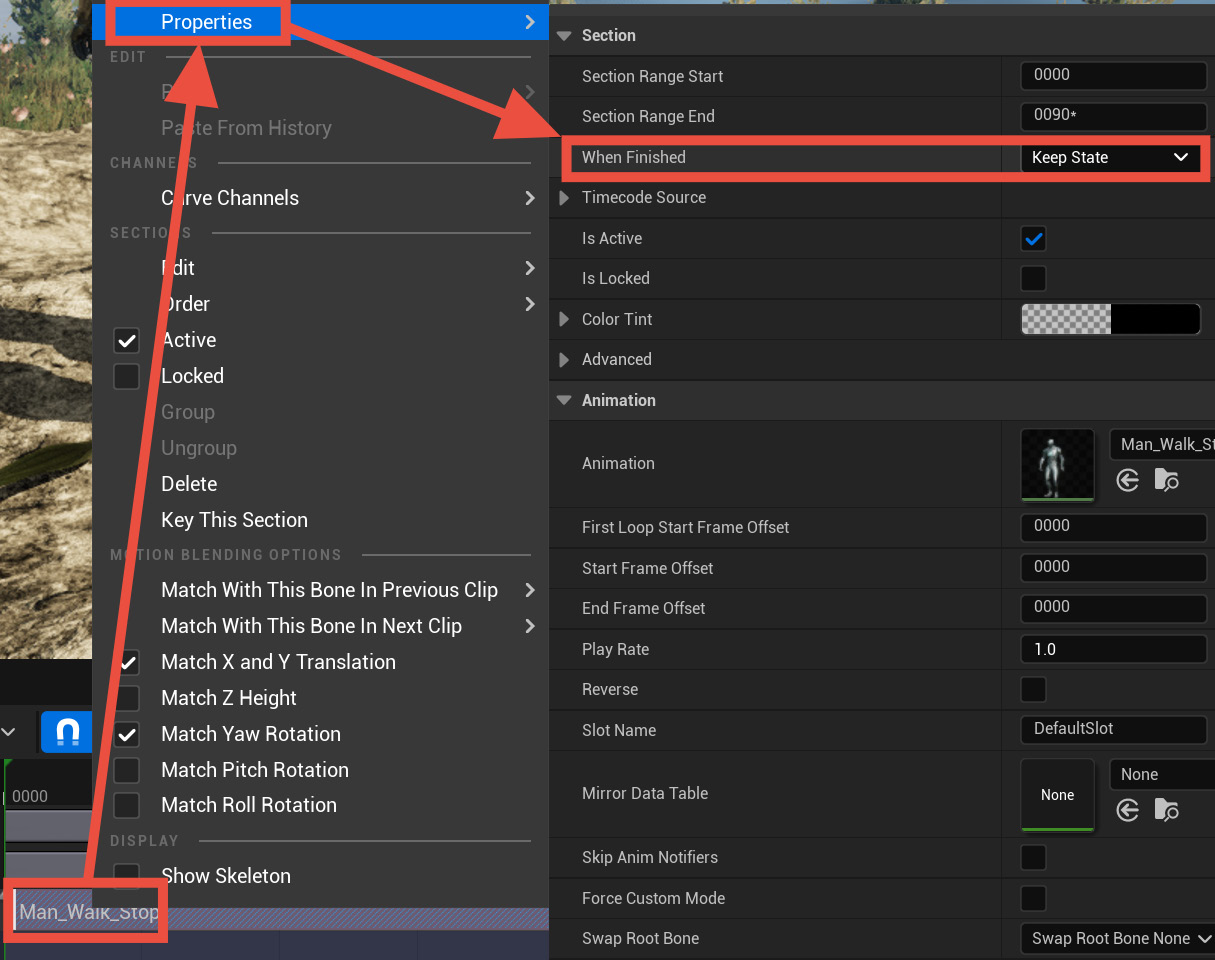
Figure 9.16: Changing Adam’s animation state
- Now, repeat steps 1 to 4 for Eve’s character, but for Eve’s animation, choose, Female_Walk_Stop.
In our situation, both Adam and Eve are used in the same location in Shot_08 and Shot_09. For them not to appear in both shots, we will need to convert them into spawnables. This will give control to the Level Sequencer to remove them from their location before loading the next shot. It’s easier if I were to show you. Let’s go!
- While still in the Shot_08 Level sequence, right-click on BP_Spacesuit_Adam and choose Convert to Spawnable:
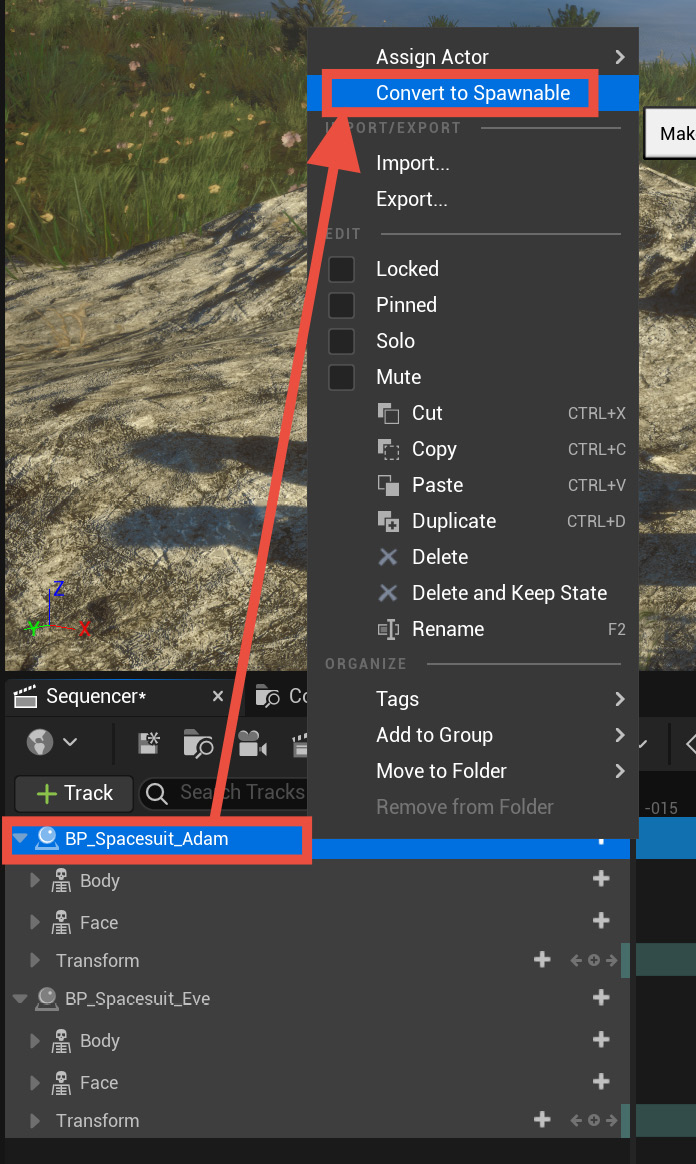
Figure 9.17: Converting BP_Spacesuit_Adam into a spawnable
A lightning bolt icon will appear to indicate that BP_Spacesuit_Adam is now a spawnable Actor:
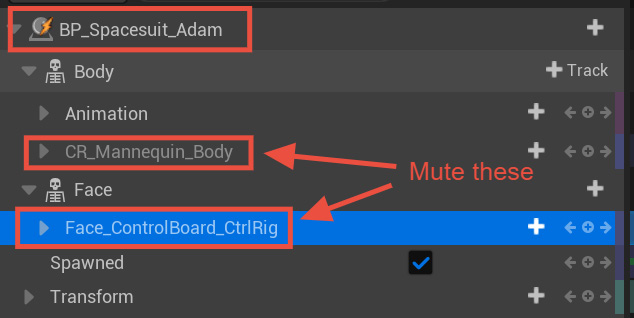
Figure 9.18: Lightning bolt indicating a spawnable Actor
- At this point, you may have to mute the CR_Mannequin_Body and Face_ControlBoard_CtrlRig tracks again.
- Then, repeat the spawnable conversion for BP_Spacesuit_Eve and save your project.
Now that both characters have been converted into spawnables, you will not see them listed in the Outliner. Here is the result of the instructions:
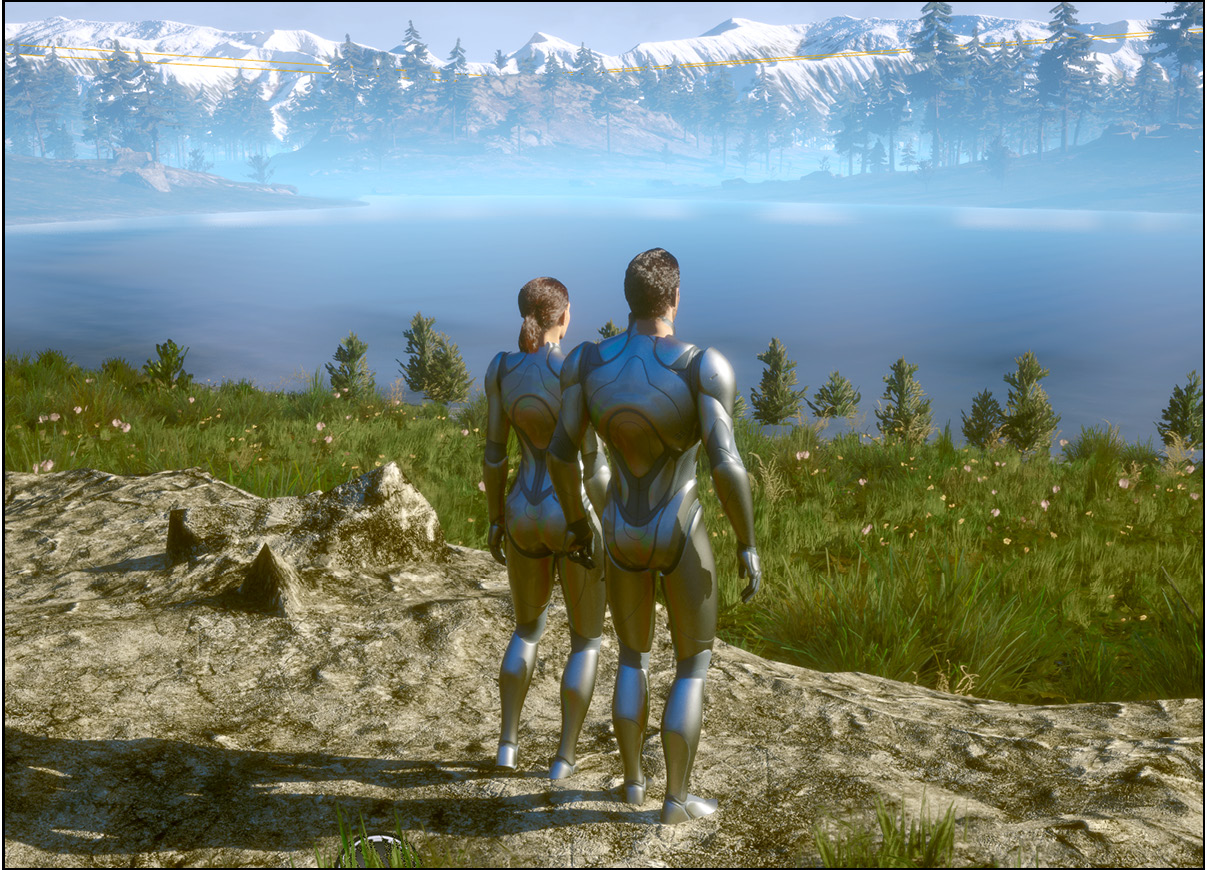
Figure 9.19: Adam and Eve at the end of Shot_08
In this section, you created a new Level sequence and added the two MetaHuman characters in their spacesuit. Then, we added the walk animation to both characters, made them walk toward the water body, and converted them into spawnable Actors. In the next section, we will create the next shot, Shot_09, of Adam and Eve in their final position, and we will utilize the FK Control Rig to animate Adam placing his hand on Eve’s shoulder.


