Search icon CANCEL
Arrow left icon
Explore Products
Best Sellers
New Releases
Books
Videos
Audiobooks
Learning Hub
Conferences
Free Learning
Arrow right icon
Arrow up icon
GO TO TOP
Unity 2017 Game AI Programming - Third Edition

You're reading from   Unity 2017 Game AI Programming - Third Edition Leverage the power of Artificial Intelligence to program smart entities for your games

Arrow left icon
Product type Paperback
Published in Jan 2018
Publisher Packt
ISBN-13 9781788477901
Length 254 pages
Edition 3rd Edition
Languages
Tools
Arrow right icon
Author (1):
Arrow left icon
Raymundo Barrera Raymundo Barrera
Author Profile Icon Raymundo Barrera
Raymundo Barrera
Arrow right icon
View More author details
Toc

Table of Contents (10) Chapters Close

Preface 1. The Basics of AI in Games FREE CHAPTER 2. Finite State Machines and You 3. Implementing Sensors 4. Finding Your Way 5. Flocks and Crowds 6. Behavior Trees 7. Using Fuzzy Logic to Make Your AI Seem Alive 8. How It All Comes Together 9. Other Books You May Enjoy

Path following and steering

Sometimes, we want our AI characters to roam around in the game world, following a roughly-guided or thoroughly-defined path. For example, in a racing game, the AI opponents need to navigate the road. In an RTS game, your units need to be able to get from wherever they are to the location you tell them navigating through the terrain and around each other.

To appear intelligent, our agents need to be able to determine where they are going, and if they can reach that point, they should be able to route the most efficient path and modify that path if an obstacle appears as they navigate. As you'll learn in later chapters, even path following and steering can be represented via a finite state machine. You will then see how these systems begin to tie in.

In this book, we will cover the primary methods of pathfinding and navigation, starting with our own implementation of an A* Pathfinding System, followed by an overview of Unity's built-in Navigation Mesh (NavMesh) feature.

Dijkstra's algorithm

While perhaps not quite as popular as A* Pathfinding (which we will cover next), it's crucial to understand Dijkstra's algorithm, as it lays the foundation for other similar approaches to finding the shortest path between two nodes in a graph. The algorithm was published by Edsger W. Dijkstra in 1959. Dijkstra was a computer scientist, and though he may be best known for his namesake algorithm, he also had a hand in developing other important computing concepts, such as the semaphore. It might be fair to say Dijkstra probably didn't have StarCraft in mind when developing his algorithm, but the concepts translate beautifully to game AI programming and remain relevant to this day.

So what does the algorithm actually do? In a nutshell, it computes the shortest path between two nodes along a graph by assigning a value to each connected node based on distance. The starting node is given a value of zero. As the algorithm traverses through a list of connected nodes that have not been visited, it calculates the distance to it and assigns the value to that node. If the node had already been assigned a value in a prior iteration of the loop, it keeps the smallest value. The algorithm then selects the connected node with the smallest distance value, and marks the previously selected node as visited, so it will no longer be considered. The process repeats until all nodes have been visited. With this information, you can then calculate the shortest path.

Need help wrapping your head around Dijkstra's algorithm? The University of San Francisco has created a handy visualization tool: ;https://www.cs.usfca.edu/~galles/visualization/Dijkstra.html.

While Dijkstra's algorithm is perfectly capable, variants of it have been developed that can solve the problem more efficiently. A* is one such algorithm, and it's one of the most widely used pathfinding algorithms in games, due to its speed advantage over Dijkstra's original version.

Using A* Pathfinding

There are many games in which you can find monsters or enemies that follow the player, or go to a particular point while avoiding obstacles. For example, let's take a typical RTS game. You can select a group of units and click on a location you want them to move to, or click on the enemy units to attack them. Your units then need to find a way to reach the goal without colliding with the obstacles or avoid them as intelligently as possible. The enemy units also need to be able to do the same. Obstacles could be different for different units, terrain, or other in-game entities. For example, an air force unit might be able to pass over a mountain, while the ground or artillery units need to find a way around it. A* (pronounced "A star") is a pathfinding algorithm that is widely used in games because of its performance and accuracy. Let's take a look at an example to see how it works. Let's say we want our unit to move from point A to point B, but there's a wall in the way and it can't go straight towards the target. So, it needs to find a way to get to point B while avoiding the wall. The following figure illustrates this scenario:

In order to find the path from point A to point B, we need to know more about the map, such as the position of the obstacles. To do this, we can split our whole map into small tiles, representing the whole map in a grid format. The tiles can also be other shapes such as hexagons and triangles. Representing the whole map in a grid makes the search area more simplified, and this is an important step in pathfinding. We can now reference our map in a small 2D array:

Once our map is represented by a set of tiles, we can start searching for the best path to reach the target by calculating the movement score of each tile adjacent to the starting tile, which is a tile on the map not occupied by an obstacle, and then choosing the tile with the lowest cost. We'll dive into the specifics of how we assign scores and traverse the grid in Chapter 3, Finding Your Way, but this is the concept of A* Pathfinding in a nutshell:

A* Pathfinding calculates the cost to move across the tiles

A* is an important pattern to know when it comes to pathfinding, but Unity also gives us a couple of features right out of the box, such as automatic Navigation Mesh generation and the NavMesh agent, which we'll explore in the next section and then in more detail in Chapter 3, Finding Your Way. These features make implementing pathfinding in your games a walk in the park (no pun intended). Whether you choose to implement your own A* solution or simply go with Unity's built-in NavMesh feature will depend on your project's needs. Each option has its own pros and cons, but ultimately, knowing about both will allow you to make the best possible choice. With that said, let's have a quick look at NavMesh.

IDA* Pathfinding

IDA* star stands for iterative deepening A*. It is a depth-first permutation of A* with a lower overall memory cost, but is generally considered costlier in terms of time. Whereas A* keeps multiple nodes in memory at a time, IDA* does not since it is a depth-first search. For this reason, IDA* may visit the same node multiple times, leading to a higher time cost. Either solution will give you the shortest path between two nodes.

In instances where the graph is too big for A* in terms of memory, IDA* is preferable, but it is generally accepted that A* is good enough for most use cases in games. That said, we'll explore both solutions in Chapter 4, Finding Your Way, so you can arrive at your own conclusion and pick the right pathfinding algorithm for your game.

Using Navigation Mesh

Now that we've taken a brief look at A*, let's look at some possible scenarios where we might find NavMesh a fitting approach to calculate the grid. One thing that you might notice is that using a simple grid in A* requires quite a number of computations to get a path that is the shortest to the target and, at the same time, avoids the obstacles. So, to make it cheaper and easier for AI characters to find a path, people came up with the idea of using waypoints as a guide to move AI characters from the start point to the target point. Let's say we want to move our AI character from point A to point B and we've set up three waypoints, as shown in the following figure:
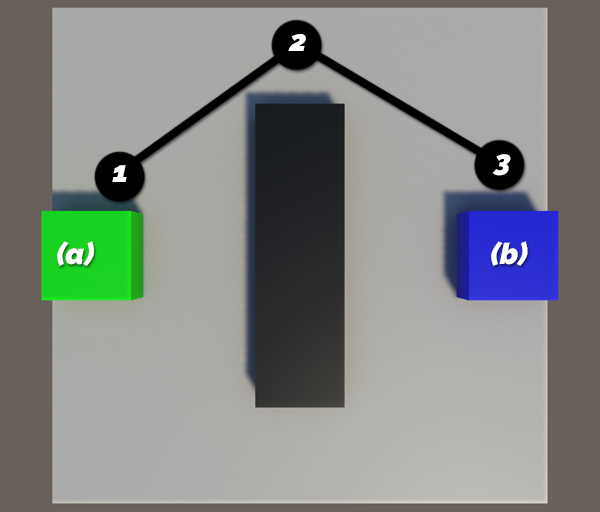
All we have to do now is to pick up the nearest waypoint and then follow its connected node leading to the target waypoint. Most games use waypoints for pathfinding because they are simple and quite effective in terms of using less computation resources. However, they do have some issues. What if we want to update the obstacles in our map? We'll also have to place waypoints for the updated map again, as shown in the following figure:
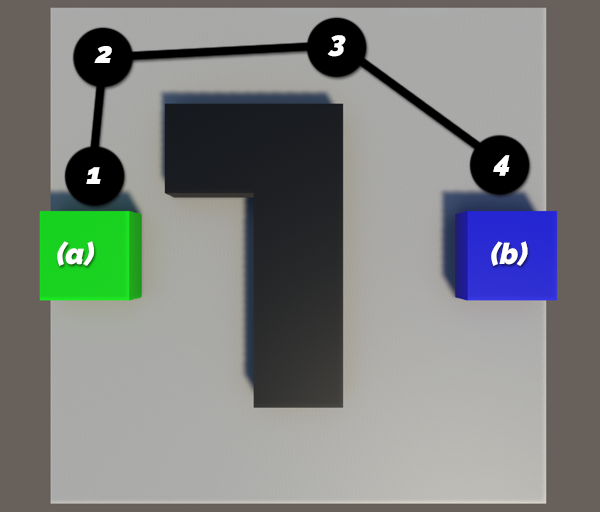
Having to manually alter waypoints every time the layout of your level changes can be cumbersome and very time-consuming. In addition, following each node to the target can mean that the AI character moves in a series of straight lines from node to node. Look at the preceding figures; it's quite likely that the AI character will collide with the wall where the path is close to the wall. If that happens, our AI will keep trying to go through the wall to reach the next target, but it won't be able to and will get stuck there. Even though we can smooth out the path by transforming it to a spline and doing some adjustments to avoid such obstacles, the problem is that the waypoints don't give us any information about the environment, other than the spline being connected between the two nodes. What if our smoothed and adjusted path passes the edge of a cliff or bridge? The new path might not be a safe path anymore. So, for our AI entities to be able to effectively traverse the whole level, we're going to need a tremendous number of waypoints, which will be really hard to implement and manage.

This is a situation where a NavMesh makes the most sense. NavMesh is another graph structure that can be used to represent our world, similar to the way we did with our square tile-based grid or waypoints graph, as shown in the following diagram:

A Navigation Mesh uses convex polygons to represent the areas in the map that an AI entity can travel to. The most important benefit of using a Navigation Mesh is that it gives a lot more information about the environment than a waypoint system. Now we can adjust our path safely because we know the safe region in which our AI entities can travel. Another advantage of using a Navigation Mesh is that we can use the same mesh for different types of AI entities. Different AI entities can have different properties such as size, speed, and movement abilities. A set of waypoints is tailored for humans; AI may not work nicely for flying creatures or AI-controlled vehicles. These might need different sets of waypoints. Using a Navigation Mesh can save a lot of time in such cases.

Generating a Navigation Mesh programmatically based on a scene can be a somewhat complicated process. Fortunately, Unity 3.5 introduced a built-in Navigation Mesh generator as a pro-only feature, but is now included for free from the Unity 5 personal edition onwards. Unity's implementation provides a lot of additional functionality out of the box. Not just the generation of the NavMesh itself, but agent collision and pathfinding on the generated graph (via A*, of course) as well. Chapter 4, Finding Your Way, will look at some of the useful and interesting ways we can use Unity's NavMesh feature in our games, and will explore the additions and improvements that came with Unity 2017.1.

You have been reading a chapter from
Unity 2017 Game AI Programming - Third Edition - Third Edition
Published in: Jan 2018
Publisher: Packt
ISBN-13: 9781788477901
Register for a free Packt account to unlock a world of extra content!
A free Packt account unlocks extra newsletters, articles, discounted offers, and much more. Start advancing your knowledge today.
Unlock this book and the full library FREE for 7 days
Get unlimited access to 7000+ expert-authored eBooks and videos courses covering every tech area you can think of
Renews at $19.99/month. Cancel anytime