Using Mod X and Mod Y for automation
FL Studio provides you with control knobs that you can use to automate any other FL Studio plugin knob. Essentially, you can create an automation once and have control knobs on different plugins copy the automation.
Warning: this next feature is a little on the advanced side. If you find this confusing, don’t worry, as you’ll only need it when you want to create your own custom sound design.
In the same menu window as before, in Figure 5.10, you can see options for manipulating the envelope of Panning, Volume, Mod X, Mod Y, and Pitch. Just like the volume, you can adjust the envelopes for any of these parameters.
Panning determines whether you want the audio to come out of the right or left speaker. Pitch determines how high or low the sound is.
Mod stands for modulation. Mod X and Mod Y may seem a little unintuitive at first glance. From a big-picture understanding, X and Y are essentially placeholder names for whatever control is assigned to them. They allow you to create automation now, and later figure out what control you want to link the automation to.
What does it mean to modify the envelope of Mod X and Mod Y? Let’s take a closer look at these. Mod X and Mod Y allow you to create an automation clip that other controls can use. The easiest way to understand this is through an example:
- Route the sample we’re currently using to a track in the mixer. We discussed routing in Chapter 4, Routing to the Mixer and Applying Automation.
- Select the Mod X button to open up the Mod X envelope controls, as shown in the following screenshot:

Figure 5.11 – Mod X
On the right side, under Filter, you’ll see two knobs that say MOD X and MOD Y.
- Right-click on the MOD X knob and select Create automation clip:

Figure 5.12 – Mod X automation
An automation clip is created in the playlist.
- Create a curve in the automation; any type of curve will do. If you need a refresher on how to create automation curves, we discussed it in Chapter 4, Routing to the Mixer and Applying Automation.
- Add the sample that you modified to the playlist. Your playlist should now look similar to the following screenshot:

Figure 5.13 – Playlist
So far, we’ve set up the Mod X control with automation for a sample. Essentially, it’s saying that we have automation that will change over time. But what do we want to automate?
- In the mixer channel where you sent your instrument, add an FL Studio effect plugin to the sample. I’m going to choose Fruity parametric EQ 2, but you can pick any native FL Studio plugin:
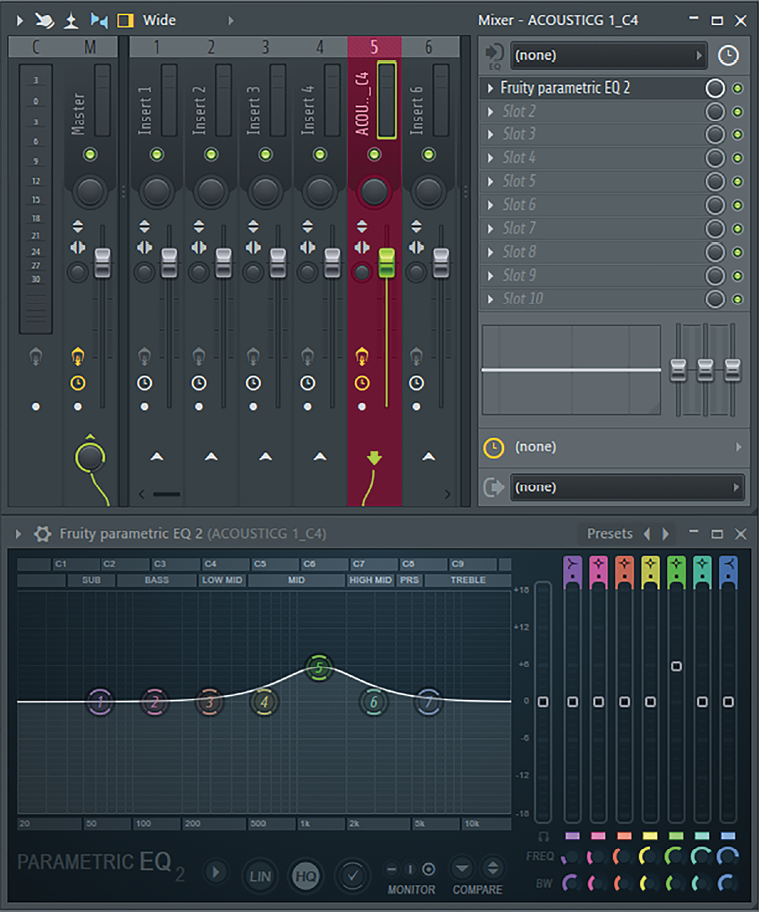
Figure 5.14 – Fruity parametric EQ 2 effect on the sample
- We can now pick any control knob in our native plugin effect and link it to our Mod X automation clip. Right-click on any adjustable knob in your effect plugin. In my example, I’m going to right-click on the band 5 peaking knob. Select Link to controller…:
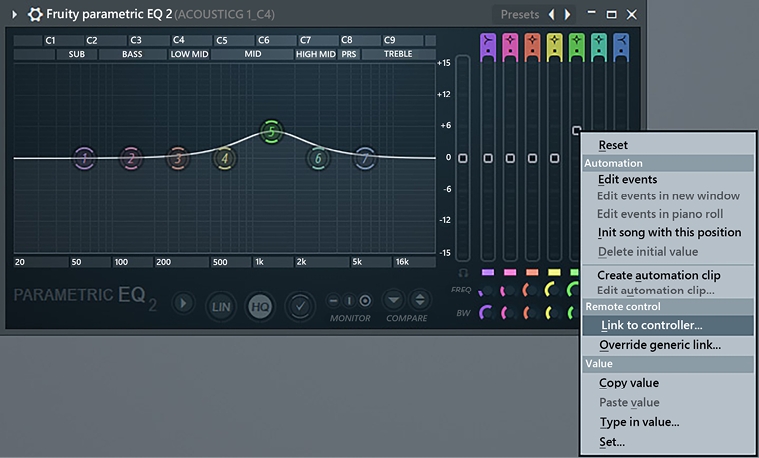
Figure 5.15 – Link to controller
- Once selected, the Remote control settings window will pop up, as shown in the following screenshot. Under the Internal controller heading, you’ll see the automation clip that you created in the playlist, as well as any other automation clips present:
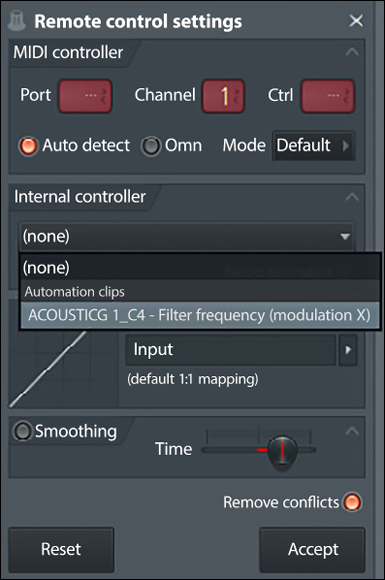
Figure 5.16 – Internal controller
- If another control knob is already linked to your automation clip, you’ll need to uncheck the Remove conflicts button at the bottom. This won’t be an issue if this is your first time doing this. Once your automation clip is selected, click Accept at the bottom.
- Go back to your playlist and play the song. The following screenshot shows our sample, the automation of Mod X, and the effect knob that is being modified:
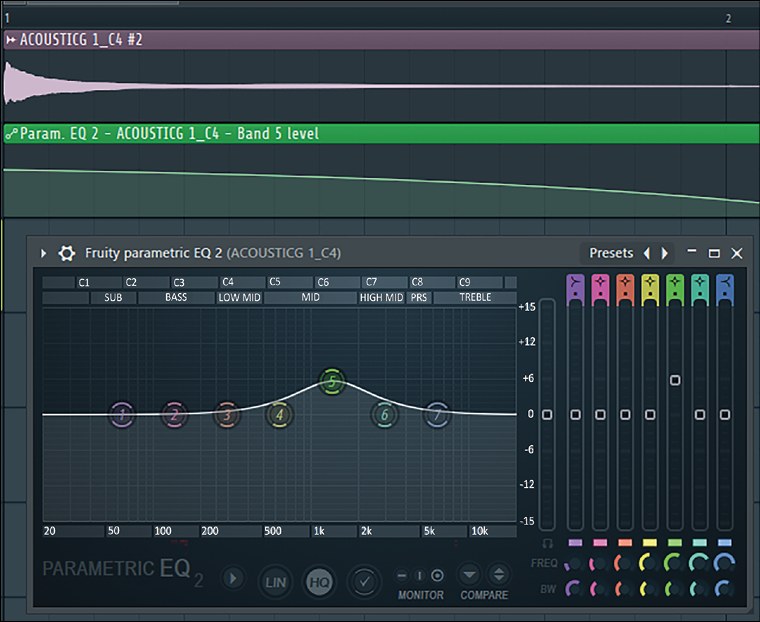
Figure 5.17 – Effect is being modulated
What you’ve done is created an automation clip and linked the automation clip to an effect control. As you play your song, the plugin effect knob that you linked will adjust according to the automation clip. In my example, band 5 of the Fruity parametric EQ 2 effect moves according to the automation clip.
You aren’t restricted to linking one control to an automation clip. You can have multiple effect controls linked to the same automation clip using the same technique.
What’s the point of Mod X and Mod Y?
We used Mod X and Mod Y controls to create automation clips in our example, but this could have been any kind of automation clip. Mod X and Mod Y don’t control anything on their own; they’re just empty controls to be assigned.
Mod X and Mod Y are simply further tools that can be used when arranging your songs. Most commonly, they’re used to show how an effect changes over time to bring interest to the arrangement. For example, if you know that you want the intensity to build up before reaching the chorus but you don’t yet know what effects you want to apply, you could set up the Mod X automation ahead of time and add effects later.
The only difference in using Mod X and Mod Y versus some other automation control is that they are specifically referenced in several FL Studio plugins, such as Patcher, Slicex, Sytrus, and Harmor. When you use those plugins, you’ll find the names X and Y appear in several places of the plugin. If you’re planning on doing surround sound 3D space, Mod X and Mod Y are logical control candidates to use to identify your x and y axes’ position.
Overall, Mod X and Y are useful for creating automation that you can later assign controls to. You now know how to modify a waveform using Mod X and Y, and have learned how, by doing this, you can pass around automation between plugins.


