Practicing the basics of the Voxel Remesher
We've learned about the importance of topology in relation to the shape of our sculptures. We understand that we can only push polygons around a short distance before they become too stretched out to properly represent the shape we are trying to make. In the Creating dynamic topology with Dyntopo section, we discovered one solution to this problem, but it was riddled with little issues that would make our workflow very difficult later down the line.
In this section, we will explore a better alternative for adjusting the topology while we sculpt. Blender has several methods for analyzing a mesh to determine which polygons are necessary to support any given shape. After analyzing the shape of a model, Blender can replace the original polygons with a completely new set of polygons to create a new mesh that better fits the shape we are trying to represent. This process is known as Remeshing.
There are several types of remeshing, but for sculpting, we require a really fast method. Luckily, we have an almost instantaneous type of remeshing called Voxel Remeshing. Voxels are three-dimensional volume elements, which is a nerdy way of saying: voxels are little cubes.
If we analyze a sphere, we can visualize its volume as being filled with little cubes. This tends to make our objects look extremely blocky, so we can follow it up by smoothing out all of the corners of the voxels, which will give us a nice new mesh. You can see a visualization of this process in the following diagram:

Figure 2.12 – The original Quad Sphere on the left-hand side, converted into voxels in the middle, and smoothed out into a new sphere-shaped mesh on the right-hand side
This process works for any shape. It's also extremely fast, so we can voxel remesh our sculpture as often as we need to. Let's try it out.
Getting ready
The Voxel Remesher utility will work with any object, but working with a sphere is boring, so let's try it with an example file. Download the devilishlyHandsomeGuy.blend example file from the GitHub repository at https://github.com/PacktPublishing/Sculpting-the-Blender-Way/blob/main/Chapter02/devilishlyHandsomeGuy.blend.
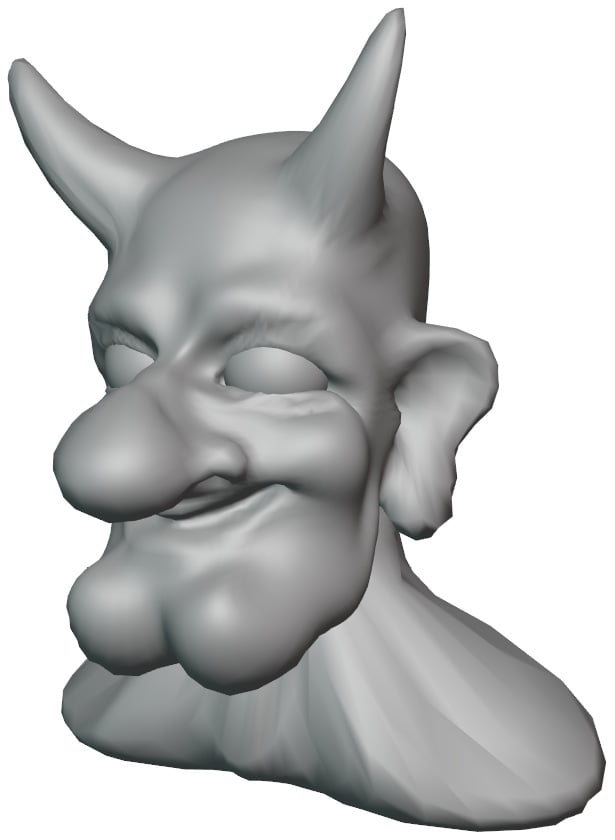
Once you've downloaded the example file, open it in Blender by either double-clicking on the file or dragging the file into the Blender window and choosing Open. Inside this file, you'll find a sculpture of a devilishly handsome guy, which you can see in the following diagram:

Figure 2.13 – The devilishly handsome guy
This character has been sculpted out of a basic Quad Sphere. The topology of this model is being stretched too far apart, which is causing issues. Notice how the shading around the neck, the base of the horns, and the ears have become blocky and distorted? This is a clear sign that the polygons have been stretched too far.
It's not just a shading issue; we don't have enough polygons in these areas to keep sculpting new details on this character. So, let's practice using the Voxel Remesher on this character to create new polygons and solve these issues.
How to do it…
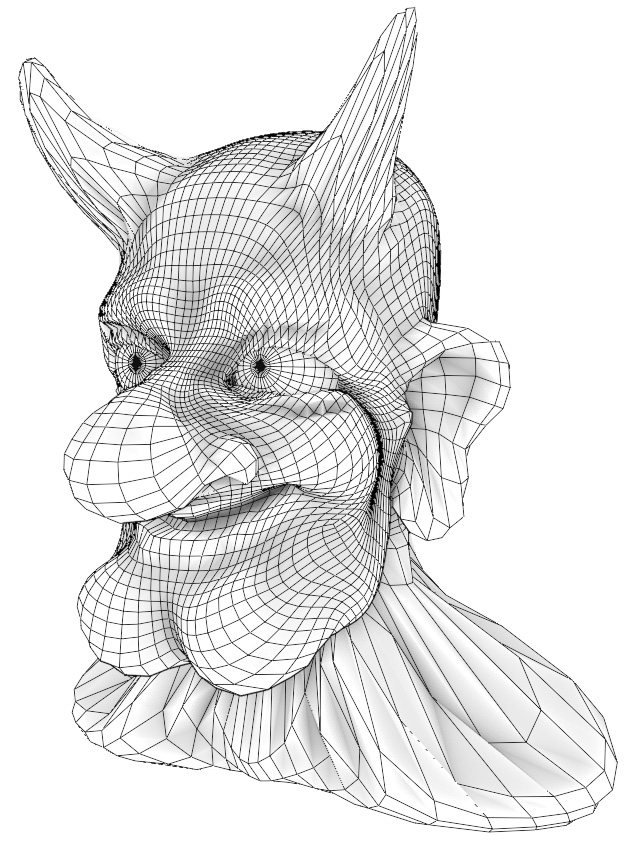
Start by turning on the wireframe overlay so that we can see what the topology of the model looks like before and after we remesh it. As we can observe in the following diagram, the topology of this devilishly handsome guy has been stretched:

Figure 2.14 – The devilishly handsome guy before remeshing (this diagram has been simplified for better visibility in this book)
Take a look at the nose, horns, neck, shoulders, ears, and chin. These areas have all been stretched way too far. This character will greatly benefit from some extra polygons. Let's fix this now:
- Locate the Remesh options in the upper-right corner of the 3D Viewport header.
- Click on Remesh to open the pop-over menu.
Here, we can view the settings for the Voxel Remesher:

Figure 2.15 – The Remesh pop-over menu
To get a good result, we must choose a voxel size that can capture the details of the sculpture. If our voxel size is too high, we will lose details. If our voxel size is too low, we will have too many polygons and our sculpture will be difficult to work with. Luckily, we don't have to guess which size to use; we can use the eyedropper tool to pick a size from the model.
- Click on the eyedropper icon next to the Voxel Size setting.
- Use the eyedropper to click on an area of the model that isn't stretched too thin; the character's forehead is a good choice.
- Open the Remesh pop-over menu again.
You'll notice that the Voxel Size setting has been updated to match the size of the polygons on the character's forehead, which is
0.087872 min our example. (Don't worry about getting this number exactly right; it just has to be close.) Now, we can run the Voxel Remesher to generate new polygons. - Click on the Remesh button at the bottom of the pop-over menu.
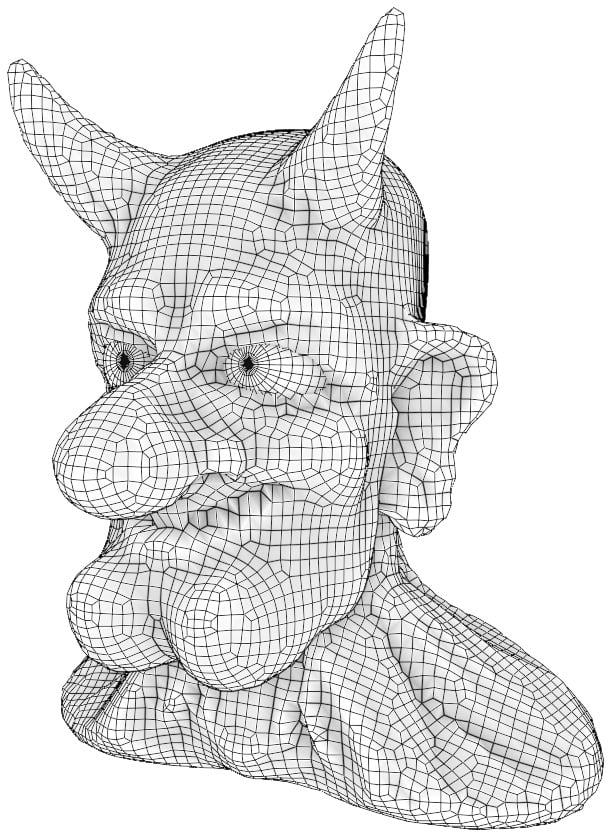
You can view how our example turned out in the following diagram:

Figure 2.16 – The devilishly handsome guy after remeshing (this diagram has been simplified for better visibility in this book)
Excellent! The character has a fresh set of polygons for us to work with!
How it works…
The Voxel Remesher is the preferred method for many artists in the Blender community since it avoids many of the downsides from Dyntopo, but it still allows us to update the topology of the model to fit the shape while we work. The only real downside of the Voxel Remesher is that we have to manually run the remesher to update the geometry. This makes the Snake Hook brush slightly harder to use. Other than that, this method is better for an optimized workflow.
This character might look a little blocky now, but that's actually a good thing. When working with the Voxel Remesher, we are meant to start sculpting the major forms that have a low level of detail. As we make changes to the major forms, we can run the Voxel Remesher over and over again each time our polygons become stretched out.
Unfortunately, some of the details in this character didn't turn out very well. The mouth ended up pretty blocky because the voxel size we used wasn't small enough to represent that shape. Also, the neck has become somewhat distorted. This is because the original polygons in the neck were stretched so far that the Voxel Remesher couldn't really make sense of them. Problems such as this can easily be smoothed out, but this character really should have been remeshed earlier in the sculpting process to avoid these issues.
In the next section, we will gain additional practice with using the Voxel Remesher at the correct time and with the right detail size to avoid these issues.


