


Creating buttons and changing their text property
Getting ready
This recipe extends the previous one. You can download the entire code from the Packt Publishing website.
How to do it...
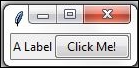
We are adding a button that, when clicked, performs an action. In this recipe, we will update the label we added in the previous recipe, as well as updating the text property of the button.
# Modify adding a Label                                      # 1
aLabel = ttk.Label(win, text="A Label")                      # 2
aLabel.grid(column=0, row=0)                                 # 3


# Button Click Event Callback Function                       # 4
def clickMe():                                               # 5
    action.configure(text="** I have been Clicked! **")
    aLabel.configure(foreground='red')

# Adding a Button                                            # 6
action = ttk.Button(win, text="Click Me!", command=clickMe)  # 7
action.grid(column=1, row=0)                                 # 8
Before clicking the button:
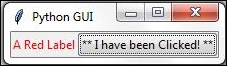
After clicking the button, the color of the label has been changed, and so has the text of the button. Action!
How it works...
In line 2 we are now assigning the label to a variable and in line 3 we use this variable to position the label within the form. We will need this variable to change its properties in the clickMe() function. By default, this is a module-level variable so we can access it inside the function as long as we declare the variable above the function that calls it.
Line 5 is the event handler that is being invoked once the button gets clicked.
In line 7, we create the button and bind the command to the clickMe() function.
Note
GUIs are event-driven. Clicking the button creates an event. We bind what happens when this event occurs in the callback function using the command property of the ttk.Button widget. Notice how we do not use parentheses; only the name clickMe.
We also change the text of the label to include red as in the printed book, this might otherwise not be obvious. When you run the code you can see that the color did indeed change.
Lines 3 and 8 both use the grid layout manager, which will be discussed in the following chapter. This aligns both the label and the button.
There's more...
We will continue to add more and more widgets to our GUI and we will make use of many built-in properties in other recipes in the book.


