Playgrounds
When I was a kid, the best part of the school day was going to the playground. It really did not matter what we were playing as long as we were on the playground, I knew it would be fun. When Apple introduced Playgrounds as part of Xcode 6, I was excited just by the name, but I wondered if Apple could make its Playground as fun as the playgrounds from my youth. While Apple's Playgrounds might not be as fun as playing kickball when I was nine years old, it definitely brings a lot of fun back to experimenting and playing with code.
Getting started with Playgrounds
Playgrounds are an interactive work environment that lets us write code and see the results immediately in the sidebars. As changes are made to the code, the results in the sidebar also change in real time. This means that Playgrounds are a great way to learn and experiment with Swift.
Playgrounds also make it incredibly easy to try out new APIs, prototype new algorithms, and demonstrate how code works. We will be using Playgrounds throughout this book to show how our sample code works. Therefore, before we really get into Swift development, let's spend some time learning and getting comfortable with Playgrounds.
If the Swift code does not make a lot of sense right now, do not worry; as we go through the book, this code will begin to make sense. We are simply trying to get a feel of Playgrounds right now.
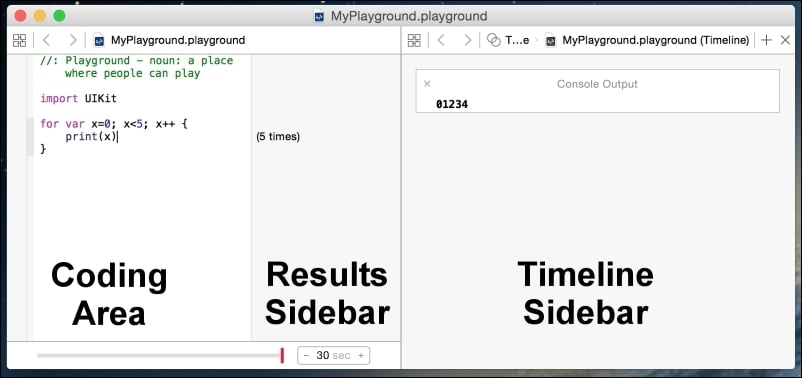
A Playground has three sections, as follows:
- Coding Area: This is where you enter your Swift code.
- Results Sidebar: This is where the results of your code are shown. Each time you type in a new line of code, the results are re-evaluated and the results sidebar is updated with the new results.
- Timeline Sidebar: This sidebar displays various objects depending on what your code does. Later in this chapter, we will show you how to display an image in the timeline sidebar.
The following screenshot shows how the sections are arranged in a Playground:

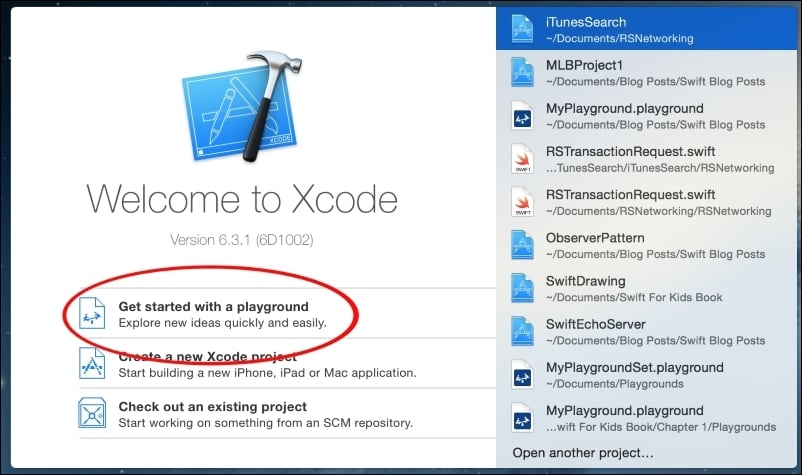
Let's start a new Playground. The first thing we need to do is to start Xcode. Once Xcode has started, we can select the Get started with a playground option, as shown in the following screenshot:

Alternatively, we can navigate to File | New | Playground from the top menu bar, as shown in the following screenshot:

Next, we should see a screen similar to the following screenshot that lets us name our Playground and select whether the Playground is an iOS or OS X Playground. For most of the examples in this book, it is safe to assume that you can select either iOS or OS X unless it is otherwise noted.

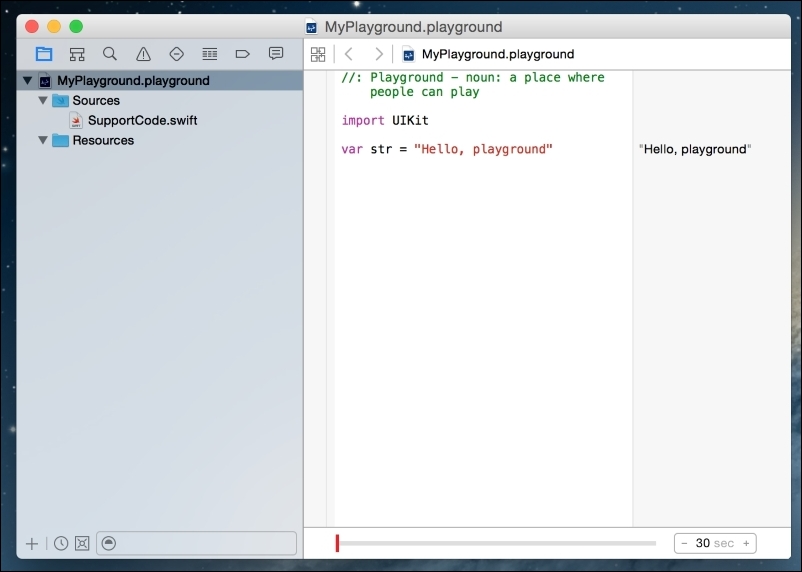
Finally, we are asked for the location to save our Playground too. After we select the location, the Playground will open up and look similar to the following screenshot:

From the preceding screenshot, we can see that the coding area of the Playground looks like the coding area for an Xcode project. What is different is the sidebar on the right-hand side. This sidebar is where the results of our code are shown. The code in the previous screenshot imports iOS's UIKit framework and sets a variable named str to the string Hello, playground. You can see the content of the str string in the sidebar to the right of the code.
By default, a new Playground does not open the timeline sidebar. You can open it manually by pressing the Command, Option, and Enter keys together. We will show you why the timeline sidebar is so important later in this chapter.
iOS and OS X Playgrounds
When you start a new iOS Playground, the Playground imports UIKit (Cocoa Touch). This gives us access to the UIKit framework that provides the core infrastructure for iOS applications. When we start a new OS X Playground, the Playground imports Cocoa. This gives us access to the OS X Cocoa framework.
What the last paragraph means is, if we want to experiment with specific features of either UIKit or Cocoa, we need to open the correct Playground. As an example, if we have an iOS Playground open and we want to create an object that represents a color, we would use a UIColor object. If we had an OS X playground open, we would use an NSColor object to represent a color.
Showing images in a Playground
As you will see throughout this book, Playgrounds are great at showing the results of code as text in the results sidebar. Playgrounds can also do a lot more than just text; they can also do images, graphs, and display views. Let's take a look at how we would show an image in a Playground. The first thing we need to do is to load the image into the resource directory of our Playground. The following steps show how to load an image into the resource directory:
- Let's begin by showing the project navigator sidebar. To do this, in the top menu bar navigate to View | Navigators | Show Project Navigator, or you can use the Command-1 keyboard shortcut. The project navigator looks like this:

- Next, we need to drag the image into the
Resourcesfolder so that we can access it from our code. Once we drag the image file over it, it will appear in theResourcesfolder. - Now we can access the image that is in our
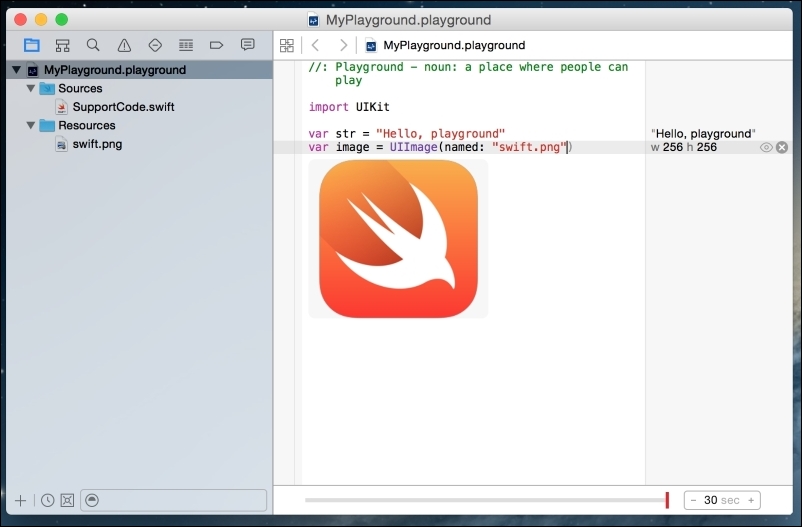
Resourcesfolder with our code. The following screenshot shows how we will do this. The actual code that we use to access the image is not as important at this time as knowing how to access resources within a playground:
- To view the image, we need to hover our cursor in the results sidebar over the section that shows the width and height of the image. In our example, the width and height section looks like this: w 256 h 256. Once we hover the mouse pointer of the width and height, we should see two symbols, as shown in the following screenshot:

- We can press either of the symbols to show the image. The one that is shaped like a circle with a plus sign in it will display the image within the playground's code section, while the one that looks like an eye will pop the image up outside of the playground. The following screenshot shows what it looks like if we press the symbol that looks like a circle with a plus sign in it.

Displaying graphs in Playgrounds
We can also graph the value of numeric variables over time with the timeline sidebar. This feature is really useful when we are prototyping new algorithms. It allows us to see the value of the variable throughout the course of the calculations. To see how graphing works, take a look at the following Playground:

In this playground, we set the variable j to 1. We then create a for loop that assigns numbers 1 through 5 to the variable i. At each step in the for loop, we set the value of the variable j to the current value of j multiplied by i. The graph in the timeline sidebar shows the value of the variable j at each step of the for loop. We will be covering for loops in detail later in this book.
To bring up the graph, click on the symbol that is shaped like a circle with a dot in it. We can then move the timeline slider to see the values of variable j at each step of the for loop.
What Playgrounds are not
There is a lot more that we can do with Playgrounds, and we have only scratched the surface in our quick introduction here. As we proceed through the book, we will be using Playgrounds for almost all of the sample code and will demonstrate other features of Playgrounds as they are used.
Before we leave this brief introduction, let's take a look at what Playgrounds are not, so we can understand when not to use Playgrounds:
- Playgrounds should not be used for performance testing: The performance you see from any code that is run in a Playground is not representative of how fast the code will run when it is in your projects.
- Playgrounds do not support user interaction: Users cannot interact with code that is run in a Playground.
- Playgrounds do not support on-device execution: You cannot run the code that is present in a Playground outside of the Playground. This means you cannot run it as an external application or on an external device.


