Creating a new application
The next step is to create a new application. Usually, you would have to create several projects in Eclipse: one project for the shared game code, another one for the desktop launcher, and more for the Android, iOS, and HTML5/GWT launchers. Furthermore, the projects would also have to be configured and linked together in a certain way. This is quite a time-consuming task and more or less an error-prone process for inexperienced users.
Luckily, LibGDX provides tools to generate preconfigured projects for a new application that can be directly imported into Eclipse. There are two tools to create a LibGDX project, the latest one is using Gradle, and the old project setup tool written by Aurelien Ribon. First, we will learn about the old setup tool and then about the Gradle setup tool.
Using the old setup tool
The old project setup tool is an executable JAR file called gdx-setup-ui.jar.
Step 1
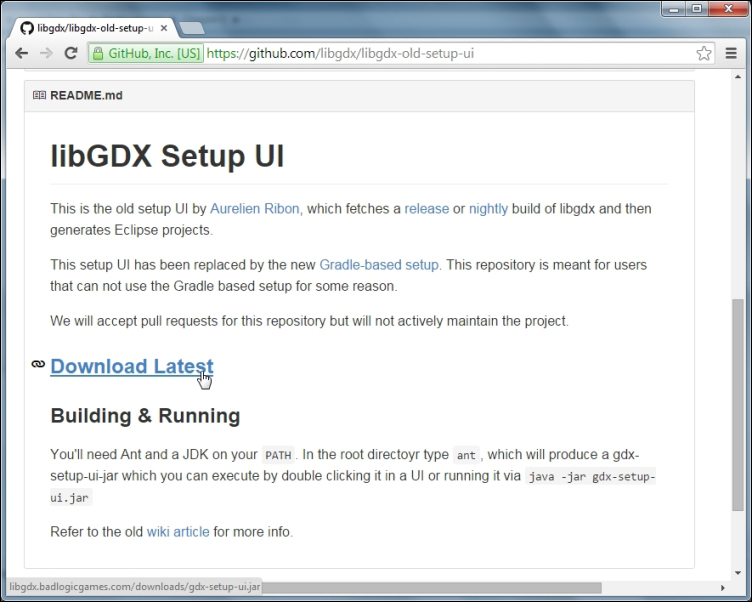
You can download the old setup tool from https://github.com/libgdx/libgdx-old-setup-ui, as shown here:
Step 2
To run the tool, double-click on the gdx-setup-ui file. When the program starts, click on the big Create button:

Step 3
In the next window, you will see a box labeled CONFIGURATION on the left-hand side. Here, you can configure what the tool will generate.
Enter demo in the Name field, which defines a common project name for your application. Each launcher project will add its own suffix to it, such as -desktop, -android, or -html. A preview of the outcome is shown in the OVERVIEW box on the right-hand side of the window.
The Package field defines the name of your Java package. This needs to be a unique identifier written in lowercase, which is usually derived from a reversed domain name. You do not have to own a domain name nor does it have to really exist, but it helps in choosing nonconflicting namespaces for Java applications. This is especially important on Android, as identical package names for two separate applications would mean that the already installed application is going to be overwritten by the second one while trying to install it. For this demo application, use com.packtpub.libgdx.demo as the package name for now.
The Game class field defines the name of the main class in the shared game code project. Enter MyDemo as the game class name.
The Destination field defines the destination folder where all the projects will be generated. Click on the blue folder button (just next to the field) and set the destination folder to C:\libgdx\.
In another box called LIBRARY SELECTION, the status of required libraries is shown. If there is any item listed in red, it needs to be fixed before any project can be generated. You will see LibGDX being listed in red in the Required section. Click on the blue folder icon next to it:

Step 4
Then, choose the downloaded archive file libgdx-1.2.0.zip from C:\libgdx\ and click on Open, as shown in the following screenshot:

Step 5
The text color of the LibGDX label should have changed from red to green by now. Click on the Open the generation screen button to continue:

Step 6
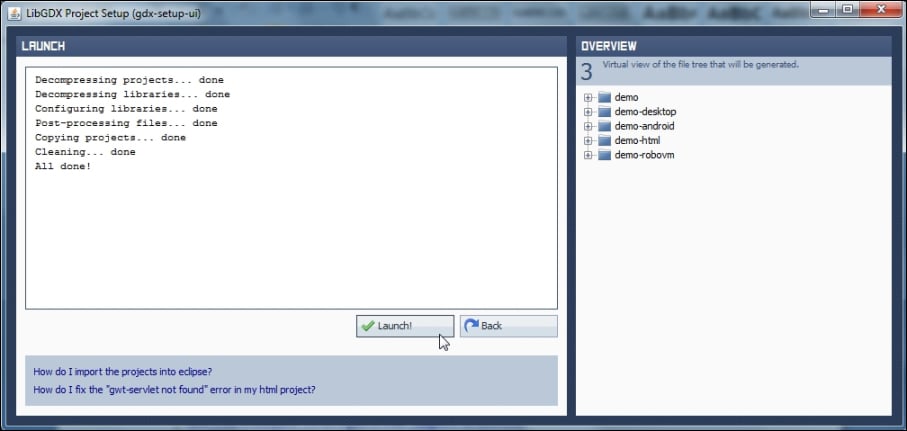
Next, click on the Launch! button to generate all the projects, as shown here:
Step 7
All done! You can now go to Eclipse and start importing the generated projects into your workspace. To do this, simply navigate to the Import option in the File menu.
Step 8
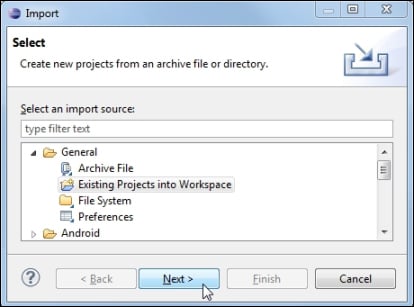
In the Import dialog box, open the General category, select Existing Projects into Workspace, and click on the Next button, as shown here:
Step 9
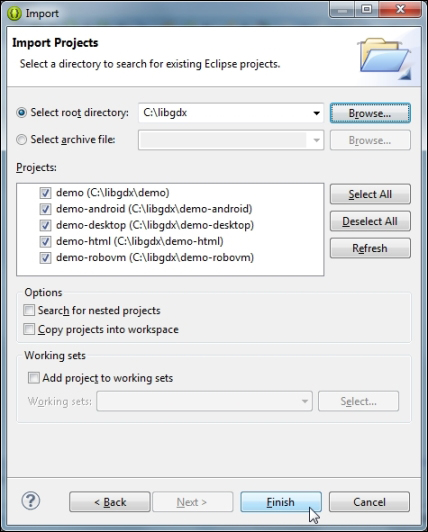
Click on the radio button Select root directory and enter C:\libgdx in the text field. This is the directory where all your generated projects were created. You need to confirm your text input by pressing the return key once. Eclipse will start to scan the directory for your projects and list them. Leave all checkboxes selected and click on the Finish button, as shown in the following screenshot:
Step 10
Eclipse will automatically try to build (compile) all the four newly imported projects in your workspace and probably fail. There are two issues that need to be resolved manually after the import. The first one is reported directly to the Console window in Eclipse. It complains about being unable to resolve the target android-15, as shown in the following screenshot:

You have to open the project properties of the demo-android project. First, select it in the Package Explorer box on the left-hand side. Then, go to the menu bar and navigate to Properties option in the Project menu:

Step 11
The title of the window will say Properties for demo-android. If this is not the case, close the window and make sure you have selected the correct project and try again. Next, select Android from the list on the left-hand side. You will see a list of targets that are available on your system. Select Android 2.2, which uses API level 8, and click on the OK button, as shown here:

Step 12
Eclipse will recognize the change and successfully build the Android project this time.
The second issue requires you to click on the Problems tab in Eclipse. Open the Errors list and right-click on the reported problem, which will say The GWT SDK JAR gwt-servlet.jar is missing in the WEB-INF/lib directory. Choose Quick Fix from the context menu, as shown in the following screenshot:

Step 13
In the Quick Fix dialog box, select Synchronize <WAR>/WEB-INF/lib with SDK libraries as the desired fix and click on the Finish button, as shown here:

The two issues will be solved by now, which means that all the projects are now automatically built without failure and can be compiled.
Note
Though the steps to create a project using gdx-setup-ui might seem difficult, actually it's very easy. In our book, we will generate the project setup for our first game using this setup tool, and later in Chapter 14, Bullet Physics, we will use the Gradle-based tool to generate the project, thereby mastering the two technologies.
Using the Gradle-based setup
For the first game, we will use the projects generated using the old setup tool; however, read this section and understand how it works, so that we can use it later in Chapter 14, Bullet Physics.
You can download the gdx-setup.jar file from http://libgdx.badlogicgames.com/download.html and then click on Download Setup App, as shown in the following screenshot:

However, we have already downloaded the libgdx-1.2.0.zip file, which contains gdx-setup.jar; hence, we will extract gdx-setup from the archive. To run the tool, double-click on gdx-setup to get the following screenshot:
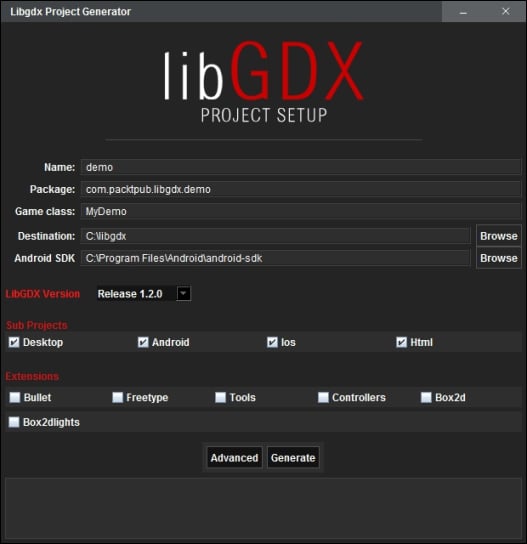
The Name, Package, Game Class, and Destination fields are the same that we learned for the old project setup tool.
The
Android SDK field defines the path to where you have installed your android sdk. Click on the Browse button and set it to the android sdk folder. Here, it's C:\Program Files\Android\android-sdk.
We will now select Release 1.2.0 from the drop-down list in the Libgdx Version field. Next under the Sub Projects tab, you can select the hardware platforms that you want to support. Here, we select all four, namely, Desktop, Android, Ios, and Html.
Finally, you can select the extensions (for example, box2d, physics bullet, and so on) to be included in your app. Some might not work on all the platforms for which you'll get a warning. For the demo, we don't need any extensions, hence ignore this part.
Note
Once chosen and created, you will have to add new hardware platforms or extensions manually. For manually adding dependencies, visit https://github.com/libgdx/libgdx/wiki/Dependency-management-with-Gradle.
Now, click on the Advanced button, enable Eclipse, and then click on Save, as shown in the following screenshot:

Now that we have set everything, click on Generate.
Note
The gdx-setup option will prompt you to download and install the latest SDK platform and build tools. Just ignore this. While writing the book, the SDK platform was 19 and build tools were 19.0.3.
It will take a while to download and generate the projects. Make sure that you are connected to the Internet. Finally, it will display BUILD SUCCESSFUL like this:

This means you are now ready to import the project into your IDE, run, debug, and package it! All done! You can now go to Eclipse and start importing the generated projects into your workspace.
You can import projects to Eclipse as in the old project setup by following Step 7 to Step 9. However, in order to access the features of the Gradle plugin, you need to import it quite differently. Navigate to the Import option in the File menu. In the Import dialog box, select the Gradle Project subfolder from the Gradle folder, as shown in the following screenshot:

Now in the Import Gradle Project window, click on Browse and select the folder where you created the demo project. Here, it's C:\libgdx. Then, click on the Build Model button:
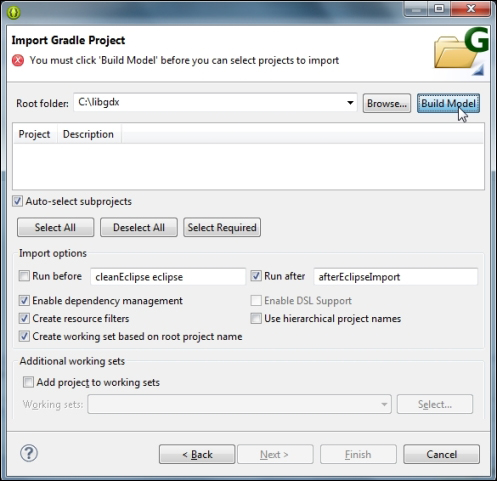
It will take a while to build the project. After this, select the different projects and click on Finish, as shown in the following screenshot:

All done! After importing, change the API level of Android to 8 by following Step 10 and Step 11 from the old project setup.


