Search icon CANCEL
Subscription
0
Cart icon
Your Cart (0 item)
Close icon
You have no products in your basket yet
Save more on your purchases! discount-offer-chevron-icon
Savings automatically calculated. No voucher code required.
Arrow left icon
Explore Products
Best Sellers
New Releases
Books
Videos
Audiobooks
Learning Hub
Newsletter Hub
Free Learning
Arrow right icon
timer SALE ENDS IN
0 Days
:
00 Hours
:
00 Minutes
:
00 Seconds
Arrow up icon
GO TO TOP
Learning Continuous Integration with Jenkins

You're reading from   Learning Continuous Integration with Jenkins

Arrow left icon
Product type Paperback
Published in May 2016
Publisher Packt
ISBN-13 9781785284830
Length 542 pages
Edition 1st Edition
Languages
Tools
Arrow right icon
Author (1):
Arrow left icon
Nikhil Pathania Nikhil Pathania
Author Profile Icon Nikhil Pathania
Nikhil Pathania
Arrow right icon
View More author details
Toc

Table of Contents (10) Chapters Close

Preface 1. Concepts of Continuous Integration FREE CHAPTER 2. Setting up Jenkins 3. Configuring Jenkins 4. Continuous Integration Using Jenkins – Part I 5. Continuous Integration Using Jenkins – Part II 6. Continuous Delivery Using Jenkins 7. Continuous Deployment Using Jenkins 8. Jenkins Best Practices Index

Continuous Delivery in action


Now, we are ready to test our Continuous Delivery pipeline. Let's assume the role of a developer who intends to work on the feature1 branch. Our developer is working on a Windows 10 machine with the following software installed on it:

  • The latest version of Eclipse (Eclipse Mars)

  • Apache Tomcat server 8

  • Git 2.6.3

  • SourceTree

  • Java JDK 1.8.0_60

  • Maven 3.3.9

We won't modify any code in order to trigger our Continuous Delivery pipeline, as in the previous section we made considerable changes to our code base. I guess checking in those changes would be more than sufficient. Nevertheless, you are free to make changes to your code.

Committing and pushing changes on the feature1 branch

The following figure gives an overview of the operation that we will perform:
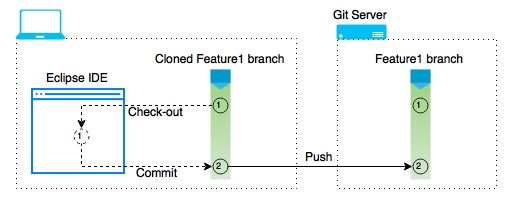
Perform the following instructions to commit and push changes:

  1. Open Eclipse IDE.

  2. Right-click on the project payslip and go to Team | Commit…:

  3. In the window that opens, add some comments (as shown in the screenshot) and select...

lock icon The rest of the chapter is locked
Register for a free Packt account to unlock a world of extra content!
A free Packt account unlocks extra newsletters, articles, discounted offers, and much more. Start advancing your knowledge today.
Unlock this book and the full library FREE for 7 days
Get unlimited access to 7000+ expert-authored eBooks and videos courses covering every tech area you can think of
Renews at $19.99/month. Cancel anytime
Banner background image