Creating "Hello World" JavaFX-style applications
The best way to show you what it is like to create and build a JavaFX application would be with a Hello World application.
In this section, you will be using the NetBeans IDE we just installed to develop, compile, and run a JavaFX-based Hello World application.
Using the Netbeans IDE
To quickly get started with creating, coding, compiling, and running a simple JavaFX-style Hello World application using the NetBeans IDE, follow the steps outlined in this section:
- From the File menu, choose New Project.
- From JavaFX application category, choose JavaFX Application. Click on Next.
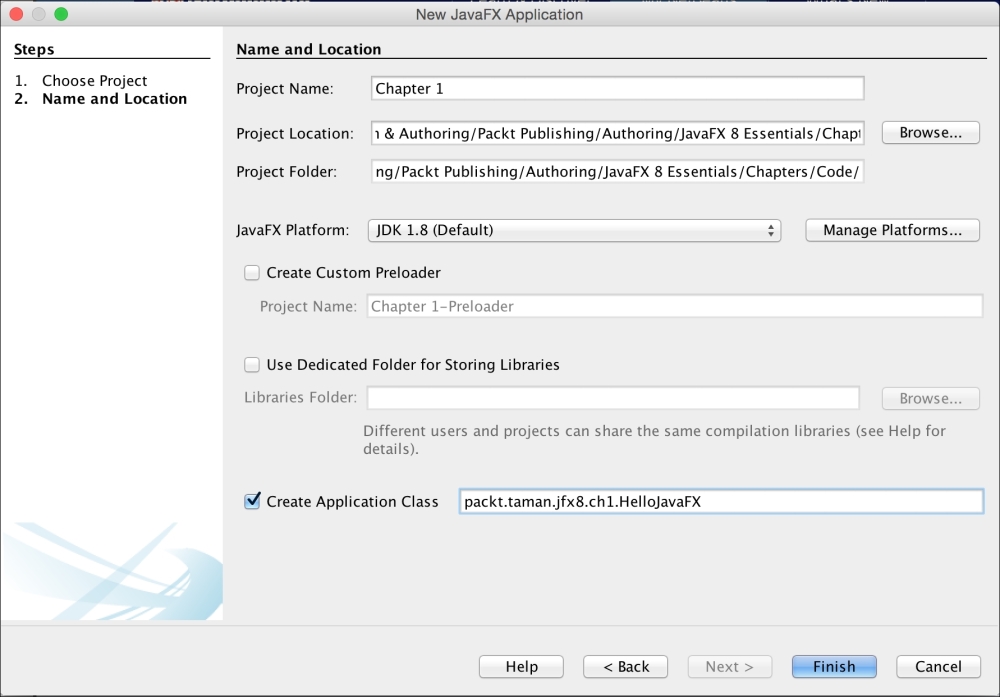
- Name the project
HelloJavaFX. Optionally, you can define the package structure for application classes. Then click on Finish as shown in the following screenshot:
New JavaFX application wizard
NetBeans opens the
HelloJavaFX.javafile and populates it with the code for a basic "Hello World" application.Note
You will find that this version of code has been modified a bit from the one NetBeans actually creates, and you can compare them to find differences, but they have the same structure. I did that to show the result on the text node on the
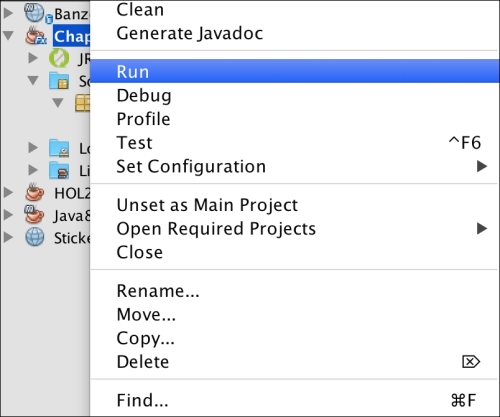
Sceneinstead of the console when clicking on the Say 'Hello World' button. For that, aVBoxcontainer has also been used. - Right-click on the project and click on Run from the menu as shown here:

Running the application
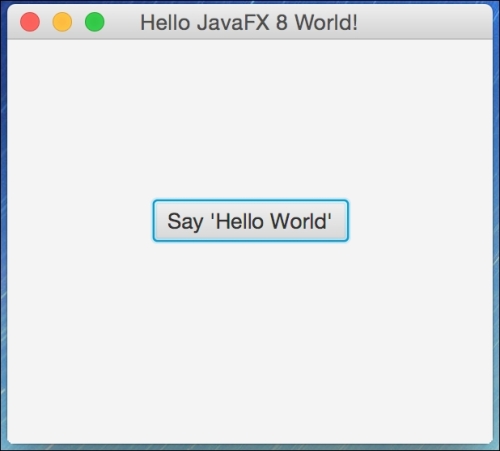
- NetBeans will compile and run the application. The output should be as shown in the following screenshot:

JavaFX Hello World launched from the NetBeans IDE
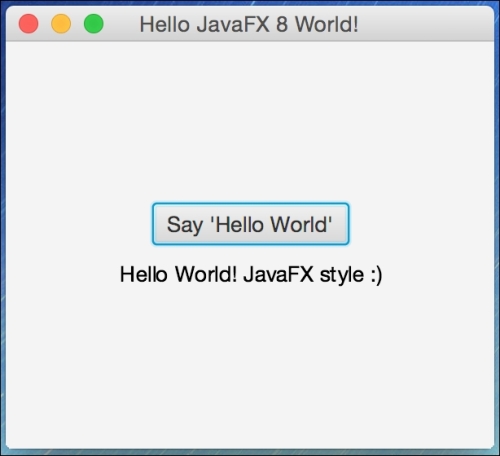
- Click on the button and you should see the following result:

JavaFX Hello World results
Here is the modified code of the basic Hello world application (HelloJavaFX.java):
import javafx.application.Application;
import javafx.scene.Scene;
import javafx.scene.control.Button;
import javafx.scene.text.Text;
import javafx.stage.Stage;
import static javafx.geometry.Pos.CENTER;
import javafx.scene.layout.VBox;

/**
  * @author mohamed_taman
 */
public class HelloJavaFX extends Application {

  @Override
  public void start(Stage primaryStage) {

    Button btn = new Button();
    Text message = new Text();

    btn.setText("Say 'Hello World'");

    btn.setOnAction(event -> {
      message.setText("Hello World! JavaFX style :)");
    });

    VBox root = new VBox(10,btn,message);
    root.setAlignment(CENTER);

    Scene scene = new Scene(root, 300, 250);

    primaryStage.setTitle("Hello JavaFX 8 World!");
    primaryStage.setScene(scene);
    primaryStage.show();
  }
  public static void main(String[] args) {
    launch(args);
  }
}
How it works
Here are the important things to know about the basic structure of a JavaFX application:
- The main class for a JavaFX application should extend the
javafx.application.Applicationclass. Thestart()method is the main entry point for all JavaFX applications. - A JavaFX application defines the user interface container by means of a stage and a scene. The JavaFX
Stageclass is the top-level JavaFX container. The JavaFXSceneclass is the container for all content. The following code snippet creates a stage and scene and makes the scene visible in a given pixel size –new Scene(root, 300, 250). - In JavaFX, the content of the scene is represented as a hierarchical scene graph of nodes. In this example, the root node is a
VBoxlayout object, which is a resizable layout node. This means that the root node's size tracks the scene's size and changes when a user resizes the stage. - The
VBoxis used here as the container that arranges its content nodes vertically in a single column with multiple rows. We have added the button btn control to the first row in the column, then the text message control to the second row on the same column, with vertical space of 10 pixels, as in the following code snippet:VBox root = new VBox(10,btn,message); root.setAlignment(CENTER);
- We set the button control with text, plus an event handler to set the message text control to Hello World! JavaFX style :) when the button is clicked on.
- You might note a strange code syntax written in Java, with no compiler errors. This is a Lambda expression, which has been added to Java SE 8, and we are going to talk about it briefly in Chapter 2, JavaFX 8 Essentials and Creating a custom UI. With a slight comparison to old anonymous inner classes style, it is cleaner and more concise to use Lambda expression now. Have a look at this comparison of code:
Old School:
btn.setOnAction(new EventHandler<ActionEvent>() {
  @Override
  public void handle(ActionEvent event) {
    message.setText("Hello World! JavaFX style :)");
  }
});
New Era:
btn.setOnAction(event -> { message.setText("Hello World! JavaFX style :)"); }); - The
main()method is not required for JavaFX applications when the JAR file for the application is created with the JavaFX Packager tool, which embeds the JavaFX Launcher in the JAR file. - However, it is useful to include the
main()method so you can run JAR files that were created without the JavaFX Launcher, such as when using an IDE in which the JavaFX tools are not fully integrated. Also, Swing applications that embed JavaFX code require themain()method. - Here, in our
main()method's entry point, we launch the JavaFX application by simply passing in the command-line arguments to theApplication.launch()method. - After the
Application.launch()method has executed, the application will enter a ready state and the framework internals will invoke thestart()method to begin. - At this point, the program execution occurs on the JavaFX application thread and not on the main thread. When the
start()method is invoked, a JavaFXjavafx.stage.Stageobject is available for you to use and manipulate.
Note
Advanced topics will be discussed at length in the next chapters. More importantly, we will go through the JavaFX application thread in the coming chapters. In the last three chapters, we will see how to bring the result from other threads into the JavaFX application thread in order to render it correctly on the scene.


