Integrating Microsoft Azure Storage
SQL Server 2014 offers you the ability to store your SQL Server data files in Microsoft Azure. This will allow you to combine on-premise and cloud-based storage solutions for your SQL Server 2014 databases. The files are stored as blobs in Microsoft Azure. This offers the DBA a number of benefits, some of which are listed as follows:
Fast and easy migration
Low cost storage—potentially limitless storage
High Availability (HA) and Disaster Recovery (DR)
Security
Creating a database that uses the Microsoft Azure Storage integration
In order to use Microsoft Azure Storage for your SQL Sever database files, you will need to create a Microsoft Azure Storage account, and you will need to create a storage container.
To create a database that uses Microsoft Azure Storage, you need to follow the ensuing steps:
Create a Microsoft Azure Storage account and then create a container.
Following this, create a policy on the storage container and generate a Shared Access Signature (SAS) key.
Now, create a SQL Server Credential.
Finally, you can create a database in Microsoft Azure Storage.
Creating a Microsoft Azure Storage account and container
To use Microsoft Azure Storage for your SQL Server database, an account and a blob storage container will need to be created. Because you have already created your Microsoft Azure Account, you will now need to create a storage container for the databases' data files.
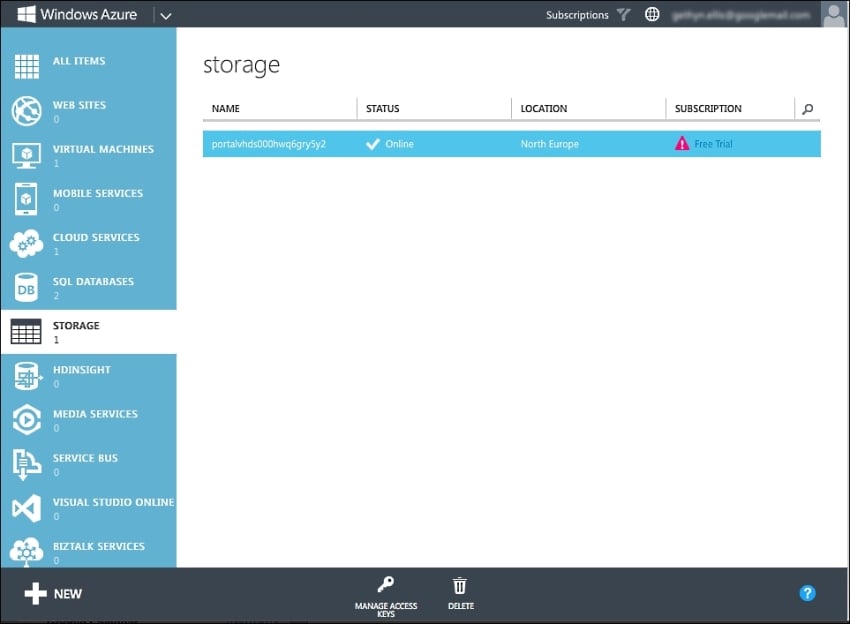
From the management portal, select the STORAGE option from the left-hand menu, which is shown in the following screenshot:

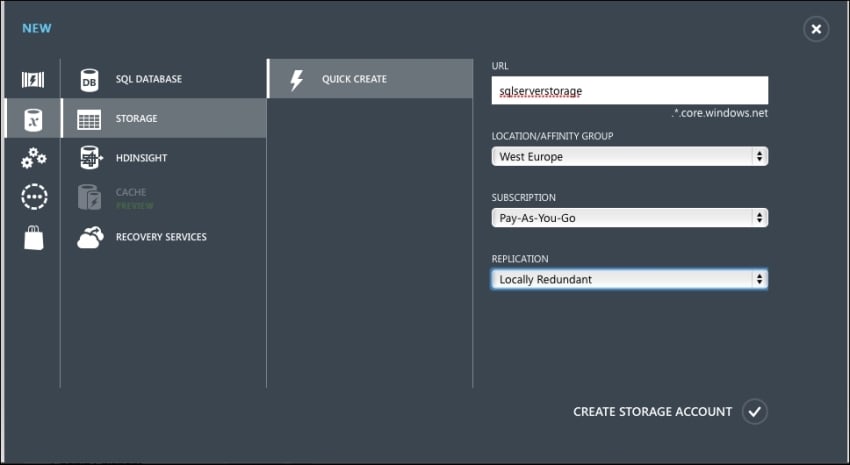
Click on the New button at the bottom of the screen and run through the wizard. The most important thing to note here is that you need to disable geo-replication. When geo-replication is set, the write order is not guaranteed, and this can lead to database corruption. Geo-replication allows you to keep multiple durable copies of data across different sites, but how the technology writes data to disk does not lend itself to how SQL Server will write data to the disk. Therefore, when using Microsoft Azure Storage for your database, you will not be able to use this option.
Click on the CREATE STORAGE ACCOUNT button to create the account as shown in the following screenshot. The storage account will take a minute or two to do this.

In the management portal, click on the newly created account that will be used for the storage configuration screen. At the top of the screen, you will see a list of options that contains Dashboard, Monitor, Configure, and Containers. Click on Containers, and click on the option to create a container. Give your container a name; I called mine sqldata.
The first step is complete; we then need to create a policy followed by SAS.
The container policy and Shared Access Signature
To simplify this process, Azure Storage Explorer is going to be used, which provides a nice graphical interface. You can download the software from the CodePlex website for free at http://azurestorageexplorer.codeplex.com.
After you have downloaded the Azure Storage Explorer, the following steps will guide you in using it to create a Shared Access Signature:
Install the
.msipackage on your computer, open up the Azure Storage Explorer, and connect to your storage container using the credentials supplied in the management portal. You will need the storage account that you created previously as well as a storage access key. Click on the storage account and then click on the Manage Access Keys icon. This can be found at the bottom of the storage container. You will need the key to connect.When you have successfully connected to your storage account, the Azure Storage Explorer will look similar to the following screenshot:

When successfully connected to the storage account, you will see the SQLDATA container on the left-hand side; click on the security button.
When the security dialog box opens, you will need to first create a new policy. Click on the Shared Access Policy tab.
Click on the New button and give the policy a name. To keep things simple, I called mine
sqldataand gave policy permissions to read, write, list, and delete; along with this, you can also give it a start date, a start time, an end date, and an end time.You then need to click on the Save Policies option. Following this, click on the Shared Access Signature tab, which is in the middle tab of the Security dialog box.
The Container name textbox should be completed. Leave the blob name text box blank and then choose the policy that was just created from the drop-down list. After this, click on the Generate Signature button. You will need this when setting up the credential in the next section.
Creating a credential
Connect to the local SQL Server instance in Management Studio that will be used to house the database that will make use of the Microsoft Azure Storage to execute the following CREATE CREDENTIAL statement:
CREATE CREDENTIAL [https://gresqlstorage.blob.core.windows.net/sqldata]
WITH IDENTITY='SHARED ACCESS SIGNATURE',
SECRET = 'sr=c&si=SQLDATA&sig=PtQi1NXUuJz%2BGCUkpdgEBS4o4Lo60FjTbfJ2dNx3XX8%3D'
Tip
Downloading the example code
You can download the example code files for all Packt books you have purchased from your account at http://www.packtpub.com. If you purchased this book elsewhere, you can visit http://www.packtpub.com/support and register to have the files e-mailed directly to you.
The CREATE CREDENTIAL statement uses the full Uniform Resource Identifier (URI) of the storage container for the credential name, including https:// address. The identity is mandatory and needs to be set as SHARED ACCESS SIGNATURE. The secret is the SAS that we created previously but not the full URI—everything up to the first ? needs to be removed.
Creating a database using Microsoft Azure Storage
To create a database that makes use of Microsoft Azure Storage, you will have to connect to the local database instance where the database will be created using Management Studio and Object Explorer. So, open a new query window and run the following CREATE DATABASES statement:
CREATE DATABASE TestDB1
ON
(NAME = TestDB1_data,
   FILENAME = 'https://gresqlstorage.blob.core.windows.net/sqldata/TestDB1Data.mdf')
 LOG ON
(NAME = TestDB1_log,
    FILENAME = 'https://gresqlstorage.blob.core.windows.net/sqldata/TestDB1Log.ldf')
GO
This command will create a database that appears to be an on-premise database housed on the SQL Server 2014 instance, but the storage of the data and log files is in fact on Microsoft Azure Storage. This is a true hybrid database that spans both on- and off-premise technologies.


