Workhorse brush
When you're just starting to work with CSP, you can sometimes be overwhelmed by the number of brushes. My advice is to create a workhorse brush and use that until you feel more confident in your basic skills.
Showing and hiding options
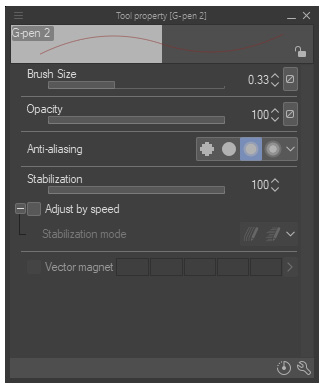
Now, we've had a taste of the options in the brush engine of CSP, but wait—there is a lot more we can do. One of those things is showing and hiding options in the Tool property palette:

Figure 2.23 – Tool property window
For example, I don't want Vector magnet, because I don't usually use it. What do we need to do to hide it?
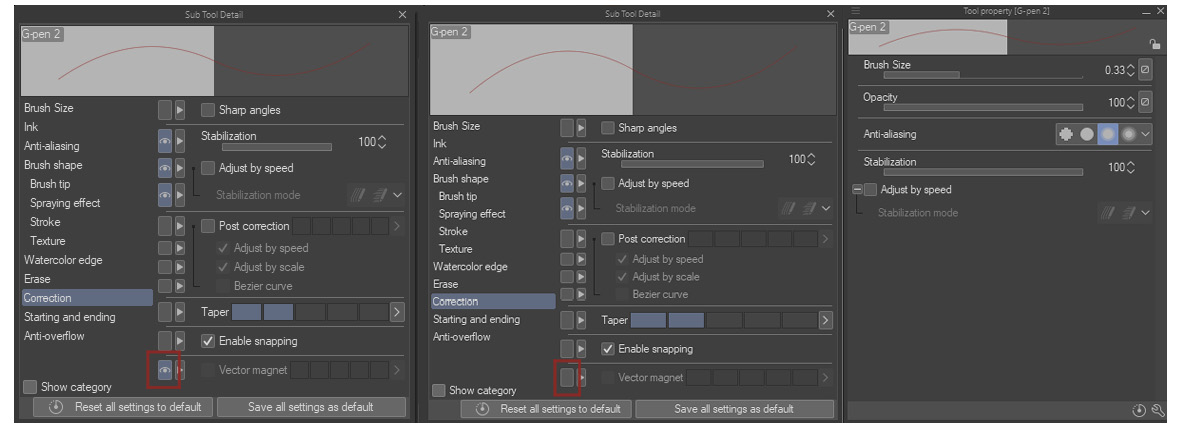
Click on that little wrench and go to Sub Tool Detail. Click on Correction, and now we can see a little eye icon over Vector magnet. We just need to click on that, and this will hide the Vector magnet option in the Tool property window:

Figure 2.24 – We just hid Vector magnet from the Tool property window
This gives you a lot of flexibility regarding what you can change in a brush, without having to click on that little wrench icon every time.
Try it yourself
Now, as a little assignment, copy a basic circle-shaped brush, such as Milli pen. Navigate to Sub Tool Detail and try to show these options in the Tool property window of a new brush:
- Brush Size lets you choose the size of the brush.
- Opacity lets you chose the max alpha value of the color you can use while not removing the pen from the tablet.
- Blending mode lets you choose how the color reacts when you draw. For example, a Multiply blending mode will let you shift the color to black.
- Color mixing will activate the mixing of the color while you paint; these three options will control how it will mix:
a) Amount of paint
b) Density of paint
c) Color stretch
- Anti-aliasing lets you have a harder or softer edge to your brush.
- Brush shape lets you choose the shape of the brush.
- Angle lets you decide the angle of the brush tip.
- Brush density is similar to Opacity, but with the difference that it lets you decide the degree of color buildup while you paint without removing the pen from the tablet. If you want a painterly effect, go for this option and not Opacity.
- Stabilization is an in-built stabilization that lets you decide how much you want to smooth your stroke.
Remember that you can find all of those options in the Tool property palette:

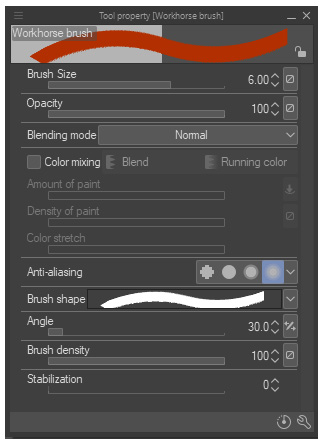
Figure 2.25 – Our Tool property window with all the options
Done? Good! Now, let's go to the next step.
Brush shape
Brush shape is a less-talked-about option in the CSP brush engine that can help you greatly, as it lets you save and load your brush options without going through your material brush tips and options.
Now, when using block colors or creating silhouettes, or if you want to have a certain degree of control when it comes to your shape edge, you need to toggle between some brushes. Usually, those are square, circle, and triangle brushes. With the Brush shape option, you can toggle between them with just a click:

Figure 2.26 – From left to right, circle pen, square pen, and triangle pen
As you can see, those brushes give different characteristics to the edge of your shape. Which one to use is based completely on personal preferences… But how do we save and load the brush options? Let's take a look:
- First of all, create a square and a triangle brush tip. I recommend using the Polygon tool:

Figure 2.27 – Tool property of the Polygon tool—if you switch between these options, you can have a square and a triangle
- Now take your previously copied Milli pen and click on the usual little wrench icon, then go to the Brush shape option.
- Now click on Register to preset. After this, click on that other little wrench icon below the brush shapes to change the name and call it Round Brush:

Figure 2.28 – Brush shape option
Now you've saved this brush shape.
- Now go to Brush tip and add your square brush tip as a material.
- Go to Brush shape, save it, and rename it Square Brush.
- Now do the same thing with the triangle brush and rename it Triangle Brush.
Now, every time you need to change your brush tip, you just need to click on Brush shape in Tool property and you can change it. Plus, you have all the options to modify the type of brush you're using. You can also switch easily between an inking brush and a painting brush with a single click:

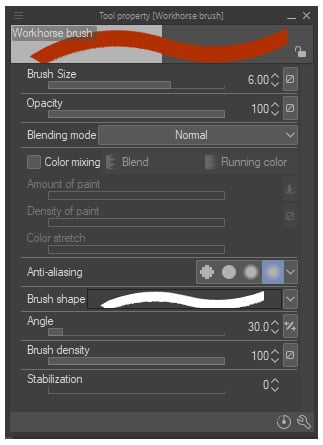
Figure 2.29 – Our workhorse tool property, as a reminder for the example
If you want to do this, it is a similar process to the steps previously followed. You just need to click on color mixing. And that's it, you have your painting brush.
Now, when I say "with a single click," I really mean it. You can link every window to a shortcut that will make that window appear under your pen.
To do so, you need to do the following:
- Go to File | Shortcut Settings.
- Click on Setting area and change it to Pop-up palette:

Figure 2.30 – Shortcut settings categories
- Now select Tool property and bind it to a shortcut.
Now every time you press that shortcut, Tool property will come up right under your pen. This works for every window you can think of, from Color Wheel to Layer. This is a pretty unique feature of CSP that lets you hide a lot of information from your monitor, without it being out of reach. For example, I don't need Color Wheel all the time, only when I need to change the color. This is really useful if you have a small monitor or a dual-monitor setup.
We will see how to use this little workhorse brush in Chapter 7, Making Your Own Illustration, Chapter 8, Creating Your Own Comic, and Chapter 9, Building Your Own Concept Art.


