Installing the Community Starter Kit
Before moving on to the installation details, make sure you have met the necessary system requirements:
.NET Framework version 1.0 or 1.1
Windows 2000, Windows XP Professional Edition, or Windows Server 2003
SQL Server 2000 or MSDE 2000
Internet Information Services (IIS)
Note
You can’t use the CSK with Windows XP Home Edition because it doesn’t include IIS.
Before installing the starter kit, make sure you have the appropriate software and hardware environment. If you don’t have SQL Server, you can install it from the Visual Studio .NET kit or from its official homepage, http://www.microsoft.com/sql/msde/. You can install IIS by going to the Windows Components Wizard located at Control Panel | Add/Remove Programs | Add/Remove Windows Components.
Once you have your system ready for the CSK, it’s time to download the starter kit from http://www.asp.net/starterkits.
Note
Before downloading the starter kit, you are offered the option to create a user account for the ASP.NET Forums. The CSK discussions provide useful insight about developing solutions using the CSK.
After you go to the Download Starter Kit link in the CSK section, you’ll need to choose what version of the starter kit to download.
There are six versions of the CSK available for download for the three standard .NET languages provided by Microsoft: C#, VB.NET, and J#. For each of these languages, you can download the SDK version or the VS (Visual Studio .NET) version. The SDK version doesn’t use code-behind files and is more appropriate for development environments like Web Matrix.
Note
Web Matrix is a free ASP.NET development tool that you can download from http://www.asp.net/webmatrix and its installer kit is only 1.3 MB. It doesn’t support all the features you can find in Visual Studio .NET, such as support for code-behind files, IntelliSense, or debugging, but can be very useful for developing small ASP.NET applications. For more information about Web Matrix, visit: http://aspnet.4guysfromrolla.com/articles/061803-1.aspx or http://www.aspnetpro.com/productreviews
There is no difference in functionality between the different versions of the starter kit. The only difference is the language they’re written in and the way they are packaged.
This book focuses on the CSVS version of the starter kit, which is a C# ASP.NET web application for Visual Studio .NET. The file download for this starter kit is named ASP.NET Community (CSVS) Installer v1.0.msi.
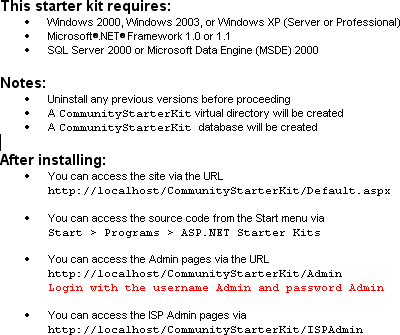
After downloading the MSI file, the installation shouldn’t raise any problems. At the beginning, you’re presented with some useful details about the system requirements and the installation location:

The actual web locations, admin name, and password may differ since you have the option to change them during installation.
After accepting the license agreement for Microsoft ASP.NET Starter Kit, you’ll have the option to specify:
1. The physical location on the hard drive where the CSK files will be installed:

2. The web location where the starter kit will install. For this book, we suggest that you leave the default virtual directory name (Community Starter Kit) unchanged, making it accessible through http://computername/CommunityStarterKit. However, changing the web folder name won’t make much of a difference.

3. The MSDE or SQL Server login information that will be used by the installer to create the necessary database objects. Obviously, the user account you specify must have permissions to create databases or objects in a specific database (if you’ll choose to use an existing database).

4. The name of the CSK database. You can choose to create a new database (which is the recommended option if you have the necessary privileges), or you can use an already existing database.

5. The login information that the CSK will use to access the CommunityStarterKit database. This doesn’t have to be the same as what you supplied earlier when installing the database. Here you can supply a username with rights only to the CommunityStarterKit database.

6. ISP admin username and ISP admin password data (which, by default, are ISPAdmin and ISPPassword respectively), and community admin username and community admin password (by default, both are Admin).
Note
A single CSK installation can support multiple communities. During the setup, the installer creates a single sample community whose administrator account is Admin. Admin is a local community account and has privileges only inside its community. The ISPAdmin account, on the other hand, is not part of any community. ISPAdmin is used to access the ISP administration pages, where you can manage the communities in the CSK installation.
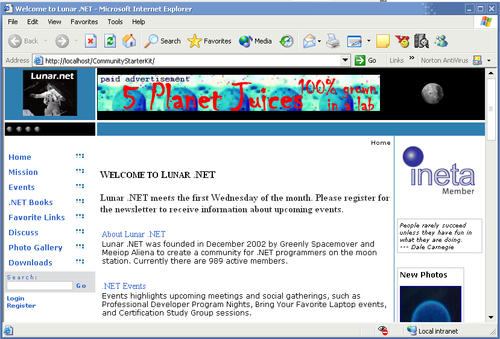
That’s it—the CSK is now ready for action! The installer also populates the database with a sample community named Lunar .NET (an imaginary community for .NET programmers on the moon station) that you can see in action right away. If you haven’t changed the default virtual directory name, you can visit the Lunar .NET community at http://localhost/CommunityStarterKit:

Note
Generally, the installation process works well; however, there have been some reports on the ASP.NET forums with problems installing the kit. Typical problems are related to the connection string used to access the CommunityStarterKit database. The connection string is stored in the Web.Config file in the CSK project folder. Also, the CSK installer program creates a log file named install.log in the setup folder. This is also a good place to look for the root of your problem.
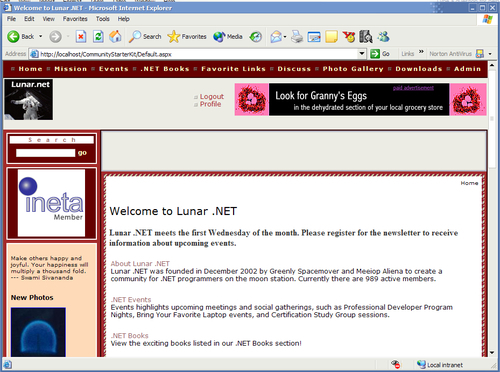
As mentioned earlier in the chapter, you can change the appearance of the website using the administrative interface. This is because the underlying architecture is based on skins. With only a few clicks, it’s possible to completely change the face of the site. The following screenshot shows one of the themes included in the starter kit:


