Preparing the workspace
The first thing we have to do is set up our workstation; it won’t be difficult because we only need a small set of essential tools. These include Visual Studio 2022, an updated Node.js runtime, a development web server (such as the built-in IIS Express), and a decent source code control system, such as Git. We will take the latter for granted as we most likely already have it up and running.
In the unlikely case you don’t, you should really make amends before moving on! Stop reading, go to www.github.com, www.bitbucket.com, or whichever online source code management (SCM) service you like the most, create a free account, and spend some time learning how to effectively use these tools; you won’t regret it, that’s for sure.
In the next sections, we’ll set up the web application project, install or upgrade the packages and libraries, and build and eventually test the result of our work. However, before doing that, we’re going to spend a couple of minutes understanding a very important concept that is required to properly use this book without getting (emotionally) hurt, at least in my opinion.
Disclaimer — do (not) try this at home
There’s something very important that we need to understand before proceeding. If you’re a seasoned web developer, you will most likely know about it already; however, since this book is for (almost) everyone, I feel like it’s very important to deal with this matter as soon as possible.
This book will make extensive use of a number of different programming tools, external components, third-party libraries, and so on. Most of them (such as TypeScript, npm, NuGet, most .NET frameworks/packages/runtimes, and so on) are shipped together with Visual Studio 2022, while others (such as Angular, its required JavaScript dependencies, and other third-party server-side and client-side packages) will be fetched from their official repositories. These things are meant to work together in a 100% compatible fashion; however, they are all subject to changes and updates during the inevitable course of time. As time passes by, the chance that these updates might affect the way they interact with each other, and the project’s health, will increase.
The broken code myth
In an attempt to minimize the chances of broken code occurring, this book will always work with fixed versions/builds of any third-party component that can be handled using the configuration files. However, some of them, such as Visual Studio and/or .NET SDK updates, might be out of that scope and might wreak havoc on the project. The source code might cease to work, or Visual Studio could suddenly be unable to properly compile it.
When something like that happens, a less experienced person will always be tempted to put the blame on the book itself. Some of them may even start thinking something like this: There are a lot of compile errors, hence the source code must be broken!
Alternatively, they may think like this: The code sample doesn’t work: the author must have rushed things here and there and forgot to test what he was writing.
It goes without saying that such hypotheses are rarely true, especially considering the amount of time that the authors, editors, and technical reviewers of these books spend in writing, testing, and refining the source code before building it up, making it available on GitHub, and often even publishing working instances of the resulting applications to worldwide public websites.
The GitHub repository for this book can be found here:
https://github.com/PacktPublishing/ASP.NET-Core-8-and-Angular
It contains a Visual Studio solution file for each chapter containing source code (Chapter_02.sln, Chapter_03.sln, and so on), as well as an additional solution file (All_Chapters.sln) containing the source code for all the chapters.
Any experienced developer will easily understand that most of these things couldn’t even be done if there was some broken code somewhere; there’s no way this book could even attempt to hit the shelves without coming with a 100% working source code, except for a few possible minor typos that will quickly be reported to the publisher and thus fixed within the GitHub repository in a short while. In the unlikely case that it looks like it doesn’t, such as raising unexpected compile errors, the novice developer should spend a reasonable amount of time trying to understand the root cause.
Here’s a list of questions they should try to answer before anything else:
- Am I using the same development framework, third-party libraries, versions, and builds adopted by the book?
- If I updated something because I felt like I needed to, am I aware of the changes that might affect the source code? Did I read the relevant changelogs? Have I spent a reasonable amount of time looking around for breaking changes and/or known issues that could have had an impact on the source code?
- Is the book’s GitHub repository also affected by this issue? Did I try to compare it with my own code, possibly replacing mine?
If the answer to any of these questions is No, then there’s a good chance that the problem is not ascribable to this book.
Stay hungry, stay foolish, yet be responsible as well
Don’t get me wrong: if you want to use a newer version of Visual Studio, update your TypeScript compiler, or upgrade any third-party library, you are definitely encouraged to do that. This is nothing less than the main scope of this book – making you fully aware of what you’re doing and capable of, way beyond the given code samples.
However, if you feel you’re ready to do that, you will also have to adapt the code accordingly; most of the time, we’re talking about trivial stuff, especially these days when you can Google the issue and/or get the solution on Stack Overflow. Have they changed the name of a property or method? Then you need to load the new spelling. Have they moved the class somewhere else? Then you need to find the new namespace and change it accordingly, and so on.
That’s about it – nothing more, nothing less. The code reflects the passage of time; the developer just needs to keep up with the flow, performing minimum changes to it when required. You can’t possibly get lost and blame someone other than yourself if you update your environment and fail to acknowledge that you have to change a bunch of code lines to make it work again.
Am I implying that the author is not responsible for the source code of this book? It’s the exact opposite; the author is always responsible. They’re supposed to do their best to fix all the reported compatibility issues while keeping the GitHub repository updated. However, you should also have your own level of responsibility; more specifically, you should understand how things work for any development book and the inevitable impact of the passage of time on any given source code. No matter how hard the author works to maintain it, the patches will never be fast or comprehensive enough to make these lines of code always work in any given scenario. That’s why the most important thing you need to understand – even before the book’s topics – is the most valuable concept in modern software development: being able to efficiently deal with the inevitable changes that will always occur. Whoever refuses to understand that is doomed; there’s no way around it.
Now that we’ve clarified these aspects, let’s get back to work.
Setting up the project(s)
Assuming we have already installed Visual Studio 2022 and Node.js (as described in Chapter 1, Introducing ASP.NET and Angular), here’s what we need to do:
- Download and install the .NET 8 SDK.
- Check that the .NET CLI will use that SDK version.
- Install the Angular CLI.
- Create a new .NET and Angular project.
- Check out the newly created project within Visual Studio.
- Update all the packages and libraries to our chosen versions.
Let’s get to work.
Installing the .NET 8 SDK
The .NET 8 SDK can be downloaded from either the official Microsoft URL (https://dotnet.microsoft.com/download/dotnet/8.0) or from the GitHub official release page (https://github.com/dotnet/core/tree/master/release-notes/8.0).
The installation is very straightforward – just follow the wizard until the end to get the job done, as follows:
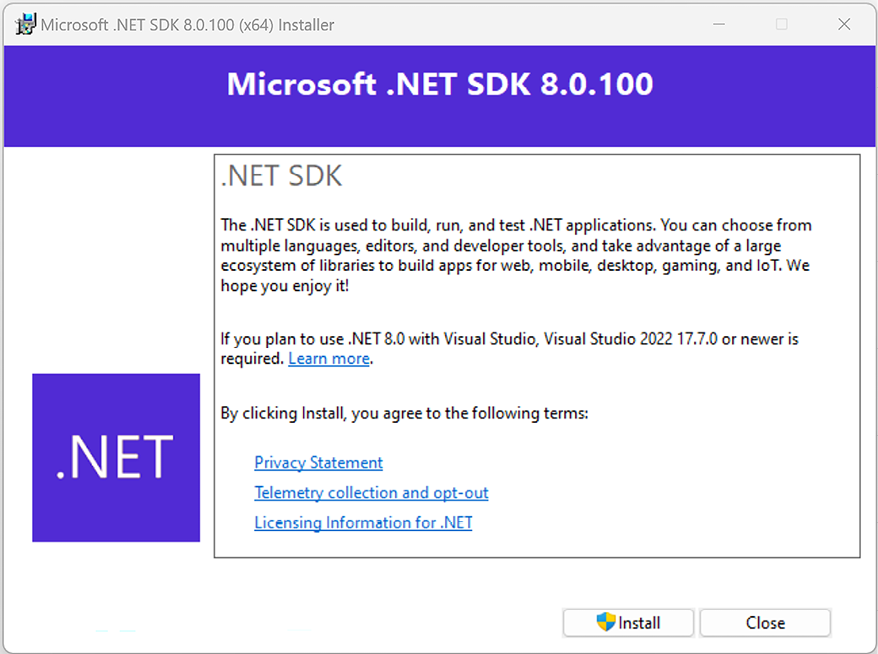
Figure 2.1: .NET SDK 8.0.100 installer
The whole installation process shouldn’t take more than a couple of minutes.
Checking the SDK version
Once the .NET SDK has been installed, we need to confirm that the new SDK PATH has been properly set and/or that the .NET CLI will actually use it. The fastest way to check that is by opening Command Prompt and typing the following:
> dotnet --version
Be sure that the .NET CLI executes without issue and that the version number is the same as we installed a moment ago.
If the prompt is unable to execute the command, go to Control Panel | System | Advanced System Settings | Environment Variables and check that the C:\Program Files\dotnet\ folder is present within the PATH environment variable; manually add it if needed.
Installing Node.js and the Angular CLI
The next thing we must do is to install the Angular Command-Line Interface – better known as the Angular CLI. In order to do that, we have to install Node.js, so that we can access npm and use it to get the official Angular packages.
If you’re on Windows, we strongly suggest installing Node.js using nvm for Windows – a neat Node.js version manager for the Windows system. The tool can be downloaded from the following URL: https://github.com/coreybutler/nvm-windows/releases.
Once Node.js has been installed, the Angular CLI can be installed using the following command:
npm install -g @angular/cli@17.0.3
After doing that, you should be able to type ng -version and get the Angular CLI ASCII logo containing the installed packages version. If that’s not the case, you might have to add the Node.js and/or npm /bin/ folder to your PATH environment variable.
After our frameworks and all the prerequisites have been installed, we can restart your computer (to ensure that everything will be loaded on startup) and go ahead.
Creating the Angular and ASP.NET Core project
Now we can create our first .NET and Angular project – in other words, our first app.
Visual Studio 2022 gives us two built-in options for doing this:
- Use the Standalone TypeScript Angular Template together with the ASP.NET Core Web API template, an approach introduced with the initial release of Visual Studio 2022 that allows to keep the front-end Angular app and the back-end ASP.NET Core API in two separate projects, although fully able to interoperate with each other.
- Use the new Angular and ASP.NET Core Template, a new approach introduced with Visual Studio 2022 v17.8 that allows to achieve the same results as the standalone template, but with less configuration effort.
The two approaches are very similar, and both of them are viable enough since they enforce the good practice of decoupling the front-end and the back-end architecture (as well as codebases), which is a pivotal concept when dealing with SPAs: being able to deal with this “multi-project approach” will definitely help the reader to better understand the distinct underlying logic of both frameworks, not only during development but also when we’ll have to eventually publish and deploy our app(s).
Furthermore, both of them will generate the boilerplate code of the front-end app using the Angular CLI version installed on the computer, which is great, because it means that our source code will be fully compatible (and up to date) with the Angular version that we have installed.
That said, for the purpose of this book we’re going to use the new Angular and ASP.NET Core Template, which will allow us to achieve optimal results with less effort.
Creating the Angular project
Let’s start with the front-end Angular project, which will also provide the name for our Visual Studio 2022 solution.
For those who don’t know the Visual Studio naming conventions, a solution is basically a collection of one or multiple projects: in our multi-project approach we’ll end up having two projects (the front-end Angular App and the back-end ASP.NET Core Web API) within a single solution.
Launch Visual Studio, then click on the Create a new project button: use the search textbox near the top of the window to look for the Angular and ASP.NET Core project template, just like shown in the following screenshot:
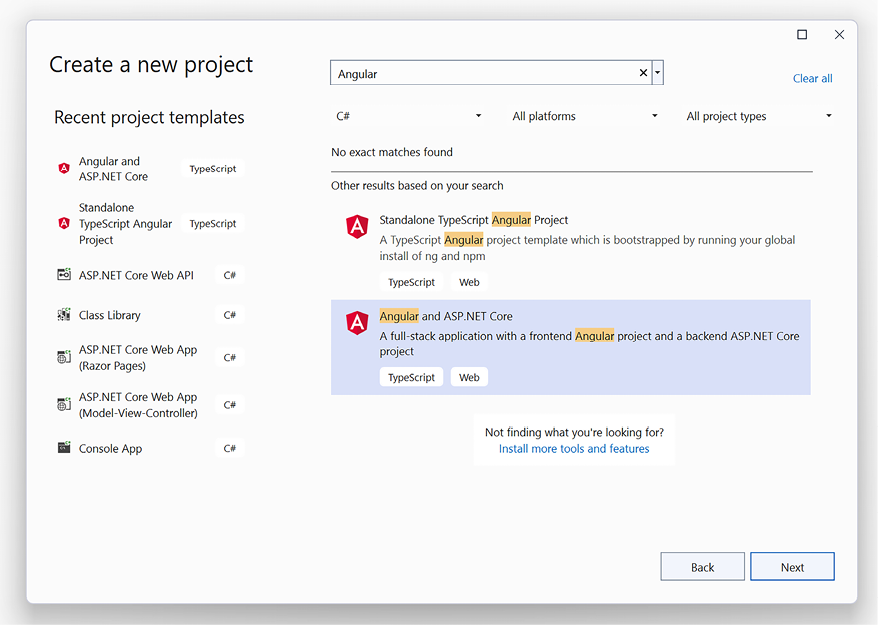
Figure 2.2: Creating a new Standalone TypeScript Angular template
Select that template and click Next to access the Configure your new project screen. In the following screenshot, fill the form with the following values:
- Solution name:
HealthCheck - Location:
C:\Projects\ - Create in new folder: Yes (checked)
There’s a good reason for calling our project HealthCheck, as we’re going to see in a short while (no spoilers, remember?).
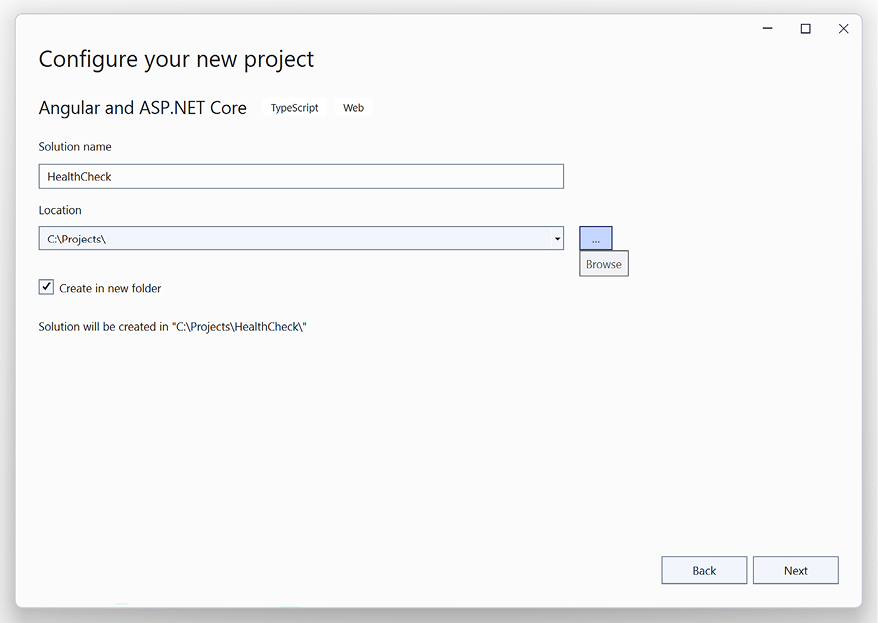
Figure 2.3: Standalone TypeScript Angular Project configuration wizard
It goes without saying that these are only suggested choices. However, in this book we’re going to use these names – which will impact our source code in terms of class names, namespaces, and so on – and \Projects\ as our root folder. Inexperienced developers are strongly advised to use the same names and folder.
Choosing a root-level folder with a short name is also advisable to avoid possible errors and/or issues related to path names being too long: Windows 10 has a 260-character limit that can create some issues with some deeply nested npm packages.
When done, click the Next button again to access the third and last section of the wizard: Additional information.
Here, we need to be sure to choose the .NET 8 Framework, then leave the default options as they already are: Configure for HTTPS: checked, Enable OpenAPI support: checked, Do not use top-level statements: unchecked, Use controllers: checked, as shown in the following screenshot.
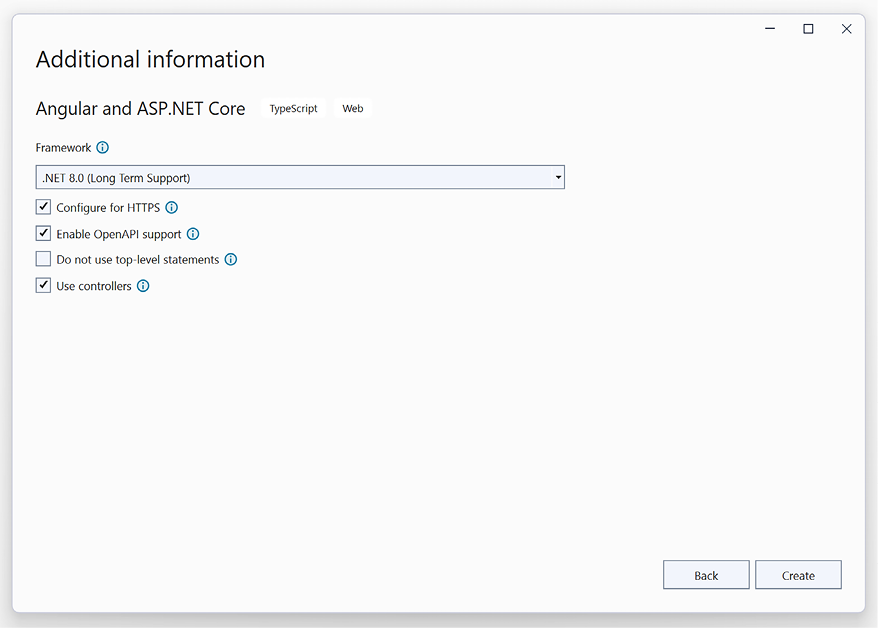
Figure 2.4: ASP.NET Core Web API template configuration wizard
Once this is done, hit Create to complete the wizard. As soon as we do that, Visual Studio will start to create and prepare our new project(s): when everything is set and done, the development GUI will appear with the new solution’s file tree clearly visible in the Solution Explorer window, as shown in the following screenshot:
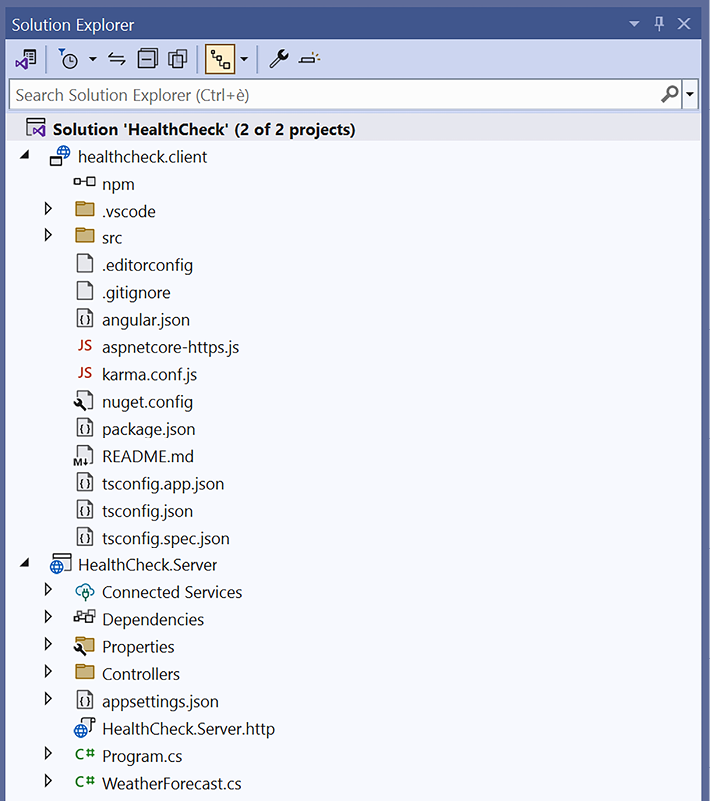
Figure 2.5: Our HealthCheck solution, featuring two distinct projects for client and server
As we can easily expect, our solution is composed of two distinct projects:
- The healthcheck.client project, for the Angular app
- The HealthCheck.Server project, for the ASP.NET Core Web API
Now we have the front-end project and the back-end project ready within the same solution: we just need a few tweaks to their configuration settings to ensure they will be executed together as we want them to do.
Setting up the HTTP and HTTPS ports
From Solution Explorer, open the HealthCheck.Server project node (the ASP.NET one), then open the /Properties/ folder and double-click the launchSettings.json file to open it in the text editor.
Once you’re there, perform the following changes:
- Set all the
"launchBrowser"settings tofalse. - Replace the random-generated HTTP and HTTPS ports with fixed values. We’re going to use
40080for HTTP and40443for HTTPS.
The reason to use fixed ports is that we’ll have to deal with some framework features (such as internal proxies) that require fixed endpoints. In the unlikely event that these ports end up being busy and/or cannot be used, feel free to change them: just be sure to apply the same changes throughout the whole book to avoid getting HTTP 404 errors.
Here’s what our launchSettings.json file should look like after these changes (updated lines are highlighted):
{
  "$schema": "http://json.schemastore.org/launchsettings.json",
  "iisSettings": {
    "windowsAuthentication": false,
    "anonymousAuthentication": true,
    "iisExpress": {
      "applicationUrl": "http://localhost:40080",
      "sslPort": 40443
    }
  },
  "profiles": {
    "http": {
      "commandName": "Project",
      "dotnetRunMessages": true,
      "launchBrowser": false,
      "launchUrl": "swagger",
      "applicationUrl": "http://localhost:40080",
      "environmentVariables": {
        "ASPNETCORE_ENVIRONMENT": "Development",
        "ASPNETCORE_HOSTINGSTARTUPASSEMBLIES": "Microsoft.AspNetCore.SpaProxy"
      }
    },
    "https": {
      "commandName": "Project",
      "dotnetRunMessages": true,
      "launchBrowser": false,
      "launchUrl": "swagger",
      "applicationUrl": "https://localhost:40443;http://localhost:40080",
      "environmentVariables": {
        "ASPNETCORE_ENVIRONMENT": "Development",
        "ASPNETCORE_HOSTINGSTARTUPASSEMBLIES": "Microsoft.AspNetCore.SpaProxy"
      }
    },
    "IIS Express": {
      "commandName": "IISExpress",
      "launchBrowser": false,
      "launchUrl": "swagger",
      "environmentVariables": {
        "ASPNETCORE_ENVIRONMENT": "Development",
        "ASPNETCORE_HOSTINGSTARTUPASSEMBLIES": "Microsoft.AspNetCore.SpaProxy"
      }
    }
  }
}
Now we just need to tell Visual Studio how to properly run our projects.
Setting the startup project(s)
Since we are dealing with two projects that need to work together, we need to make good use of one of the most important, yet less-known features introduced with the latest versions of Visual Studio, at least for SPAs: the ability to set up multiple startup projects.
It’s worth noting that, in the latest versions of Visual Studio 2022, the following settings should be already OK, but it’s better to check that this is the case.
From Solution Explorer, right-click on the HealthCheck solution (the top-level node) and select Configure Startup Projects, then perform the following steps:
- In the modal window that opens, ensure that the startup project radio button is set to Multiple startup projects, and that the Action column value is set to Start for both of our projects.
- Ensure that the HealthCheck.Server (ASP.NET) project is placed above the healthcheck.client (Angular) project, so that it will be launched first. If that’s not the case, operate with the two arrows to the right to achieve that result.
Here’s what the Multiple startup project settings should look like after these changes:
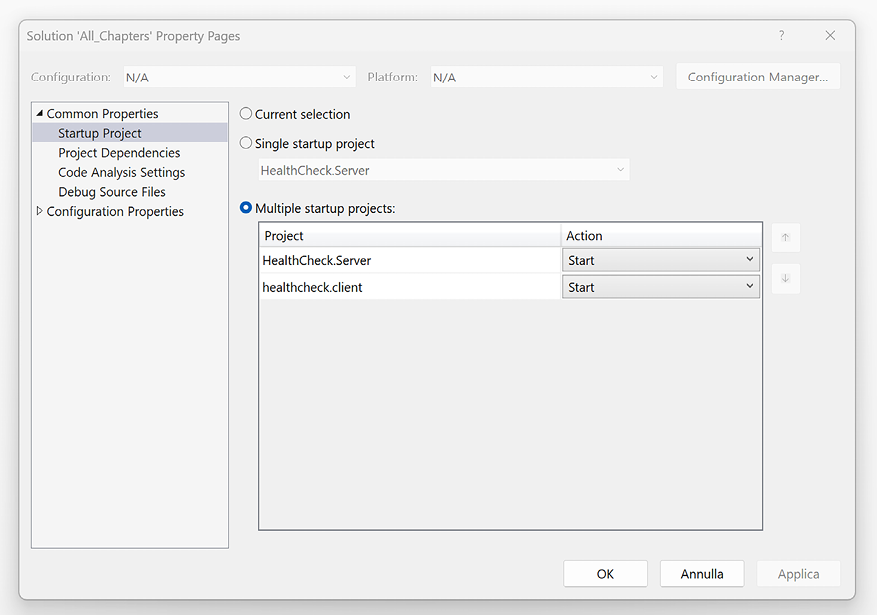
Figure 2.6: Solution ‘HealthCheck’ startup project settings window
Once this is done, we can move to the next (and last) step. Remember when we said that we would be dealing with fixed endpoints? Here’s the first one we need to take care of.
From the HealthCheck project, open the /src/proxy.conf.js file, which is the configuration file for the proxy that will be used by the Angular development server to reach our ASP.NET API project URLs when running our projects in Debug mode. Don’t worry about these concepts for now; we’ll explain them in a short while. For the time being, we just need to ensure that the proxy will route the API requests to the correct URL, including the HTTPS port.
For that reason, change the target URL to match the fixed HTTPS port that we’ve configured in the ASP.NET Core API project, which should be 40433 (unless we chose a different one):
const PROXY_CONFIG = [
  {
    context: [
      "/weatherforecast",
    ],
    target: "https://localhost:40443",
    secure: false
  }
]
module.exports = PROXY_CONFIG;
Let’s take the chance to choose a fixed HTTPS port for the Angular development server as well.
Open the /.vscode/launch.json file and change the default HTTPS port to 4200, as shown in the following highlighted code:
{
  "version": "0.2.0",
  "configurations": [
    {
      "type": "edge",
      "request": "launch",
      "name": "localhost (Edge)",
      "url": "https://localhost:4200",
      "webRoot": "${workspaceFolder}"
    }
    {
      "type": "chrome",
      "request": "launch",
      "name": "localhost (Chrome)",
      "url": "https://localhost:4200",
      "webRoot": "${workspaceFolder}"
    },
  ]
}
IMPORTANT: Your launch.json file might be different if you have Chrome and/or MS Edge installed. Just keep the configuration blocks for the browser you have on your system and plan to use to debug your app and remove (or avoid adding) the others, otherwise your project will crash on startup. In this book, we’re going to use Chrome and MS Edge, hence we’ll keep the file as it is.
Now we’re finally ready to launch our project(s) and see how well they work together: this is what the next section is all about.
Performing a test run
The best way to see if our multi-project is working as expected is to perform a quick test run by launching our projects in Debug mode. To do that, hit the Visual Studio Start button or the F5 key to start downloading the required npm dependencies, compiling, and eventually running our app.
After a few seconds, we’ll be asked to trust a self-signed certificate that ASP.NET Core will generate to allow our app to be served through HTTPS (as shown in the following screenshot). Let’s just click Yes to continue.
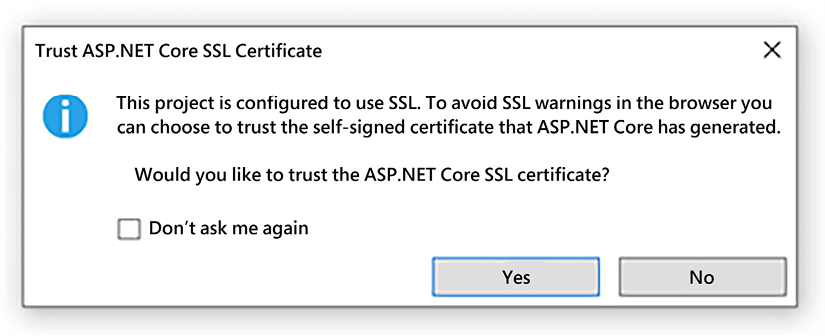
Figure 2.7: Trust ASP.NET Core SSL Certificate popup
If we don’t want to have to authorize the ASP.NET Core self-signed SSL certificates, we can flag the Don’t ask me again checkbox right before hitting Yes.
Right after that, Visual Studio will launch three separate processes:
- The ASP.NET Core Server, a web server that will serve the server-side APIs. This web server will be Kestrel (the default) or IIS Express, depending on the project configuration. Either of them will work for our purposes since we’ve wisely configured both to use the same fixed endpoints and HTTP/HTTPS ports:

Figure 2.8: Kestrel web server for the ASP.NET Core Web API project
- The Angular Live Development Server, a console application acting as a web server that will host our Angular application’s files using the
ng servecommand from the Angular CLI:
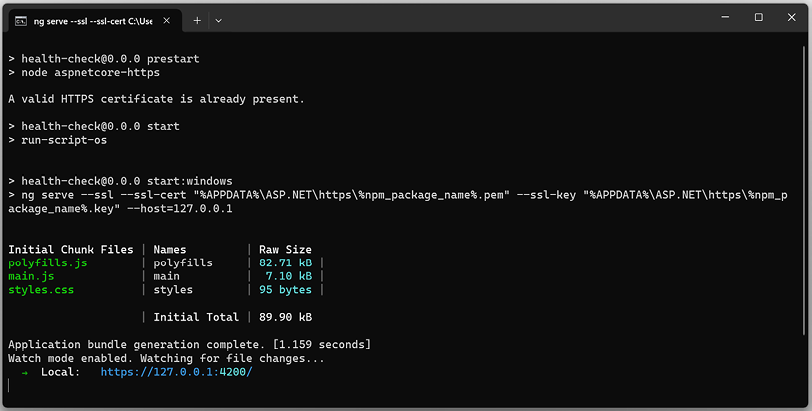
Figure 2.9 Angular Live Development Server for the Standalone TypeScript Angular project
- Our favorite web browser, such as MS Edge, Mozilla Firefox, or Google Chrome (we’re going to use MS Edge from now on), which will interact with the Angular Live Development Server through the fixed HTTPS endpoint we configured a while ago:
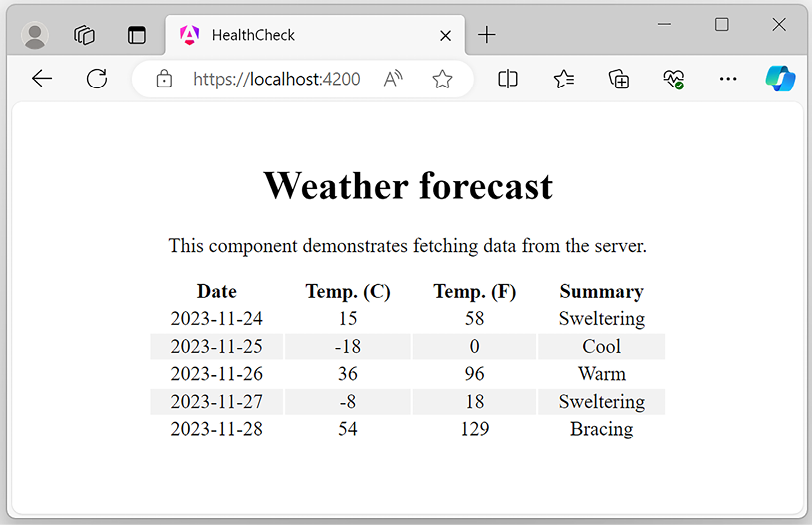
Figure 2.10: MS Edge web browser for the Standalone TypeScript Angular project
The page we’re going to see in the web browser shows a basic Angular component performing a simple data fetching retrieval task from the ASP.NET Core Web API project: a tiny, yet good (and fully working) example of what we’ll be doing from now on.
What we just did was an excellent consistency check to ensure that our development system is properly configured. If we see the page shown in the preceding screenshot, it means that we’re ready to move on.
Troubleshooting
In the unlikely case we don’t, it probably means that we’re either missing something or that we’ve got some conflicting software preventing Visual Studio and/or the underlying .NET and Angular CLIs from properly compiling the project. To fix that, we can try to do the following:
- Uninstall/reinstall Node.js, as we possibly have an outdated version installed.
- Uninstall/reinstall Visual Studio, as our current installation might be broken or corrupted. The .NET SDK should come shipped with it already; however, we can try reinstalling it as well.
If everything still fails, we can try to install Visual Studio and the previously mentioned packages in a clean environment (either a physical system or a VM) to overcome any possible issues related to our current operating system configuration.
If none of these attempts work, the best thing we can do is to ask for specific support on the .NET community forums at https://forums.asp.net/default.aspx/7?General+ASP+NET.
Architecture overview
Before moving on to the next chapter, let’s take a couple more minutes to fully understand the underlying logic behind the development environment that we’ve just built.
We’ve already seen that when Visual Studio starts our projects in the development environment, three processes are launched: the standalone Angular project (healthcheck.client), the ASP.NET Core Web API (HealthCheck.Server), and the web browser that will interact with them.
Here’s a simple diagram that summarizes how these three processes work together and interact with each other:
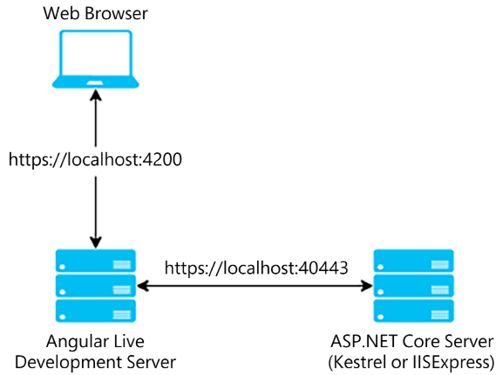
Figure 2.11: healthcheck.client (front-end) and HealthCheck.Server (back-end) interaction in the development setup
As we can see from the previous diagram, the web browser will call the Angular Live Development Server (which listens to HTTPS port 4200), which will deal with them in the following way:
- Directly serve all the requests for the Angular pages and static resources.
- Proxy all the API requests to the Kestrel web server hosting the ASP.NET Core Web API (which listens to the HTTPS port
40443).
It’s important to understand that the Angular Live Development Server is only meant for local development, where it will allow the use of most debug tools and greatly speed up the coding experience with features such as hot reload. Whenever we want to deploy our app(s) in production, or in any environment other than local development, we’re going to build our app into production bundles and deploy them to a web server (or a CDN) that will basically take its place in the preceding diagram. We’ll talk about all this extensively in Chapter 15, Windows, Linux, and Azure Deployment, when we’ll learn how to publish our apps.


