Using Blender's sculpting tools
You already understand the basic concepts of 3D sculpting. But now, let's explore how the 3D sculpting tools work in more detail. This section serves as a reference and is not meant to be practical.
Blender is excellent at 3D sculpting on meshes. When you select the Sculpture Workspace tab from the top bar, Blender automatically switches to Sculpture Mode, and the user interface changes to reflect this.
For this section, it is recommended that you use a graphics tablet and pressure-sensitive pen (also known as a stylus). That is because it makes sculpting more intuitive since we are primarily dealing with organic forms.
If you don't have a graphics tablet and stylus, don't worry – you can still follow along with the practical sculpture tutorial in Chapter 3, Let's Sculpt an Alien Plant!. Everything will still work, even if you are using a mouse instead of a stylus.
A good analogy of the digital sculpture experience would be to say that your stylus (or mouse) acts like a brush that deforms the digital clay (mesh). Depending on the tool you select, the brush affects the mesh differently.
You now know more about the Sculpture Workspace tab in Blender and the computer hardware that is used for 3D sculpting.
In the next section, we will explore the brush settings in detail.
Note
The sculpting brushes and tools that we will cover in this chapter are those that we will use in a tutorial in Chapter 3, Let's Sculpt an Alien Plant!. In the Further reading section, you will find a link to download Additional Content Volume 1 – More Blender Tools and Modifiers.pdf. This is a document in which I have covered more sculpting brushes and functions.
Brush settings
Because the basis of 3D sculpting is brush-based, we will first look at the brush settings.
The settings you should look at are Radius, Strength, and the positive or negative direction, which are indicated by + and - in the Header bar menu, respectively.
The default brush shortcuts are as follows:
- F for Radius (brush size).
- Shift + F for Strength.
- Hold Ctrl to toggle the negative (-) direction (inwards from the surface).
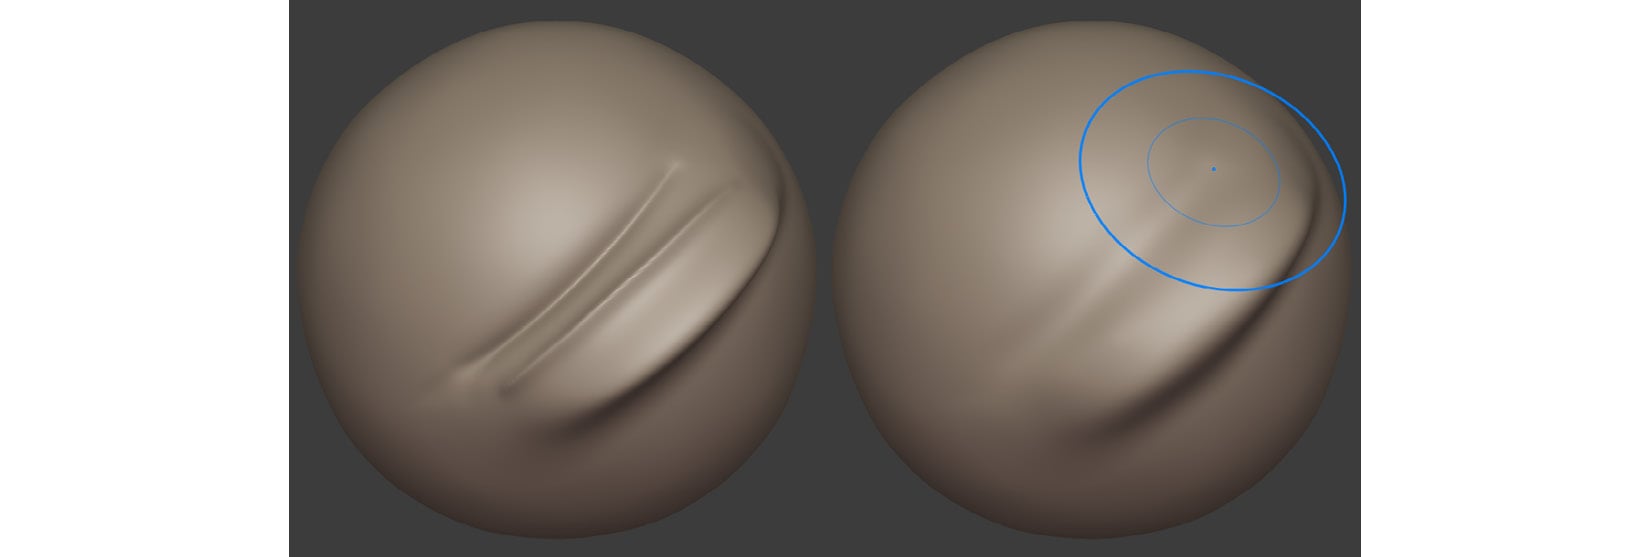
- Hold Shift to toggle the Smoothing Function while sculpting, as shown in Figure 1.24.This function works with the Draw brush, Draw Sharp brush and Inflate brush, which we will cover shortly. The Smoothing Function does not work on all brushes.
By default, the brush effect is in the positive (+) direction (pushes away from the surface):

Figure 1.20 – The Brush settings in the Header toolbar
You now have a good understanding of the brush settings that are used for 3D sculpting. In the next section, we will look at a function in Blender that is used to replace your geometry with new geometry.
Remesh
The Remesh function allows you to completely replace your existing mesh surface with a new, evenly spread-out mesh surface.
The reason you should use Remesh to replace your mesh's geometry is that during 3D sculpting, some of the geometry will become stretched (and give bad results for sculpting later). Remesh provides non-stretched geometry. Let's take a look at how we can use this function:
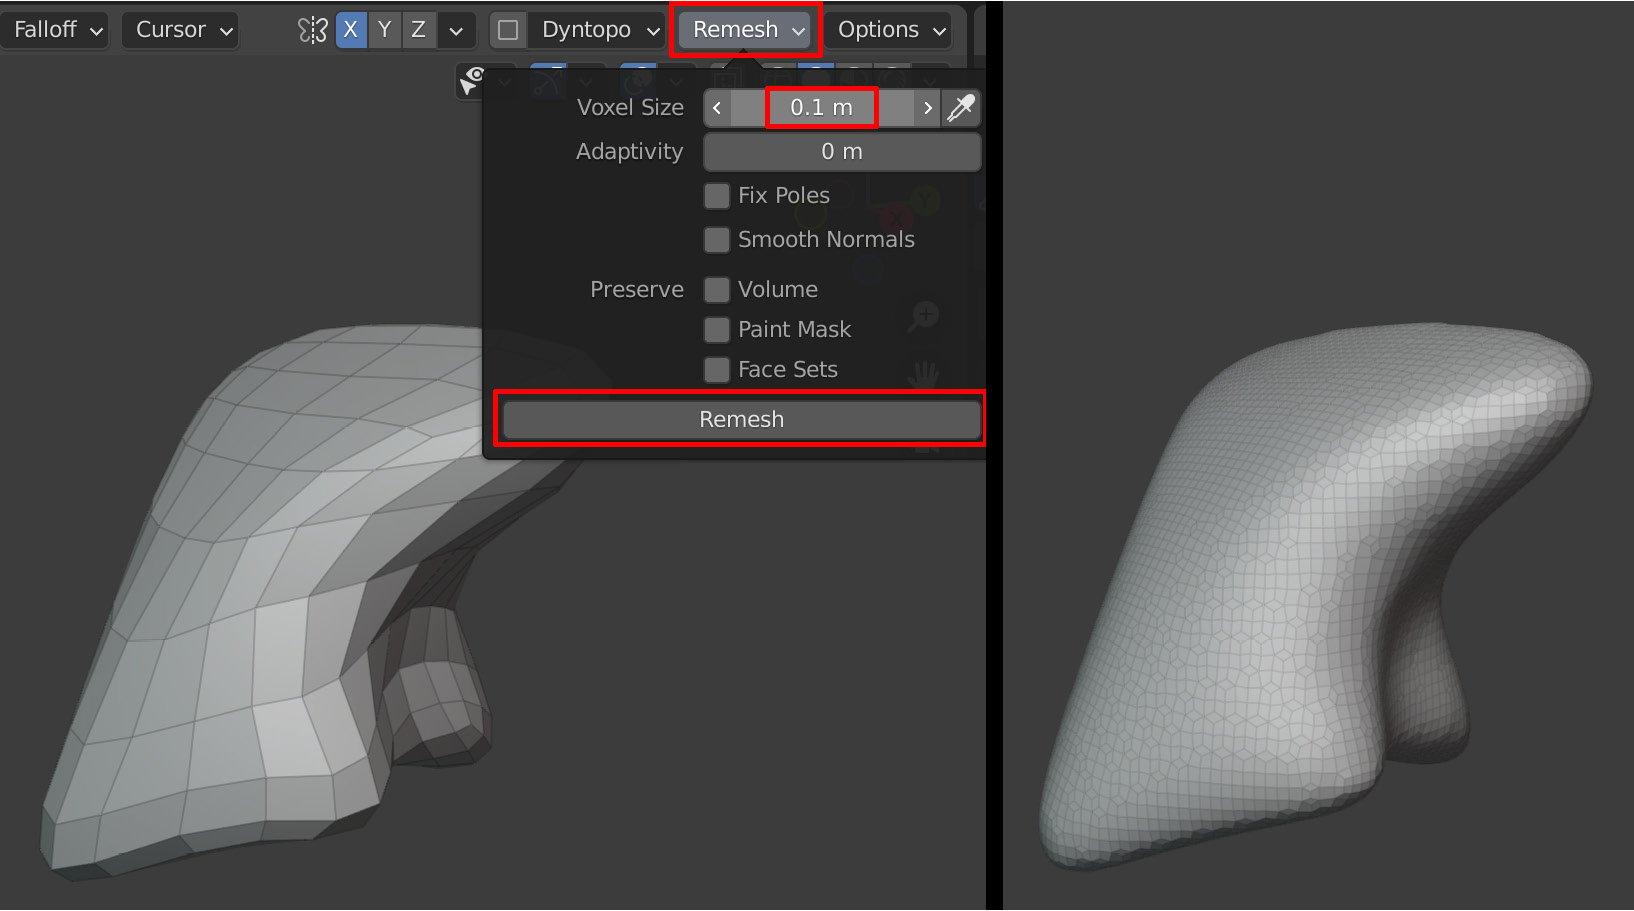
- Click on Remesh in the Header bar, as shown in the following screenshot:
- The density of this new mesh surface is dependent on the Voxel Size setting in the Remesh drop-down menu (the smaller the number, the denser the mesh). In the following screenshot, I have set Voxel Size to
0.1for illustration purposes. The Voxel Size number you should use depends on what your computer system can handle, so adjust this number accordingly. - Use the Ctrl + R shortcut to apply a remesh to your mesh. Alternatively, you can press the Remesh button at the bottom of the Remesh drop-down menu (highlighted in the following screenshot). Here, the mesh on the left is the original mesh, while the mesh on the right-hand side has been remeshed using a Voxel Size of
0.1:

Figure 1.21 – (A) Applying Remesh to your mesh; (B) The result of using Remesh on your mesh
Figure 1.21, part A, shows a low geometric-density Sphere mesh that has been deformed. Because the face count is quite low, the mesh looks angular.
The Sphere mesh on the right-hand side has been remeshed with a higher density surface. This replaced the previous mesh surface with a new, evenly spaced-out mesh surface (the model on the right). Higher density surfaces are much better for 3D sculpting.
In this section, you learned how to use Remesh to replace stretched geometry or to provide denser geometry for your sculpts.
In the next section, we will explore how to use Blender's sculpting brushes.
Blender's sculpting brushes
In this section, we will go through all the 3D sculpting brushes that will be used in Chapter 3, Let's Sculpt an Alien Plant!.
Let's start with the Draw brush.
Draw brush
This is the default brush that is selected when you launch the Sculpture Workspace. This brush has a soft fall-off. Negative mode (-) pushes in the surface instead of pulling it out, as shown on the right-hand side of the following screenshot. To use this tool, either press X on your keyboard or select the Draw brush icon from the toolbar:

Figure 1.22 – (Left) Using the Draw brush; (Right) The Draw brush icon
Draw Sharp brush
This is used to carve sharp cuts. This brush has a sharp fall-off. Negative mode (-) pulls up a sharp crease on the surface instead of carving it in, as shown on the right-hand side of the following screenshot. To use this tool, either press Spacebar + 1 on your keyboard or select the Draw Sharp icon from the toolbar:

Figure 1.23 – (Left) Using the Draw Sharp brush; (Right) The Draw Sharp icon
The Brush Smoothing function
The Draw brush, Draw Sharp brush, and Inflate brush all have a smoothing function when you hold Shift while doing 3D sculpting:

Figure 1.24 – Using the Brush Smoothing function
Inflate brush
This brush inflates the surface or deflates it in negative (-) mode. To use this tool, either press I on your keyboard or select the Inflate brush icon from the toolbar:

Figure 1.25 – (Left) Using the Inflate brush; (Right) The Inflate brush icon
Mask brush
You can paint a mask on an area on the surface of a mesh to block or limit the effect of manipulation of that area (by other brushes). To use this tool, press M on your keyboard or select the Mask brush icon from the toolbar. Holding Ctrl while painting will remove the masked area under the brush:

Figure 1.26 – (Left) (A) Painting a mask on a mesh; (B) The masking effect in action, demonstrated by brushing over the masked area with the Draw brush; (Right) The Mask brush icon
Pressing A brings up the Masking Pie menu, which contains many options for your mask, such as Sharpen Mask, Grow Mask, Shrink Mask, Decrease Contrast, Invert Mask, and Clear Mask.
In this section, you learned about the different brushes that will be used in the tutorial for Chapter 3, Let's Sculpt an Alien Plant!.
However, there are some more sculpting functions in the sculpting toolbar. We will explore these functions in the next section.


