Getting to grips with 3D
Let's take a look at the crucial elements of 3D worlds, and how Unity lets you develop games in three dimensions.
Coordinates
If you have worked with any 3D application before, you'll likely be familiar with the concept of the Z-axis . The Z-axis, in addition to the existing X for horizontal and Y for vertical, represents depth. In 3D applications, you'll see information on objects laid out in X, Y, Z format—this is known as the Cartesian coordinate method . Dimensions, rotational values, and positions in the 3D world can all be described in this way. In this book, as in other documentation of 3D, you'll see such information written with parenthesis, shown as follows:
(3, 5, 3)
This is mostly for neatness, and also due to the fact that in programming, these values must be written in this way. Regardless of their presentation, you can assume that any sets of three values separated by commas will be in X, Y, Z order.
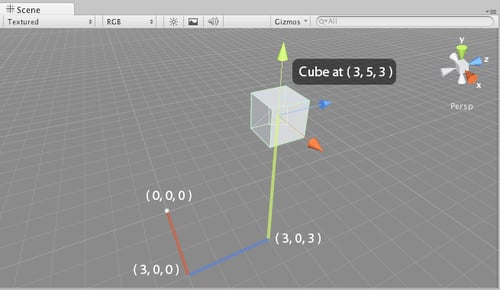
In the following image, a cube is shown at location (3,5,3) in the 3D world, meaning it is 3 units from 0 in the X-axis, 5 up in the Y-axis, and 3 forward in the Z-axis:

Local space versus world space
A crucial concept to begin looking at is the difference between local space and world space. In any 3D package, the world you will work in is technically infinite, and it can be difficult to keep track of the location of objects within it. In every 3D world, there is a point of origin, often referred to as the 'origin' or 'world zero', as it is represented by the position (0,0,0).
All world positions of objects in 3D are relative to world zero. However, to make things simpler, we also use local space (also known as object space) to define object positions in relation to one another. These relationships are known as parent-child relationships. In Unity, parent-child relationships can be established easily by dragging one object onto another in the Hierarchy. This causes the dragged object to become a child, and its coordinates from then on are read in terms relative to the parent object. For example, if the child object is exactly at the same world position as the parent object, its position is said to be (0,0,0), even if the parent position is not at world zero.
Local space assumes that every object has its own zero point, which is the point from which its axes emerge. This is usually the center of the object, and by creating relationships between objects, we can compare their positions in relation to one another. Such relationships, known as parent-child relationships, mean that we can calculate distances from other objects using local space, with the parent object's position becoming the new zero point for any of its child objects.
This is especially important to bear in mind when working on art assets in 3D modelling tools, as you should always ensure that your models are created at 0,0,0 in the package that you are using. This is to ensure that when imported into Unity, their axes are read correctly.
We can illustrate this in 2D, as the same conventions will apply to 3D. In the following example:
The first diagram (i) shows two objects in world space. A large cube exists at coordinates(3,3), and a smaller one at coordinates (6,7).
In the second diagram (ii), the smaller cube has been made a child object of the larger cube. As such the smaller cube's coordinates are said to be (3,4), because its zero point is the world position of the parent.

Vectors
You'll also see 3D vectors described in Cartesian coordinates. Like their 2D counterparts, 3D vectors are simply lines drawn in the 3D world that have a direction and a length. Vectors can be moved in world space, but remain unchanged themselves. Vectors are useful in a game engine context, as they allow us to calculate distances, relative angles between objects, and the direction of objects.
Cameras
Cameras are essential in the 3D world, as they act as the viewport for the screen.
Cameras can be placed at any point in the world, animated, or attached to characters or objects as part of a game scenario. Many cameras can exist in a particular scene, but it is assumed that a single main camera will always render what the player sees. This is why Unity gives you a Main Camera object whenever you create a new scene.
Projection mode—3D versus 2D
The Projection mode of a camera states whether it renders in 3D (Perspective) or 2D (Orthographic). Ordinarily, cameras are set to Perspective Projection mode, and as such have a pyramid shaped Field of View (FOV). A Perspective mode camera renders in 3D and is the default Projection mode for a camera in Unity. Cameras can also be set to Orthographic Projection mode in order to render in 2D—these have a rectangular field of view. This can be used on a main camera to create complete 2D games or simply used as a secondary camera used to render Heads UpDisplay (HUD) elements such as a map or health bar.
In game engines, you'll notice that effects such as lighting, motion blurs, and other effects are applied to the camera to help with game simulation of a person's eye view of the world—you can even add a few cinematic effects that the human eye will never experience, such as lens flares when looking at the sun!
Most modern 3D games utilize multiple cameras to show parts of the game world that the character camera is not currently looking at—like a 'cutaway' in cinematic terms. Unity does this with ease by allowing many cameras in a single scene, which can be scripted to act as the main camera at any point during runtime. Multiple cameras can also be used in a game to control the rendering of particular 2D and 3D elements separately as part of the optimization process. For example, objects may be grouped in layers, and cameras may be assigned to render objects in particular layers. This gives us more control over individual renders of certain elements in the game.
Polygons, edges, vertices, and meshes
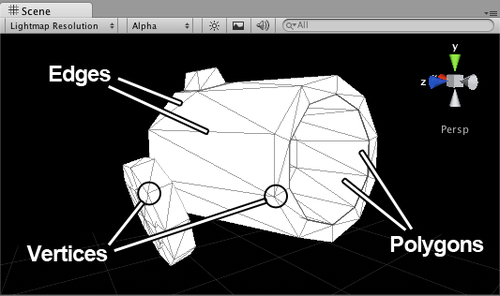
In constructing 3D shapes, all objects are ultimately made up of interconnected 2D shapes known as polygons. On importing models from a modeling application, Unity converts all polygons to polygon triangles. By combining many linked polygons, 3D modeling applications allow us to build complex shapes, known as meshes. Polygon triangles (also referred to as faces) are in turn made up of three connected edges. The locations at which these edges meet are known as points or vertices.

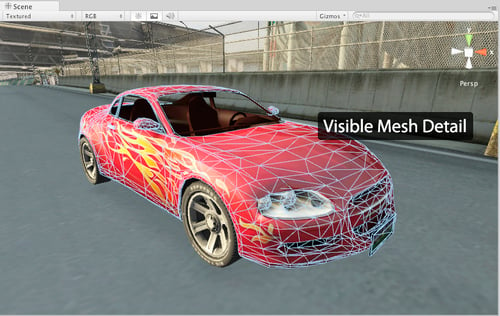
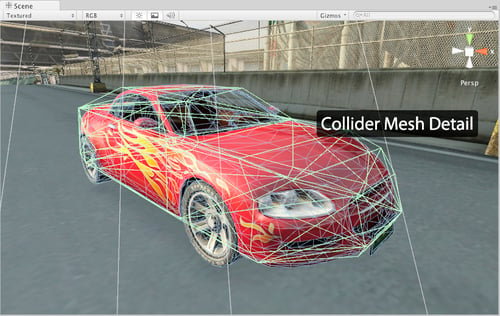
By knowing these locations, game engines are able to make calculations regarding the points of impact, known as collisions, when using complex collision detection with Mesh Colliders, such as in shooting games to detect the exact location at which a bullet has hit another object. In addition to building 3D shapes that are rendered visibly, mesh data can have many other uses. For example, it can be used to specify a shape for collision that is less detailed than a visible object, but roughly the same shape. This can help save performance as the physics engine needn't check a mesh in detail for collisions. This is seen in the following image from the Unity car tutorial, where the vehicle itself is more detailed than its collision mesh:

In the second image, you can see that the amount of detail in the mesh used for the collider is far less than the visible mesh itself:

In game projects, it is crucial for the developer to understand the importance of the polygon count. The polygon count is the total number of polygons, often in reference to models, but also in reference to props, or an entire game level (or in Unity terms, 'Scene'). The higher the number of polygons, the more work your computer must do to render the objects onscreen. This is why we've seen an increase in the level of detail from early 3D games to those of today. Simply compare the visual detail in a game such as id's Quake(1996) with the details seen in Epic's Gears Of War (2006) in just a decade. As a result of faster technology, game developers are now able to model 3D characters and worlds, for games that contain a much higher polygon count and resultant level of realism, and this trend will inevitably continue in the years to come. This said, as more platforms emerge such as mobile and online, games previously seen on dedicated consoles can now be played in a web browser thanks to Unity. As such, the hardware constraints are as important now as ever, as lower powered devices such as mobile phones and tablets are able to run 3D games. For this reason, when modeling any object to add to your game, you should consider polygonal detail, and where it is most required.
Materials, textures, and shaders
Materials are a common concept to all 3D applications, as they provide the means to set the visual appearance of a 3D model. From basic colors to reflective image-based surfaces, materials handle everything.
Let's start with a simple color and the option of using one or more images—known as textures. In a single material, the material works with the shader, which is a script in charge of the style of rendering. For example, in a reflective shader, the material will render reflections of surrounding objects, but maintain its color or the look of the image applied as its texture.
In Unity, the use of materials is easy. Any materials created in your 3D modeling package will be imported and recreated automatically by the engine and created as assets that are reusable. You can also create your own materials from scratch, assigning images as textures and selecting a shader from a large library that comes built-in. You may also write your own shader scripts or copy-paste those written by fellow developers in the Unity community, giving you more freedom for expansion beyond the included set.
When creating textures for a game in a graphics package such as Photoshop or GIMP, you must be aware of the resolution. Larger textures will give you the chance to add more detail to your textured models, but be more intensive to render. Game textures imported into Unity will be scaled to a power of 2 resolution. For example:
64px x 64px
128px x 128px
256px x 256px
512px x 512px
1024px x 1024px
Creating textures of these sizes with content that matches at the edges will mean that they can be tiled successfully by Unity. You may also use textures scaled to values that are not powers of two, but mostly these are used for GUI elements as you will discover over the course of this book.


