Connecting to text and Excel files
In this recipe, we'll connect to a Comma-Separated Values (CSV) file containing sales transactions and create a second connection to multiple Excel files. These connection types are very similar and so we'll cover them in one recipe. However, there are key features to both, which we'll highlight.
Getting ready
To follow along with the recipe, download the Sample Files 2.1 folder from this book's GitHub repository.
How to do it…
To get started, ensure you have the sample CSV and/or Excel file(s) ready on your computer and open up Tableau Prep Builder:
- From the Tableau Prep Builder home screen, click the Connect to Data button and subsequently select Text file from the Connect pane:

Figure 2.1 – Connect to a text file
- Tableau Prep will bring up the file selection window next. From here, navigate to our sample file, December 2016 Sales.csv, and open it:

Figure 2.2 – Select December 2016 Sales.csv
Once selected, Tableau Prep will automatically create a new flow with the data connection in it:

Figure 2.3 – A new flow is created when selecting any text file
Since the data connection is automatically selected, all options onscreen now relate to that particular connection. On the left-hand side, you can see the Tables pane. Note that there is only one table, equal to the filename. Since text files do not contain tables, this is by design. Tableau Prep Builder will always provide a generic user interface for data connections whenever possible. Once you're comfortable with one connection type, others should be easier to master:

Figure 2.4 – Text files such as CSV always have a single table
In the bottom pane, you can find a summary of all data fields identified in your text file, along with the automatically determined data type. In Chapter 3, Cleaning Transformations, we'll dive into the cleaning options you can perform here:

Figure 2.5 – Field summary
- In the same bottom pane, you can configure the data connection settings. For text files, you'll always want to verify the Text Options section. Tableau Prep will automatically set these values as best as possible, but I recommend you verify them before you continue. The word header refers to the first row in your dataset. If you do not have headers in your dataset, you can select Generate field names automatically, which will create headers named F1, F2, F3, and so on. You can rename those fields later on. Field Separator tells Tableau how columns are defined in a CSV file, which is usually a comma or pipe symbol. Text Qualifier tells Tableau Prep which characters indicate the start and end of a value or string.
Finally, Character Set and Locale are typically identified appropriately but you can alter them here as needed:

Figure 2.6 – Connection settings
- Now that we have connected a CSV file, let's create a second connection to an Excel file, in the same flow. To start, click the + icon in the Connections pane and select Microsoft Excel:

Figure 2.7 – Adding a second data connection
- Identical to the selection of a text file, browse to and select our sample file named December 2016 Sales.xlsx.
Once we've selected the file, Tableau Prep Builder does not automatically show another data connection in the flow, as it did for our CSV file. This is the default behavior for any data connection that has multiple tables. In the case of Microsoft Excel, each Excel sheet is considered a table:

Figure 2.8 – Connections with tables require table selection before you can continue
- In order to continue, we must drag a table, or sheet, onto the flow canvas to finalize the data connection. Proceed by dragging in the Sales_Data table. Once added, you'll notice the color of this connection is different from the text file connection we made earlier. Tableau Prep Builder randomly assigns a color to the various data flows for easy recognition.
The colors do not denote any kind of functionality:

Figure 2.9 – A flow with multiple data connections
- Once connected, you'll notice the options specific to text file connections no longer appear. However, the layout remains the same. A function common to both text and Excel files is the ability to ingest multiple files simultaneously. Select the Multiple Files tab for this function:

Figure 2.10 – Multiple Files tab
- From here, select Wildcard union to reveal the options:

Figure 2.11 – Multiple Files options
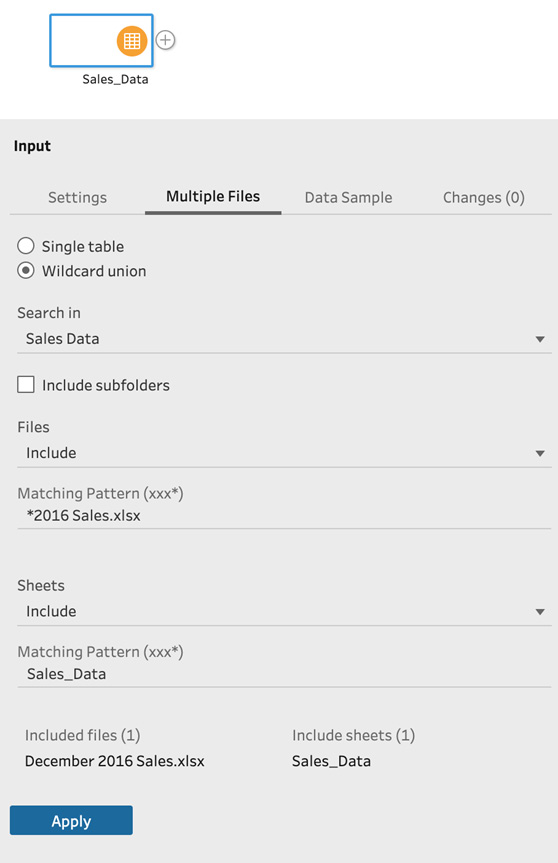
- Here, we can opt to include files in subfolders from the selected folder, which defaults to the folder where our Excel file is located. Select the Include subfolders option to enable this. Let's assume we want to include all sheets named Sales_Data, in all files ending in 2016 Sales.xlsx. To do so, we can use the asterisk symbol as a wildcard and set the file Matching Pattern property to *2016 Sales.xlx and the sheet Matching Pattern property to Sales_Data:

Figure 2.12 – Using wildcards to ingest multiple files at the same time
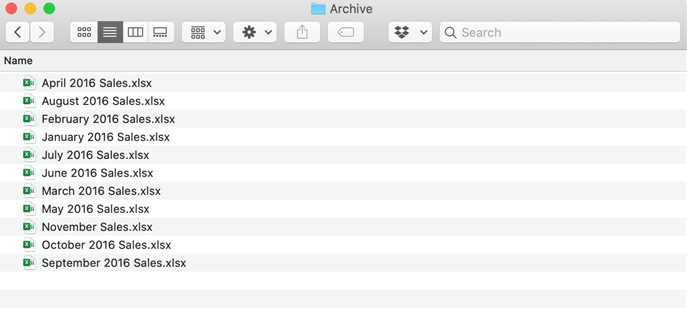
As a result, this step will now ingest all files in our subfolder named Archive and combine the data:

Figure 2.13 – All sample files here will be ingested at the same time using a single connection
By completing these steps, you have learned how to connect Tableau Prep to text and Excel files.
How it works…
Tableau Prep text files and Microsoft Excel connections automatically detect most settings very well, so, in most cases, a couple of clicks will get you up and running. The most powerful feature is undoubtedly the ability to ingest multiple files at the same time. You can ingest hundreds of files at the same time using this method, using a single data connection.


