Search icon CANCEL
Arrow left icon
Explore Products
Best Sellers
New Releases
Books
Videos
Audiobooks
Learning Hub
Conferences
Free Learning
Arrow right icon
Arrow up icon
GO TO TOP
Getting Started with Kubernetes, Second Edition

You're reading from   Getting Started with Kubernetes, Second Edition Orchestrate and manage large-scale Docker deployments

Arrow left icon
Product type Paperback
Published in May 2017
Publisher Packt
ISBN-13 9781787283367
Length 286 pages
Edition 2nd Edition
Tools
Arrow right icon
Author (1):
Arrow left icon
Jonathan Baier Jonathan Baier
Author Profile Icon Jonathan Baier
Jonathan Baier
Arrow right icon
View More author details
Toc

Table of Contents (13) Chapters Close

Preface 1. Introduction to Kubernetes FREE CHAPTER 2. Pods, Services, Replication Controllers, and Labels 3. Networking, Load Balancers, and Ingress 4. Updates, Gradual Rollouts, and Autoscaling 5. Deployments, Jobs, and DaemonSets 6. Storage and Running Stateful Applications 7. Continuous Delivery 8. Monitoring and Logging 9. Cluster Federation 10. Container Security 11. Extending Kubernetes with OCP, CoreOS, and Tectonic 12. Towards Production Ready

Working with other providers

By default, Kubernetes uses the GCE provider for Google Cloud. We can override this default by setting the KUBERNETES_PROVIDER environment variable. The following providers are supported with values listed in this table:

Provider KUBERNETES_PROVIDER value Type
Google Compute Engine gce Public cloud
Google Container Engine gke Public cloud
Amazon Web Services aws Public cloud
Microsoft Azure azure Public cloud
Hashicorp Vagrant vagrant Virtual development environment
VMware vSphere vsphere Private cloud/on-premise virtualization
Libvirt running CoreOS libvirt-coreos Virtualization management tool
Canonical Juju (folks behind Ubuntu) juju OS service orchestration tool
Kubernetes providers

Let's try setting up the cluster on AWS. As a prerequisite, we need to have AWS Command Line Interface (CLI) installed and configured for our account. The AWS CLI installation and configuration documentation can be found at the following links:

Then, it is a simple environment variable setting, as follows:

$ export KUBERNETES_PROVIDER=aws

Again, we can use the kube-up.sh command to spin up the cluster, as follows:

$ kube-up.sh

As with GCE, the setup activity will take a few minutes. It will stage files in S3 and create the appropriate instances, Virtual Private Cloud (VPC), security groups, and so on in our AWS account. Then, the Kubernetes cluster will be set up and started. Once everything is finished and started, we should see the cluster validation at the end of the output:
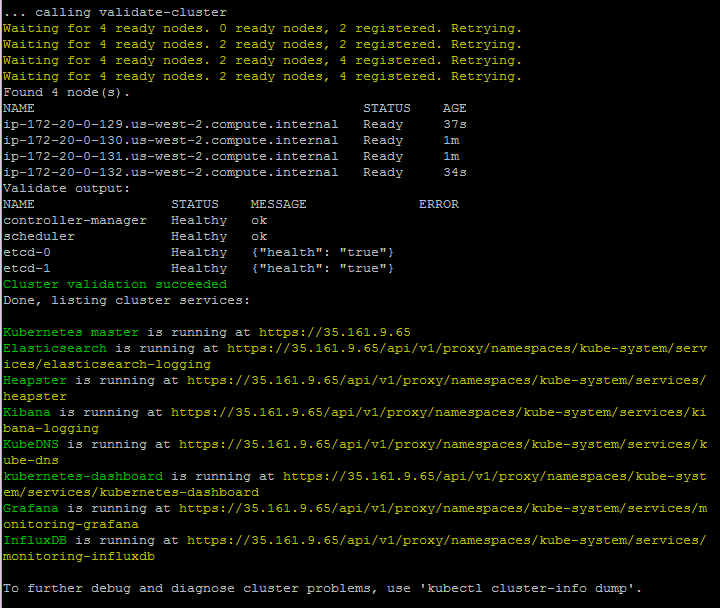
AWS cluster validation

Note that the region where the cluster is spun up is determined by the KUBE_AWS_ZONE environment variable. By default, this is set to us-west-2a (the region is derived from this Availability Zone). Even if you have a region set in your AWS CLI, it will use the region defined in KUBE_AWS_ZONE.

Once again, we will SSH into master. This time, we can use the native SSH client. We'll find the key files in /home/<username>/.ssh:

$ ssh -v -i /home/<username>/.ssh/kube_aws_rsa ubuntu@<Your master IP>

We'll use sudo docker ps --format 'table {{.Image}}t{{.Status}}' to explore the running containers. We should see something like the following:

Master container listing (AWS)

We see some of the same containers as our GCE cluster had. However, there are several missing. We see the core Kubernetes components, but the fluentd-gcp service is missing as well as some of the newer utilities such as node-problem-detector , rescheduler , glbc , kube-addon-manager , and etcd-empty-dir-cleanup. This reflects some of the subtle differences in the kube-up script between various Public Cloud providers. This is ultimately decided by the efforts of the large Kubernetes open-source community, but GCP often has many of the latest features first.

On the AWS provider, Elasticsearch and Kibana are set up for us. We can find the Kibana UI using the following syntax as URL:

https://<your master ip>/api/v1/proxy/namespaces/kube-system/services/kibana-logging

As in the case of the UI, you will be prompted for admin credentials, which can be obtained using the config command, as shown here:

$ kubectl config view

On the first visit, you'll need to set up your index. You can leave the defaults and choose @timestamp for the Time-field name. Then, click on Create and you'll be taken to the index settings page. From there, click on the Discover tab at the top and you can explore the log dashboards:
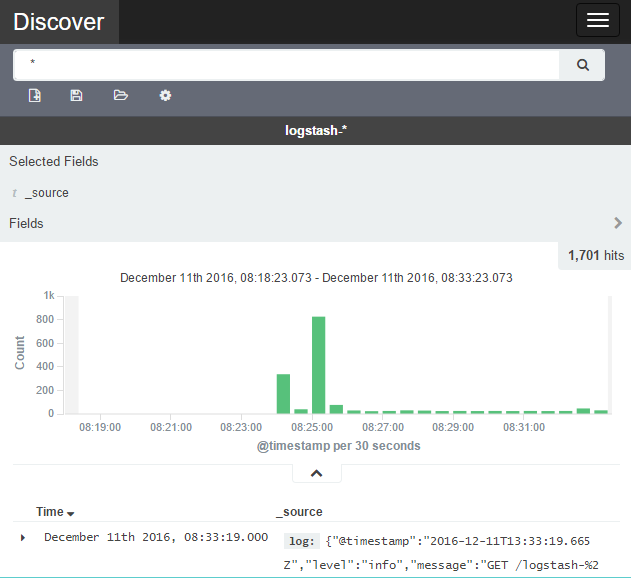
Kubernetes Kibana dashboard

Resetting the cluster

You just had a little taste of running the cluster on AWS. For the remainder of the book, I will be basing my examples on a GCE cluster. For the best experience following along, you can get back to a GCE cluster easily.

Simply tear down the AWS cluster, as follows:

$ kube-down.sh

Then, create a GCE cluster again using the following:

$ export KUBERNETES_PROVIDER=gce
$ kube-up.sh

Modifying kube-up parameters

It's worth getting to know the parameters used for the kube-up.sh script. Each provider under the kubernetes/cluster/ folder has its own su  folder which containers a config-default.sh  script.

For example, kubernetes/cluster/aws/config-default.sh has the default settings for using kube-up.sh with AWS. At the start of this script, you will see many of these values defined as well as environment variables that can be used to overrides the defaults.

In the following example, the ZONE variable is set for the script and it uses the value from the environment variable named KUBE_AWS_ZONE. If this variable is not set, it will use the default us-west-2a:

ZONE=${KUBE_AWS_ZONE:-us-west-2a}

Understanding these parameters will help you get a lot more mileage out of your kube-up.sh script.

Alternatives to kube-up.sh

The kube-up.sh script is still a pretty handy way to get started using Kubernetes on your platform of choice. However, it's not without flaws and can sometimes run aground when conditions are not just so.

Luckily, since K8's inception, a number of alternative methods for creating clusters have emerged. Two such GitHub projects are KOPs and kube-aws. While the later is tied to AWS, they both provide an alternative method to easily spinning up your new cluster:

Additionally, a number of managed services have arisen including Google Container Engine (GKE) and Microsoft Azure Container Service (ACS), which provide an automated install and some managed cluster operations. We will look at a brief demo of these in Chapter 12, Towards Production Ready.

Starting from scratch

Finally, there is the option to start from scratch. Luckily, starting in 1.4, the Kubernetes team has put a major focus in easing the cluster setup process. To that end they have introduced kubeadm for Ubuntu 16.04, CentOS 7, and HypriotOS v1.0.1+.

Let's take a quick look at spinning up a cluster on AWS from scratch using the kubeadm tool.

Cluster setup

We will need to provision our cluster master and nodes beforehand. For the moment, we are limited to the operating systems and version listed earlier. Additionally, it is recommended that you have at least 1 GB of RAM and all the nodes must have network connectivity to one another.

For this walk through, we will need one t2.medium (master node) and three t2.mirco (nodes) sized instances on AWS. These instance have burstable CPU and come with the minimum 1 GB of RAM needed. We will need to create one master and three worker nodes.

We will also need to create some security groups for the cluster. The following ports are needed for the master:

Type Protocol Port range Source
All Traffic All All {This SG ID (Master SG)}
All Traffic All All {Node SG ID}
SSH TCP 22 {Your Local Machine's IP}
HTTTPS TCP 443 {Range allowed to access K8s API and UI}
Master Security Group Rules

The next table shows the ports node security groups:

Type Protocol Port range Source
All Traffic All All {Master SG ID}
All Traffic All All {This SG ID (Node SG)}
SSH TCP 22 {Your Local Machine's IP}
Node Security Group Rules

Once you have these SGs, go ahead and spin up four instances (one t2.medium and three t2.mircos) using Ubuntu 16.04. If you are new to AWS, refer to the documentation on spinning up EC2 instances at the following URL:

http://docs.aws.amazon.com/AWSEC2/latest/UserGuide/LaunchingAndUsingInstances.html

Be sure to identify the t2.medium instance as the master and associate the master security group. Name the other three as nodes and associate the node security group with those.

These steps are adapted from the walk-through in the manual. For more information or to work with an alternative to Ubuntu refer to https://kubernetes.io/docs/getting-started-guides/kubeadm/.

Installing Kubernetes components (kubelet and kubeadm)

Next we will need to SSH into all four of the instances and install the Kubernetes components.

As root, perform the following steps on all four instances:

1. Update packages and install the apt-transport-https package so we can download from sources   that use HTTPS:

   $ apt-get update 
$ apt-get install -y apt-transport-https

2. Install the Google Cloud public key:

   $ curl -s https://packages.cloud.google.com/apt/doc/apt-key.gpg |
apt-key add -

3. Next, create a source list for the Kubernetes package downloads with your favorite editor:

   $ vi /etc/apt/sources.list.d/kubernetes.list

4. Use the following as contents for this file and save:

   deb http://apt.kubernetes.io/ kubernetes-xenial main

Listing 1-1. /etc/apt/sources.list.d/kubernetes.list

5. Update your sources once more:

   $ apt-get update

6. Install Docker and the core Kubernetes components:

   $ apt-get install -y docker.io 
$ apt-get install -y kubelet kubeadm kubectl kubernetes-cni

Setting up a Master

On the instance you have previously chosen as master, we will run master initialization. Again, as root run the following command:

$ kubeadm init

Note that initialization can only be run once, so if you run into problems you'll kubeadm reset.

Joining nodes

After a successful initialization, you will get a join command that can be used by the nodes. Copy this down for the join process later on. It should look similar to this:

$ kubeadm join --token=<some token> <master ip address>

The token is used to authenticate cluster nodes, so make sure to store it somewhere securely for future use.

Networking

Our cluster will need a networking layer for the pods to communicate on. Note that kubeadm requires a CNI compatible network fabric. The list of plugins currently available can be found here:

http://kubernetes.io/docs/admin/addons/

For our example, we will use calico. We will need to create the calico components on our cluster using the following yaml. For convenience you can download it here:

http://docs.projectcalico.org/v1.6/getting-started/kubernetes/installation/hosted/kubeadm/calico.yaml

Once you have this file on your master, create the components with the following command:

$ kubectl apply -f calico.yaml

Give this a minute to run setup and then list the kube-system nodes to check:

$ kubectl get pods --namespace=kube-system

You should get a listing similar to the following one with three new calico pods and one completed job that is not shown:

Calico setup

Joining the cluster

Now we need to run the join command we copied earlier, on each of our node instances:

$ kubeadm join --token=<some token> <master ip address>

Once you've finished that, you should be able to see all nodes from the master by running this command:

$ kubectl get nodes

If all went well, this will show three nodes and one master, as shown here:

Calico setup
You have been reading a chapter from
Getting Started with Kubernetes, Second Edition - Second Edition
Published in: May 2017
Publisher: Packt
ISBN-13: 9781787283367
Register for a free Packt account to unlock a world of extra content!
A free Packt account unlocks extra newsletters, articles, discounted offers, and much more. Start advancing your knowledge today.
Unlock this book and the full library FREE for 7 days
Get unlimited access to 7000+ expert-authored eBooks and videos courses covering every tech area you can think of
Renews at $19.99/month. Cancel anytime