First access to a FortiGate
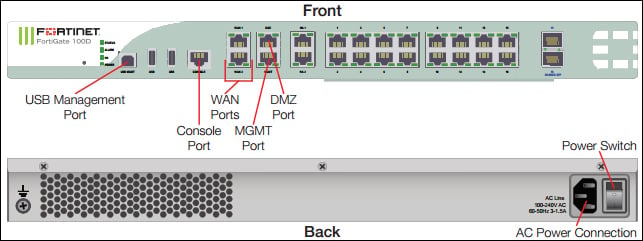
Depending on the model of FortiGate, we will have different number of interfaces and their disposition will change. Some models have ports labeled as Internal and External, whereas other Fortigate units will have ports labeled port1, port2, and so on. Every FortiGate unit will also have a console port (RJ45 or RS-232 on older models). The console port can be used to directly connect a workstation or terminal server for out-of-band access. An example can be seen in the following diagram, showing and RJ45 management port and WAN interfaces on a FortiGate 100D:
The basic configuration of a FortiGate can be performed using:
FortiExplorer (a software for Windows and Mac dedicated to the first installation)
The CLI through the console port
The web-based manager
We will perform the basic configuration using the web-based manager. This requires:
A computer configured with an IP address on the 192.168.1.0 network (with subnet mask 255.255.255.0). For example, 192.168.1.100.
An Ethernet cable to connect the computer to one of the following interfaces (depending on the FortiGate model): internal, port1, or management.
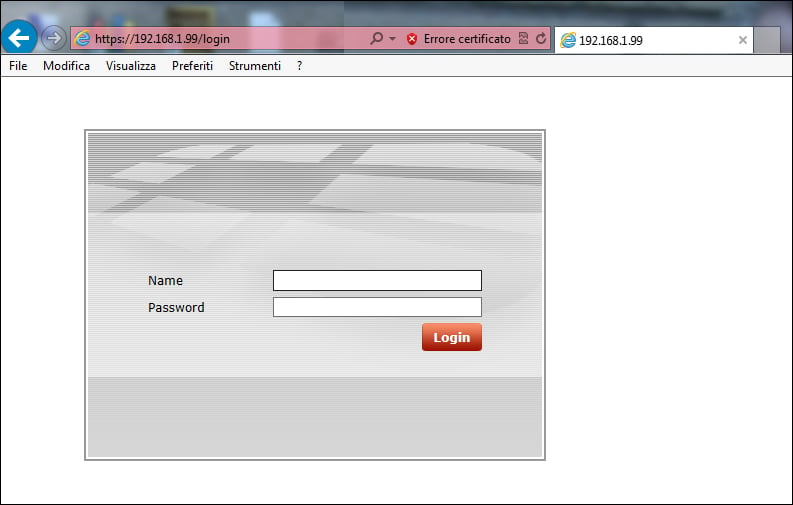
The device should respond on the default IP address 192.168.1.99, then we can open the web-based manager with a browser using the following URL: https://192.168.1.99. The default user (admin) does not require password (see the following screenshot):
There is no mandatory order, so the following list is just a suggestion to have a checklist of things we need to do with a new FortiGate:
Changing the:
Admin password
Name of the host
Time and time zone
Selecting the operation mode and configuring the internal and external interfaces
Registering your FortiGate
Taking a backup of the existing configuration
Updating the system firmware
Updating definitions and services
Changing the admin password, name of the host, time, and time zone
From the web-based manager use the System Information widget (by going to System | Dashboard | Status). Then perform the following steps:
Select the Change Password option in the Current Administrator row and insert the new password.
Select the Change option in the Host Name row and insert the preferred name (it is a good idea to keep a naming convention that helps identifying the device location and use on our network). Note that as soon as we modify the host name, the CLI prompt will also change to reflect the new parameter.
Navigate to System Time | Change | Set Time and set the FortiGate system date and time. Select your time zone and then click on OK.
See the following screenshot for the aforementioned options in the System Information widget:

Note
Host Name and Serial Number will be required to register the unit with Fortinet. Take note of this information now to save time later.
It is worthwhile to add an NTP (Network Time Protocol) server to keep time synchronization for the FortiGate. We can navigate to the System Time options to select FortiGuard or a specific NTP source as we can see in the following screenshot:
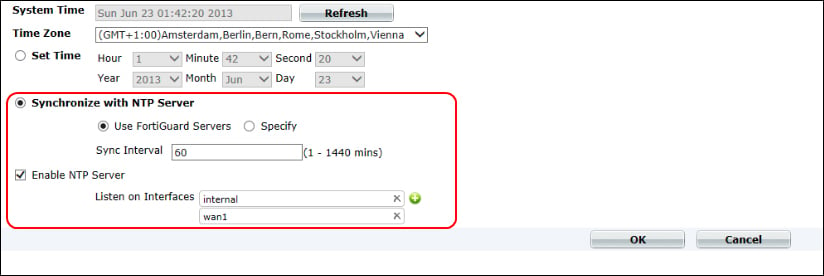
As we have just seen, a FortiGate unit can also act as an NTP server for our network (that makes sense especially if the unit is acting as a gateway between our internal network and the Internet). We have to select the interfaces that will be listening to the clients' NTP queries.
Note
By default, FortiOS has the daylight savings time (DST) configuration enabled. To disable DST when daylight saving time ends, we have to use CLI with the following commands:
config system global | set dst disable | end
Selecting the operation mode and configuring the internal and external interfaces
The FortiGate unit can run in two modes: Network Address Translation (NAT)/Routing mode and Transparent mode. Both the modes are explained in the following list:
Network Address Translation (NAT) mode: If the FortiGate is deployed as a gateway between different networks, we have to use this mode. Each network interface will need configuration parameters. The appliance will filter the traffic and translate the network address when traffic flows from one interface to the other. This is the default mode for a FortiGate unit.
Transparent mode: In this mode, all the interfaces of the FortiGate are on the same network and the appliance is not visible to the rest of the network. The FortiGate unit acts as a bridge between different network segments. The idea is to perform filtering (anti-spam, antivirus, intrusion protection, and traffic scanning) behind an existing router or firewall on a relatively simple network.
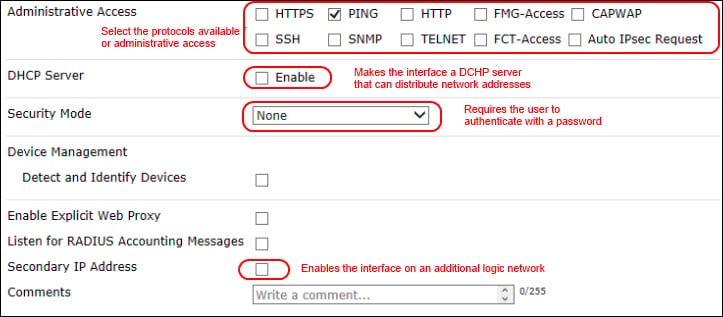
To configure the NAT mode, we need to configure a network address on our interfaces by navigating to the System | Network | Interface menu. Usually we need to configure at least one internal (LAN) interface and an external (WAN) interface. The following screenshot displays the configuration of a WAN interface (with a static public IP address):
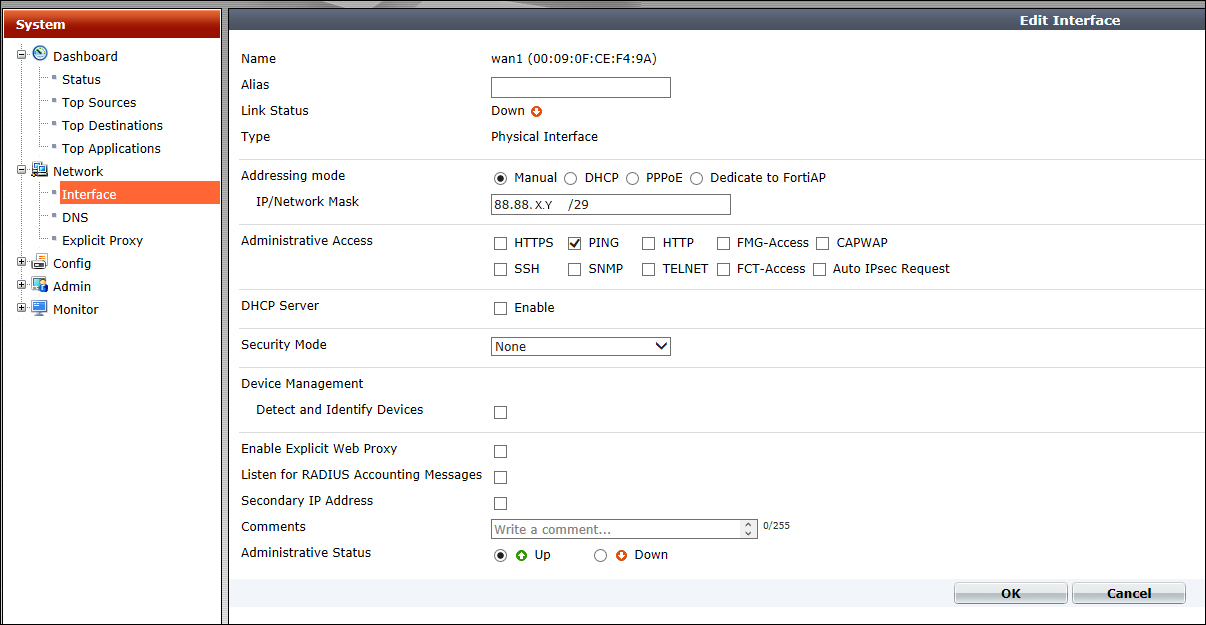
Since we are talking about a public network adapter, it is advisable to remove all Administrative Access options (unchecking the appropriate boxes), perhaps leaving only the ping access for testing. As part of this first installation it is recommended that we also set our FortiGate to use one or more public DNS compatible with our providers or accessible from our connection. We can go to the Network | DNS menu and edit the server option as shown in the following screenshot:
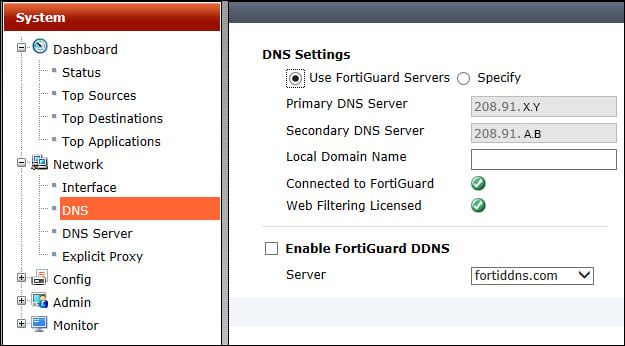
To achieve an initial connection to the Internet (or to the rest of the corporate network) we should set up a static route by going to the Router pane | Static Route option as shown in the following screenshot:

Note
The router pane only exists in medium business and higher models. The desktop versions like the 40C model have the routing open under the System pane. This area under the System pane is only for creating static routes. All dynamic routing has to be done through the CLI for desktop models.
As mentioned earlier in this chapter, the administrative interface allows the management of different levels of operation of the FortiGate unit. A good example is the one we have just seen, with the routing layer included in the Router pane and not in System as for the previous parameters.
To configure transparent mode, we need to set a management IP address (the one we will use to administer the FortiGate unit). This makes sense because in transparent mode the appliance has no other network addresses exposed. From the web-based manager we will again use the System Information widget (by navigating to System | Dashboard | Status). In Operation Mode we have to click on Change and then select Transparent. We will immediately be required to add a management IP and a gateway (to make it reachable also from a different subnet). We can see the two steps in the following screenshot:

Then we will have to configure the DNS servers as we have seen for the NAT mode.
Registering your FortiGate
We should register our FortiGate at the earliest on the Fortinet support site, following the links that we can see in the following screenshot. There we are able to find all the updates related to our device and to activate the features associated with our FortiGate unit license:
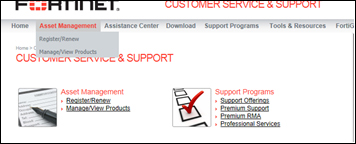
As we stated earlier, host name and serial number are required to register a FortiGate unit (the information is available in the System Information widget).
Note
Registration of our first FortiGate unit will also require a one-time registration on the Fortinet website with our company information.
Updating the system firmware
Device registration entitles us to download the most recent version of the firmware (the base set of instructions stored in our device) and to apply it to our FortiGate unit. Once we have acquired an appropriate software update from the support site we can upgrade the firewall. The operation is made in the Firmware Version widget selecting Update as shown in the following screenshot:

The aforementioned widget is also used to read the current version of our firmware. We must always make a backup of the configuration of the appliance before applying any firmware update (especially if we have to work on a unit that is already operational). Backups (and restores) are performed by navigating to System Information | System Configuration | Backup (or Restore) as shown in the following screenshot:

Restoring a device
To restore a device after a faulty update, we can use the CLI from a console connection. The steps are described here: Verifying the current firmware version and upgrading the FortiOS firmware (http://docs.fortinet.com/cb/html/index.html#page/FOS_Cookbook/Install-basic/update_firmware.html). For a detailed description of the CLI commands related to backup and restore use the document available at: http://docs.fortinet.com/fdb/html/fdb-user-guide/index.html?page=source%2Freferences%2Fr_cli_admin_execute.html.
Note
The Release Notes of the different versions of FortiOS and firmware contain a section named Upgrade Information. It is really important to read them because updating from one version to the other may require some intermediate steps. There could be well known issues and limits as well as information about fixed and known bugs.
Updating definitions and services
The previous steps have enabled the FortiGate unit to reach the Fortinet services and to acquire updates for all the services we are subscribed to.
It is not required to add security policies for this purpose. We can verify that the connection from the appliance to the Internet is working by pinging the name of a public site from the CLI using the command execute ping <hostname> (for more information see Layer 2 and Layer 3 TCP/IP Diagnostics, in Chapter 5, Troubleshooting).
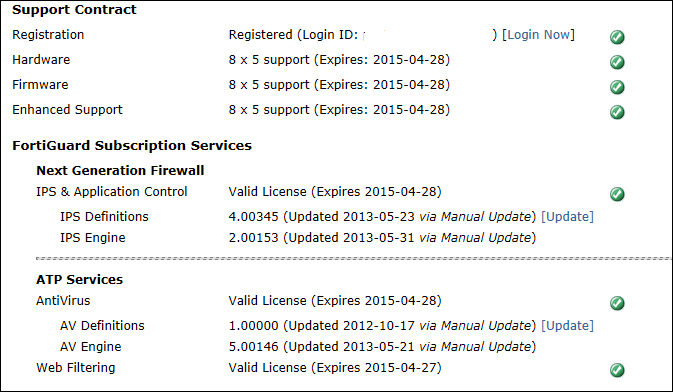
The updates for the different features and licensing inside our FortiGate are unified inside a single mechanism that is called FortiGuard. We are able to see the status of our license registration by navigating to Config | FortiGuard. Services should be registered automatically and updates should be received from Fortinet by default. We can verify that the Allow Push Update flag is selected (see the following screenshot). In the same screen we are able to force the update process by clicking on the Update Now button:
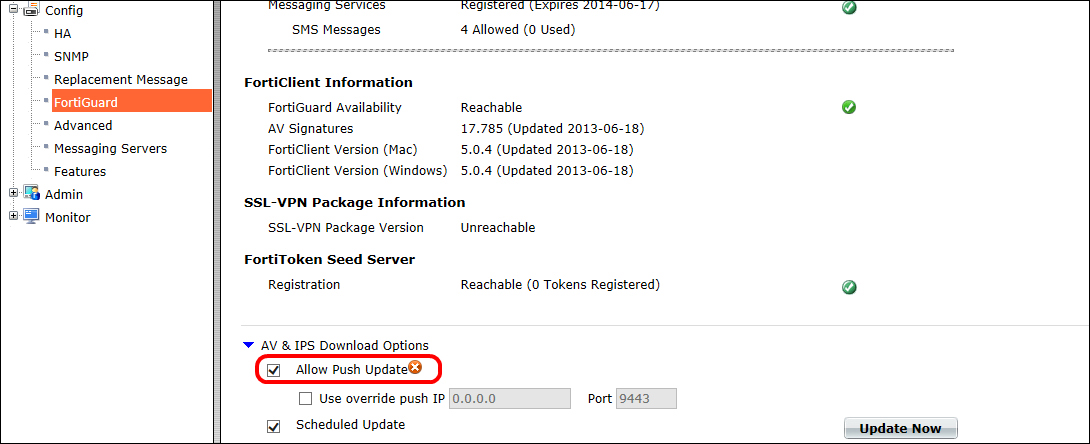
All the services should show a green flag, like the ones we can see in the following the screenshot:
Note
If an error is shown in the aforementioned menu, probably we will have to get in touch with the Fortinet support at http://www.fortinet.com/support/contact_support.html.
VLANs and logical interfaces
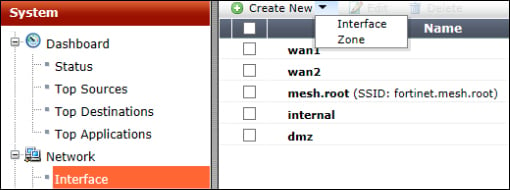
FortiGate supports the segregation (and aggregation) of network interfaces with the use of VLAN (virtual LAN). The basic idea of a VLAN is to keep the traffic of networks that we want to segregate at the physical layer (layer 2) within the same device. We are able to combine multiple logical networks on a single interface and filter traffic between them while retaining the capability. While there are different standards in order to obtain this result, Fortinet has used the international standard IEEE 802.1Q. Each Ethernet frames will have a tag, which indicates a single VLAN membership. Network interfaces will be able to receive data from one or more VLANs, but will discard all communications related to VLAN to which they do not belong. The traffic will pass from one VLAN to another only through layer 3 (routing) thus realizing the physical separation within networks with a single device that we talked about. To define a VLAN in a FortiGate we will navigate to the System | Network | Interface menu and select Create New Interface as shown in the following screenshot:
Now we can specify the network adapter to associate with this VLAN and its ID tag as we can see in the following screenshot:

Note
The interface will be seen as untagged if connected to an untagged device (for example, a PC) and tagged if connected to a port with VLAN enabled, like a layer 2 switch.
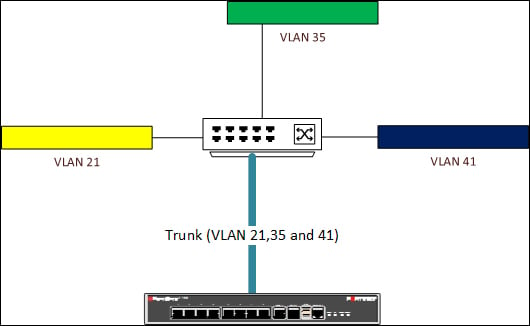
Repeating the aforementioned operation with a different VLAN ID, but on the same interface, we will obtain what is commonly referred to as a trunk. A trunk is a way to accept multiple VLANs on a single interface. This is required, for example, when we have a device (let's say a switch) for the upstream of a FortiGate, that receives tagged traffic from different VLANs and then forwards it to the Fortigate. An example is shown in the following diagram:
As mentioned, once the VLANs are defined, we can aggregate multiple ports into a single logical entity. Such a combination is a logical interface defined as a software switch.
A software switch groups physical interfaces in a software interface (also called a softswitch). All the interfaces in a softswitch share one IP address and become a single entry on the interface list. This method can be useful to aggregate different interfaces that are on the same subnet without creating a firewall policy. A good example for this would be combining a wired and a wireless interface so that clients on the wireless interface can see devices on the wired network. A softswitch is configured using the interface menu and selecting Type as Software Switch. The base configuration can be seen in the following screenshot:

Talking about logical interfaces like the softswitch, it is also important to introduce the Loopback Interface. It can be generated inside the firewall and does not require a physical interface. Loopback interfaces are always up and reachable and are used, for example, to configure a unique IP for a service that is common to more than one of the networks connected to the FortiGate unit (for example, to deploy a proxy service). Loopback interfaces are also commonly used with dynamic routing. The configuration is shown in the following screenshot:

A loopback interface requires much of the same configuration options that a physical interface does. The menu used to configure an interface contains the options explained in the following screenshot:
