Provisioning and connecting to an Azure SQL database using PowerShell
In this recipe, we'll learn how to create and connect to an Azure SQL Database instance. Azure SQL Database comes in three failovers: standalone Azure SQL Database, Azure SQL Database elastic pools, and managed instances. In this recipe, we'll create a standalone Azure SQL database.
Getting ready
In a new PowerShell window, execute the Connect-AzAccount command to log in to your Microsoft Azure account.
How to do it…
Let's begin by provisioning Azure SQL Database.
Provisioning Azure SQL Database
The steps are as follows:
- Execute the following PowerShell command to create a new resource group:
New-AzResourceGroup -Name packtade -Location "central us"
- Execute the following query to create a new Azure SQL server:
#create credential object for the Azure SQL Server admin credential
$sqladminpassword = ConvertTo-SecureString 'Sql@Server@1234' -AsPlainText -Force
$sqladmincredential = New-Object System.Management.Automation.PSCredential ('sqladmin', $sqladminpassword)
# create the azure sql server
New-AzSqlServer -ServerName azadesqlserver -SqlAdministratorCredentials $sqladmincredential -Location "central us" -ResourceGroupName packtade
You should get a similar output as shown in the following screenshot:

Figure 2.1 – Creating a new Azure SQL server
- Execute the following query to create a new Azure SQL database:
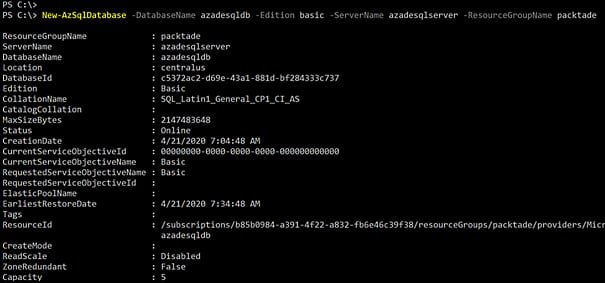
New-AzSqlDatabase -DatabaseName azadesqldb -Edition basic -ServerName azadesqlserver -ResourceGroupName packtade
You should get an output as shown in the following screenshot:

Figure 2.2 – Creating a new Azure SQL database
Connecting to an Azure SQL database
To connect to an Azure SQL database, let's first whitelist the IP in the Azure SQL Server firewall:
- Execute the following command to whitelist the public IP of the machine to connect to an Azure SQL database. (This recipe assumes that you are connecting from your local system. To connect from a system other than your local system, change the IP in the following command.) Execute the following command in the PowerShell window to whitelist the machine's public IP in the Azure SQL Server firewall:
$clientip = (Invoke-RestMethod -Uri https://ipinfo.io/json).ip
New-AzSqlServerFirewallRule -FirewallRuleName "home" -StartIpAddress $clientip -EndIpAddress $clientip -ServerName azadesqlserver -ResourceGroupName packtade
You will get an output similar to the one shown in the following screenshot:

Figure 2.3 – Creating a new Azure SQL Server firewall rule
- Execute the following command to connect to an Azure SQL database from SQLCMD (SQLCMD comes with the SQL Server installation, or you can download the SQLCMD utility from https://docs.microsoft.com/en-us/sql/tools/sqlcmd-utility?view=sql-server-ver15):
sqlcmd -S "azadesqlserver.database.windows.net" -U sqladmin -P "Sql@Server@1234" -d azadesqldb
Here's the output:

Figure 2.4 – Connecting to an Azure SQL database
How it works…
We first execute the New-AzSQLServer command to provision a new Azure SQL server. The command accepts the server name, location, resource group, and login credentials. An Azure SQL server, unlike an on-premises SQL server, is not a physical machine or VM that is accessible to customers.
We then execute the New-AzSQLDatabase command to create an Azure SQL database. This command accepts the database name, the Azure SQL server name, the resource group, and the edition. There are multiple SQL database editions to choose from based on the application workload. However, for the sake of this demo, we will create a basic edition.
To connect to an Azure SQL database, we first need to whitelist the machine's IP in the Azure SQL Server firewall. Only whitelisted IPs are allowed to connect to the database. To whitelist the client's public IP, we use the New-AzSQLServerfirewallrule command. This command accepts the server name, resource group, and start and end IPs. We can either whitelist a single IP or a range of IPs.
We can connect to an Azure SQL database from SQL Server Management Studio, SQLCMD, or a programming language using the appropriate SQL Server drivers. When connecting to an Azure SQL database, we need to specify the server name as azuresqlservername.database.windows.net, and then specify the Azure SQL database to connect to.


