Dealing with sprites
When working on our 2D game, we need sprites to fill in our environment, and also to display characters. Several sprites can be used to create an animation, like a walking character: each sprite represents a certain frame in the animation.

Importing sprites
Tip
If we don't import the package when we have created the project, we can do it at any moment by clicking on Assets | Import Package.
In the Project panel, click on p1_front to see its setting in the Inspector. It can be found under Platformer Pack | Player, or can be searched by using the small search box in the right upper corner of the Project panel. Once selected, the Inspector looks like the following:

You can control the properties of the sprites by changing the values in the Inspector. In order to understand them, let's break them down:
- Sprite Mode: This mode consists of two options
SingleandMultiple.Singleshould be selected when the image contains only a single object or character that will be used as a single sprite.Multiple, instead, it should be selected when multiple elements are contained within the same image .These may include different variations of the same object or its animation sheet. - Packing Tag: This is an optional variable used to specify the name of the
Sprite Sheetin which this texture will be packed. This is useful when we need to optimize our game. - Pixels Per Unit: This controls the scale of the sprite. This variable defines how many pixels correspond to one world space unit. The default value for this is
100. - Pivot: This allows us to change the pivot point for our sprite, which, by default, is set to
Center. When required, you can change it to one of the other predefined points or place it in a custom position by selectingCustom.
Tip
Choosing Multiple instead of Single in the sprite mode will remove the pivot option. In fact, the pivot point for each sprite in the image can be selected by using the Sprite Editor.
The Sprite Renderer component
Since we already have the p1_front sprite selected, let's drag it into the Hierarchy panel.
Tip
You can place it in the scene by dragging it directly inside the Scene view.
When we add a sprite in our scene, a game object is created with a Sprite Renderer component attached to it. This component is responsible for rendering a Sprite in the game; without it, the game object would be empty.

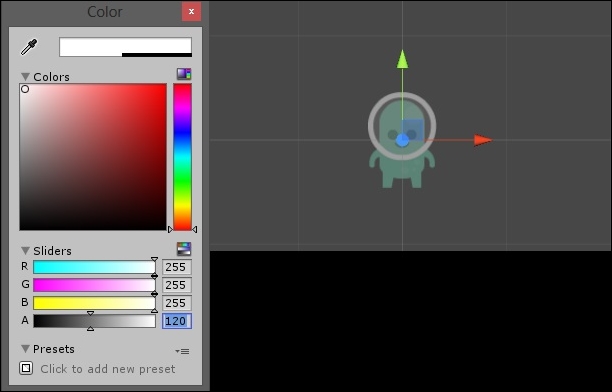
Let's explore the options in this component. First, Sprite is the variable that will store the sprite to render on screen. In this case, it is automatically with the sprite we have dragged in. The Color variable controls the color of the Sprite along with its alpha channel. If we click on it, a color picker shows up; we can see the effect of our change immediately in the Scene view:

The Material variable stores information about the material of the sprite. By default, it is set to Default Sprite Material. Usually, we don't want to change this during 2D game development; however, it may be necessary in particular cases, for instance when the sprite needs to be affected by lights.
Then, the Sorting Layer and Order In Layer variables are used to define the order of visualization of the sprites in the scene. In fact, not all the sprites are on the same level. Think about a background, a cloud, and our character. The cloud should be located on top of the background and the character should be on top of both of them. By default, the Sorting Layer is set to Default and Order In Layer to 0. So far, Default is the only layer available. Since we want to order our sprites later, let's create a few more layers. Click on Add Sorting Layer under Sorting Layer. As a result, the Inspector shows us the Tags & Layers settings. By clicking on the + button in the right bottom corner, we are able to add other sorting layers. Let's add two more layers, and name them respectively Background and Foreground, as shown in the following image:

The order of these layers is important. We can easily change it by clicking on the designated layer and dragging it above or below another one.
Now, select the game object we have created in the Hierarchy panel again. In the Inspector, we are able to change its sorting layer to Foreground.
Before going forward, create a new folder in the Project panel named Scenes and save the scene inside it as Scene1. We can do this by clicking on File | Save Scene.
The Sprite Editor
In the importing settings, we can find the Sprite Editor button. After we have selected p1_spritesheet again from Platformer Pack | Player, we can now click on the button. As a result, the Sprite Editor window shows up.
The Sprite Editor should be used when dealing with a sprite that contains multiple elements (If this is the case, don't forget to set Multiple in the Sprite Mode). So, we should see something like the following:

Our goal is to slice all the single positions of the character in the image, so that we can use them as an individual sprites in our scene. There are different ways to achieve this. Let's discuss some of them:
- Click and drag: This allows you to simply click and drag over the desired elements to create rectangular selections that will define each sprite. You can change each selection as preferred. You are able to change the position by dragging the rectangle, its size by clicking on the corners of each rectangle, and the Pivot point by clicking and dragging it. Furthermore, clicking on the trim button in the sprite window will change the size of the rectangle to fit the selected sprite.
By clicking on the slice button in the top left of the Sprite Editor, a new window appears. This allows you to select other ways to slice your
Sprite Sheets. The default slicing type is set toAutomatic, but you can also choose different kinds of grids too. - Automatic: When using the automatic method, Unity will detect each sprite and draw a trimmed rectangle around it. With
Automaticselected, you can also change the Pivot position for each sprite. We can also select a Method to tell Unity what should happen to the sprites that are already defined. TheDelete Existingmethod deletes all the previous selections and creates new ones from scratch. TheSmartmethod attempts to create new selections for undefined sprites, while adjusting them to fit with the older selections. Finally, theSafemethod adds new selections over the previous ones without changing them. - Grid: This allows you to create equal size selections for all the sprites in the image. Once we have set
Gridas slicing type, then we will be able to change the size used for the slicing, and eventually adjust the position of the Pivot point for each sprite.
In particular, for our project, we can just use the Automatic method - it will work fine.
Note
By clicking on the Revert button, we can restart from scratch, removing all the previous selections.

After closing the Sprite Editor, let's check the image file in the Project panel. As you can see, a little icon appeared and it allows us to expand the file and see all the single Sprites we have created in the Sprite Editor. Now, these can be used as normal Sprites in our game and can be placed in our scenes and scripts.
Note
Having a single image with different Sprites is a technique called Sprite sheets. When importing sprites to your game project, it is preferred to group them into one image. This is because Unity can send a single file in the graphic card, and, as a result, enhance the performance by saving both memory and computational time.
Furthermore, sprite sheets are useful for creating 2D animations (such as walking, jumping, breathing, and explosions). In fact, it allows us to keep everything organized and easy to use. In the next chapter, we will discuss the process of animation in more detail.


