Mapping the inputs
While the input setting relies on the project setting, I always like to discuss it as an individual topic. If you have come from an engine structuring background, you probably know that the inputs are an independent topic just like rendering, networking, and so on.
Any game built within Unreal Engine (or any game in general) must have the input class, which defines the whole input for the game. Fortunately, Unreal Engine has made this step easier, and has given you the chance not to worry about input handling. It does this for you at a lower level of the engine core, and gives you a nice and easy-to-use interface, where you can map some predefined input keys, buttons, and axes, and name them. You can then refer to these buttons by code using their respective names.
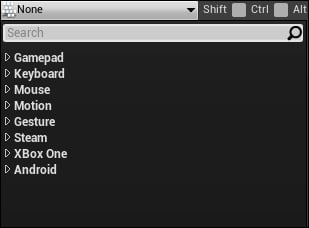
Unreal Engine supports a lot of input devices, which has made the input mapping list huge, and it is better to learn more about the supported devices in order to make this huge list easy to manipulate. The inputs that are supported are:
- Gamepad: This contains the mapping for all the buttons and axes used by any gamepad type
- Keyboard: This contains the mapping for all the keyboard keys
- Mouse: This contains the mapping for all the mouse buttons and axes
- Motion controllers: They contains the mapping for any motion device, such as Razer for example
- Gesture: This contains the mapping for some gestures integration, which could be used with any touch device (mobile, touchpad, and so on)
- Steam: This contains the mapping for the special buttons of the Steam controller; all other Steam controller buttons are accessible through the gamepad inputs
- Xbox One: This contains the mapping for the special buttons of the Xbox One controller; all other Xbox One controller buttons are accessible through gamepad inputs
- Android: This contains the mapping for the special buttons of Android devices (Back, Volume, Menu, and so on)
And that's how the list of inputs looks by default while every section is folded; unfolding those sections will give you an endless list of keys and buttons that you can map for your game and for different platforms and devices.

In order to use these inputs for your game, you have to select some keys and give them names; this is called the process of Binding Keys. But before diving into this process, you will have to understand the different types of binding within Unreal Engine.
Unreal Engine supports two main binding types; they are divided by the sensitivity of the input key/button. This means that the input button/key could fire a couple of events when it is pressed and/or released, or it will keep firing events as long as it is pressed. The two main types of bindings are:
- Action mapping: Action mapping should represent a button or key press, and then within the code you can call some logic based on pressing that key
- Axis mapping: Axis mapping should represent a value change of the pressure on the button, which usually works with the trigger buttons of a controller or the thumb sticks of the controller as well
Here are few more points to remember before we start the mapping process:
- The game will be using the keyboard and mouse as PC inputs and will be using the controller/gamepad as the console input (you can still use the controller with PCs, though).
- I highly recommend that you use the same names I used to map my keys; if you change any, you have to be aware that you have to change them within the code as well.
- To add a new action mapping or axis mapping, you just need to hit the = sign next to the action and/or axis title. But if you want to add more buttons to the same action or axis, then you need to hit the + sign next to the action map itself.

Now you are ready to go. By opening the project settings from within the Edit menu, and then navigating to the Input options under the Engine section, you have access to the inputs mapping. You can now start mapping your key inputs.
- Action mappings: This contains the following options:
- Jump: Will be using either Spacebar or the controller lower face button to perform the jump on press
- Attack: Will be using the LMB or the controller right trigger to perform attack.
- ChangeWeapon: Will be shuffling between weapons on pressing the Tab button or the Gamepad Right Shoulder (the one above the trigger).
The end result of this action key mapping should eventually look something like this:

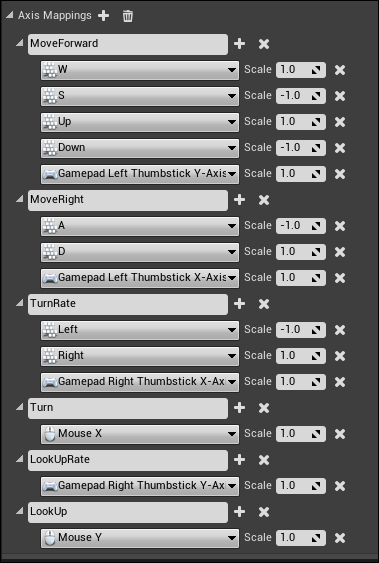
- Axis mappings: This contains the following menu:
- MoveForward: Will be using the keyboard's W or S or Up/Down arrow, or the controller Y axis of the left thumb stick, to move the player forward and backward. The value of 1 means forward and the value of 0-1 means backward.
- MoveRight: Will be using the keyboard's A/D or the controller X axis of the left thumb stick to move the player right and left. The value of 1 means right and the value of 0-1 means left.
- TurnRate: Will be using the keyboard arrows or the X axis of the right thumb stick of the controller to rotate the camera sideways.
- Turn: Will rotate the camera sideways using the mouse.
- LookUpRate: Will be using the Y axis of the right thumb stick of the controller to rotate the camera up and down.
- LookUp: Will lookup using the mouse Y axis.
The end result of this axis key mapping should eventually be something like this:

Now you have successfully mapped the game inputs. Keep in mind that you might need to map more keys in the future, but those are the keys I needed for Bellz. If you need more you can keep adding and mapping keys based on your game design. Personally I found those inputs are enough for our current example.
If you still remember the project directory we mentioned earlier in this chapter, there was a config folder for the project. If you access this config folder, and you open the DefaultInput.ini file using any text editor, you will find the input mapping that you've already done at the end of the DefaultInput.ini file. This means those inputs are modifiable at any time because the shipped game will have a similar file eventually!


