Search icon CANCEL
Subscription
0
Cart icon
Your Cart (0 item)
Close icon
You have no products in your basket yet
Save more on your purchases! discount-offer-chevron-icon
Savings automatically calculated. No voucher code required.
Arrow left icon
Explore Products
Best Sellers
New Releases
Books
Videos
Audiobooks
Learning Hub
Newsletter Hub
Free Learning
Arrow right icon
timer SALE ENDS IN
0 Days
:
00 Hours
:
00 Minutes
:
00 Seconds
Arrow up icon
GO TO TOP
Mastering Lumion 3D

You're reading from   Mastering Lumion 3D Master the art of creating real-time 3D architectural visualizations using Lumion 3D

Arrow left icon
Product type Paperback
Published in Dec 2014
Publisher
ISBN-13 9781783552030
Length 286 pages
Edition 1st Edition
Concepts
Arrow right icon
Author (1):
Arrow left icon
Ciro Cardoso Ciro Cardoso
Author Profile Icon Ciro Cardoso
Ciro Cardoso
Arrow right icon
View More author details
Toc

Table of Contents (12) Chapters Close

Preface 1. Getting Ready for Lumion 3D FREE CHAPTER 2. Creating a Project in Lumion 3. Importing 3D Models 4. Applying and Creating Materials 5. Creating Your 3D World 6. Lighting in Lumion 7. Creating Realistic Visualizations 8. Non-photorealistic Visualizations with Lumion 9. Animation Techniques 10. Creating Walk-through Visualizations Index

Adding Lumion's objects to the scene


To import a Lumion 3D model, we need to use another menu called Objects. I am sure you still remember the Checking Lumion's content section, where we saw that after opening this menu, we have access to eight categories of 3D models and objects to populate the scene.

On the left-hand side, open the Objects menu, and by default, the Nature category is selected. Let's stick to this category for now and select the Place object button, as shown in the following screenshot:
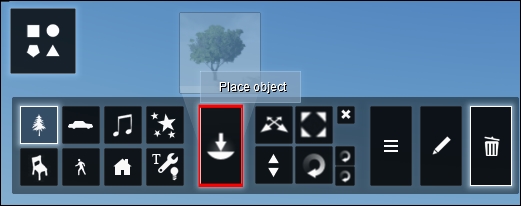
As you can see in the previous screenshot, a tree is already loaded, and when we click on the button again, the yellow wireframe box appears. This yellow box is very useful because, without too much effort, we get feedback on how big the object is. Also, since the box is only a wireframe, we can see where the 3D model will be placed. If you need to change the 3D model, there is a thumbnail called Change object above the Place object button; this thumbnail gives you access to the different...

lock icon The rest of the chapter is locked
Register for a free Packt account to unlock a world of extra content!
A free Packt account unlocks extra newsletters, articles, discounted offers, and much more. Start advancing your knowledge today.
Unlock this book and the full library FREE for 7 days
Get unlimited access to 7000+ expert-authored eBooks and videos courses covering every tech area you can think of
Renews at $19.99/month. Cancel anytime
Banner background image