Search icon CANCEL
Arrow left icon
Explore Products
Best Sellers
New Releases
Books
Videos
Audiobooks
Learning Hub
Conferences
Free Learning
Arrow right icon
Arrow up icon
GO TO TOP
Learn Microsoft Office 2019

You're reading from   Learn Microsoft Office 2019 A comprehensive guide to getting started with Word, PowerPoint, Excel, Access, and Outlook

Arrow left icon
Product type Paperback
Published in May 2020
Publisher Packt
ISBN-13 9781839217258
Length 794 pages
Edition 1st Edition
Tools
Arrow right icon
Author (1):
Arrow left icon
Linda Foulkes Linda Foulkes
Author Profile Icon Linda Foulkes
Linda Foulkes
Arrow right icon
View More author details
Toc

Table of Contents (26) Chapters Close

Preface 1. Section 1: Word
2. Exploring the Interface and Formatting Elements FREE CHAPTER 3. Creating Lists and Constructing Advanced Tables 4. Creating Professional Documents 5. Versions, Restrictions, and Comparisons 6. Section 2: PowerPoint
7. The PowerPoint Interface and Presentation Options 8. Formatting Slides, Tables, Charts, and Graphic Elements 9. Photo Albums, Sections, and Show Tools 10. Section 3: Excel
11. Formatting, Manipulating, and Presenting Data Visually 12. Applying Formulas and Functions 13. Analyzing and Organizing Data 14. Section 4: Common Tasks
15. Exporting and Optimizing Files and the Browser View 16. Sharing and Protecting Files 17. Section 5: Access
18. Database Organization and Setting Relationships 19. Building Forms and Report Design 20. Constructing Queries to Analyze Data 21. Section 6: Outlook
22. Creating and Attaching Item Content 23. Managing Mail and Contacts 24. Calendar Objects, Tasks, Notes, and Journal Entries 25. Other Books You May Enjoy

Creating tables

In this topic, we will create a table and become familiar with table elements, enter text, and master table selection techniques. Tables are used to display information in a list or to organize information in rows and columns. There is more than one way to insert a table in Word. Let's review them while referring to the following screenshot:
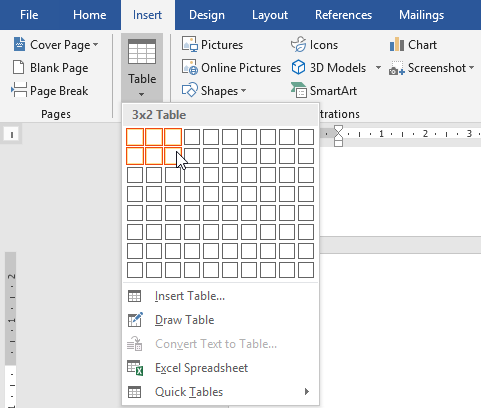
  1. Using the Table icon from the Insert tab (shown in the preceding screenshot), and selecting the number of columns and rows you require by clicking and dragging the mouse pointer over the rows and columns provided.
  2. Using the Insert Table… option from the drop-down list on the Table icon from the Insert tab, and specifying the number of rows and columns you require.
  3. Using the Draw Table option.
  4. Inserting a quick table. A gallery of table formats will appear, from which to choose styles. Adjust the content as necessary...
lock icon The rest of the chapter is locked
Register for a free Packt account to unlock a world of extra content!
A free Packt account unlocks extra newsletters, articles, discounted offers, and much more. Start advancing your knowledge today.
Unlock this book and the full library FREE for 7 days
Get unlimited access to 7000+ expert-authored eBooks and videos courses covering every tech area you can think of
Renews at $19.99/month. Cancel anytime