As mentioned in Chapter 1, A Rabbit Springs to Life, a physical network connection must be established between the application servers and RabbitMQ. An Advanced Message Queuing Protocol (AMQP) connection is a link between the client and the broker that performs underlying networking tasks, including initial authentication, IP resolution, and networking:

Each AMQP connection maintains a set of underlying channels. A channel reuses a connection, forgoing the need to reauthorize and open a new TCP stream, making it more resource-efficient.
The following diagram illustrates a channel within a connection between an application and RabbitMQ:

Unlike creating channels, creating connections is a costly operation, very much like it is with database connections. Typically, database connections are pooled, where each instance of the pool is used by a single execution thread. AMQP is different in the sense that a single connection can be used by many threads through many multiplexed channels.
The handshake process for an AMQP connection requires at least seven TCP packets, and even more when using TLS. Channels can be opened and closed more frequently if needed:
- AMQP connections: 7 TCP packages
- AMQP channel: 2 TCP packages
- AMQP publish: 1 TCP package (more for larger messages)
- AMQP close channel: 2 TCP packages
- AMQP close connection: 2 TCP packages
- Total 14-19 packages (plus Acks)
The following diagram illustrates an overview of the information that's sent to connections and channels:

Establishing a single long-lived connection between the Application Service and RabbitMQ is a good start.
A decision must be made regarding which programming language and client library to use. The first few examples in this book are written in Ruby, and the client library Bunny (https://github.com/ruby-amqp/bunny) is used to publish and consume messages. Ruby is an easy language to read and understand, even if it is unfamiliar to you.
The application must be configured to use a certain connection endpoint, often referred to as a connection string; for example, a host and port. The connection string contains the information needed to be able to establish a connection. AMQP's assigned port number is 5672. TLS/SSL-encrypted AMQP can be used via AMQPS; it's a secure version of the AMQP protocol that's assigned port 5671.
The library is the element that opens the TCP connection to the target IP address and port. The connection parameters have been added as a URI string to an environment variable to the code called RABBITMQ_URI. There is no URI standard for AMQP URIs, but this format is widely used:
RABBITMQ_URI="amqp://user:password@host/vhost"
According to the Ruby (Bunny) documentation, connecting to RabbitMQ is simple. The code for this is divided into code blocks, and can be found later in this chapter:
- Add the username, the password, and the vhost that were set up in Chapter 1, A Rabbit Springs to Life, and then add the string to an environment variable on the machine:
RABBITMQ_URI="amqp://cc-dev:taxi123@localhost/cc-dev-vhost"
- Require the bunny client library:
# Require client library
require "bunny"
- Read the connection URI from the environment variable and start a connection:
connection = Bunny.new ENV['RABBITMQ_URI']
# Start a session with RabbitMQ
connection.start
This seems straightforward so far, but CC requires production-grade code that can gracefully handle failures. What if RabbitMQ is not running? Clearly, it is bad if the whole application is down. What if RabbitMQ needs to be restarted? CC wants its application to recover gracefully if any issues occur. In fact, CC wants its application to keep functioning, regardless of whether the whole messaging subsystem is working or not. The user experience must be smooth and easy to understand, as well as reliable.
In summary, the behavior CC wishes to achieve is as follows:
- If the connection to RabbitMQ is lost, it should reconnect by itself.
- If the connection is down, sending or fetching messages should fail gracefully.
When the application connects to the broker, it needs to handle connection failures. No network is reliable all the time and misconfigurations and mistakes happen; the broker might be down, and so on. While not automatic, in this case, error detection should happen early in the process.
To handle TCP connection failures in Bunny, it is necessary to catch the exception:
begin
  connection = Bunny.new ENV['RABBITMQ_URI']
  connection.start
rescue Bunny::TCPConnectionFailed => e
  puts "Connection to server failed"
end
Detecting network connection failures is nearly useless if an application cannot recover from them. Recovery is an important part of error handling.
Some client libraries offer automatic connection recovery features that include consumer recovery. Any operation that's attempted on a closed channel will fail with an exception. If Bunny detects a TCP connection failure, it will try to reconnect every 5 seconds with no limit regarding the number of reconnection attempts. It is possible to disable automatic connection recovery by adding automatic_recovery => false to Bunny.new. This setting should only be used if you're reconnecting in some other way, or when testing the connection string.
Messages can be sent across languages, platforms, and operating systems. You can choose from a number of different client libraries for different languages. There are lots of client libraries out there, but here are some that are recommended:
- Python: Pika
- Node.js: amqplib
- PHP: php-amqplib
- Java: amqp-client
- Clojure: Langohr
This section has shown how CC manages to establish a connection to RabbitMQ. We demonstrated why a long-lived connection is recommended and how to handle some common errors. Now, it's time to create a channel inside the connection.
Working with channels
Every AMQP protocol-related operation occurs over a channel. The channel instances are created by the connection instance. As described, a channel is a virtual (AMQP) connection inside the (TCP) connection. All operations performed by a client happen on a channel, queues are declared on channels, and messages are sent over channels.
A channel never exists on its own; it's always in the context of a connection:
# Declare a channel
channel = connection.create_channel
Channels in a connection are closed once the connection is closed or when a channel error occurs. Client libraries allow us to observe and react to channel exceptions.
More exceptions are usually thrown at a channel level than at the connection level. Channel-level exceptions often indicate errors the application can recover from, such as, when it has no permissions, or when attempting to consume from a deleted queue. Any attempted operation on a closed channel will also fail with an exception.
CC is now able to connect to a RabbitMQ broker, open a channel, and issue a series of commands, all in a thread-safe and exception-safe manner. It's now time to build on this foundation!
Building the taxi request tool
Now, it's time to build the message flow.
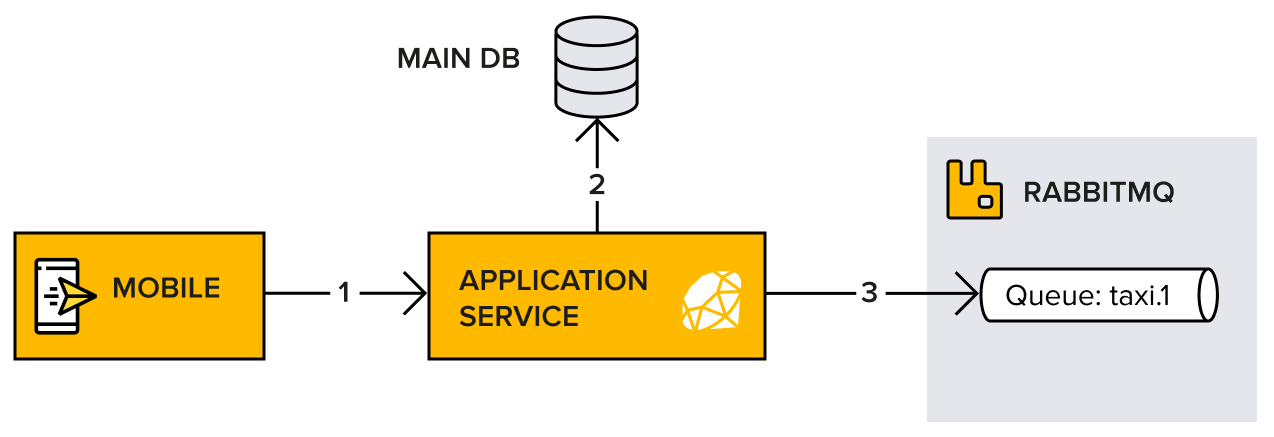
First, the customer will send a simple HTTP request from the mobile application to the Application Service. This message will contain meta-information such as a timestamp, sender and receiver IDs, and the destination and requested taxi ID.
The message flow will look something like this:

The Application Service stores the information in a database so that all the data becomes visible for the data analysis scripts in a later state.
The flow between the mobile device, the Application Service, and RabbitMQ is illustrated in the following diagram:

Regarding our main flow, the discussion about AMQP in Chapter 1, A Rabbit Springs to Life, detailed how messages are published to exchanges after being routed to queues to be consumed.
A routing strategy determines which queue (or queues) the message will be routed to. The routing strategy bases its decision on a routing key (a free-form string) and potentially on message meta-information. Think of the routing key as an address that the exchange uses to decide how the message should be routed. It also needs to be a binding between an exchange and the queue to enable a message to flow from the former to the latter.
Now, let's explore the direct exchange.
The direct exchange
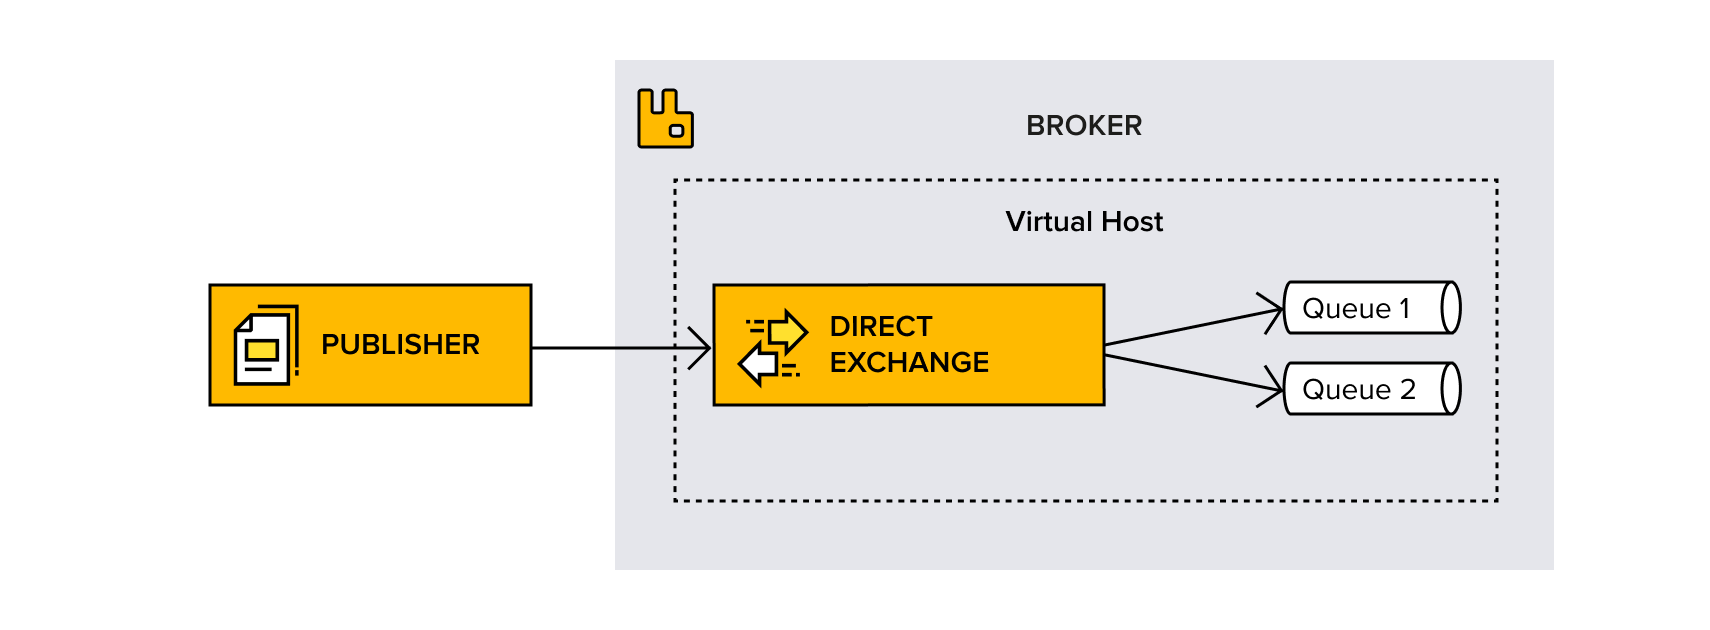
A direct exchange delivers messages to queues based on a message routing key. A message goes to the queue(s) whose bindings routine key matches the routing key of the message.
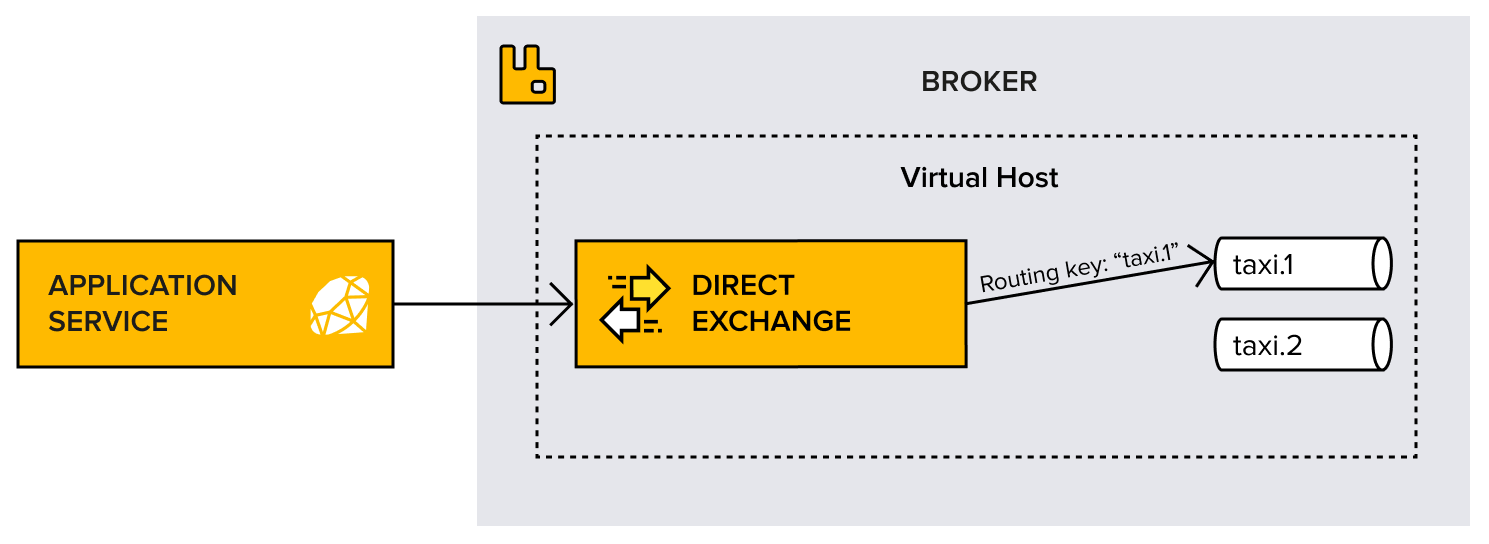
CC only has two cars, so it starts out with a simple communication system where one customer can request a taxi from one driver. In this case, one message needs to be routed to the queue acting as the inbox of that driver. Therefore, the exchange-routing strategy that will be used is a direct one, matching the destination queue name with the routing key used when the message is produced, as illustrated in the following diagram:

An example use case of direct exchange could be as follows:
- The customer orders the taxi named taxi.1. An HTTP request is sent from the customer's mobile application to the Application Service.
- The Application Service sends a message to RabbitMQ with a routing key, taxi.1. The message routing key matches the name of the queue, so the message ends up in the taxi.1 queue.
The following diagram demonstrates how the direct exchange message routing would happen:

This may not be the most efficient approach to scale. In fact, it will be reviewed as soon as CC has more cars, but it's the easiest way to get started and launch the application fast.
Let's follow the first code CC creates as the initial application and learn about the different concepts at the same time. The code at the beginning of the code block has been taken from the connection and channel section:
- Require the bunny client library.
- Read the URI connection from the environment variable and start a connection.
- Start a communication session with RabbitMQ.
- Declare the taxi.1 queue.
- Declare the taxi.1 direct exchange.
- Bind the taxi.1 queue to the taxi-direct exchange with the taxi.1 routing key:
# 1. Require client library
require "bunny"

# 2. Read RABBITMQ_URI from ENV
connection = Bunny.new ENV["'RABBITMQ_URI"]

# 3. Start a communication session with RabbitMQ
connection.start
channel = connection.create_channel

def on_start(channel)
 # 4. Declare a queue for a given taxi
 queue = channel.queue("taxi.1", durable: true)
 # 5. Declare a direct exchange, taxi-direct
 exchange = channel.direct("taxi-direct", durable: true, auto_delete: true)

 # 6. Bind the queue to the exchange
 queue.bind(exchange, routing_key: "taxi.1")

 # 7. Return the exchange
 exchange
end

exchange = on_start(channel)
It's a bit of an overkill and unnecessary to declare queues and exchanges for every message that's sent, so it's highly recommended to create a method that handles the setup of the application. This should be a method that creates the connection and declares queues, exchanges, and so on. The method in this example is simply called on_start, which declares the queue and binds an exchange to the queue.
If the exchange doesn't exist when something is published to it, it will raise exceptions. If the exchange already exists, it will do nothing; otherwise, it will actually create one. This is why it's safe to declare queues every time the application starts or before publishing a message.
In addition to using the direct type, CC has configured the durable type, autoDelete, and the argument properties of the exchange. This exchange should not go away after a restart of RabbitMQ, nor when it's unused, which explains the values used in the configuration.
After creating the exchange, the taxi queue is created and bound to it.
The queue is declared with a similar approach to an exchange, but with slightly different properties, as follows:
- durable: True – the queue must stay declared, even after a broker restart.
- autoDelete: False – keep the queue, even if it's not being consumed anymore.
- exclusive: False – this queue should be able to be consumed by other connections (several application servers can be connected to RabbitMQ and accessed from different connections).
- arguments: Null – no need to custom configure the queue.
The queue is bound to the exchange using its own name as the routing key so that the direct routing strategy can route messages to it. When this is done, publishing messages to the taxi-direct exchange will actually deliver messages to the taxi queue whose name matches the published routing key.
If no queue is bound to an exchange, or if the routing strategy can't find a matching destination queue, the message that was published to the exchange will be discarded silently. As an option, it is possible to be notified when unroutable messages are discarded, as shown in subsequent chapters.
Again, when the same properties are used, these operations are idempotent, so the queue can safely be declared and bound to the exchange, again and again
Although direct exchange has been covered in this chapter, AMQP 0-9-1 brokers provide four different types of exchanges. Depending on the binding setups you have between queues and parameters, these exchanges route messages differently. The upcoming chapters look closer at the other types of exchanges. For now, here is a short explanation of each:
- Fanout: Messages are routed to all queues bound to the fanout exchange.
- Topic: Wildcards must form a match between the routing key and the binding's specific routing pattern.
- Headers: Use the message header attributes for routing.
Now, it's time to send our first message to RabbitMQ!


