Running PowerShell 7
The first way everyone runs PowerShell is through the bundled console (remember, PowerShell is not just a language, it’s a shell and a configuration management framework as well). Let’s assume that you installed using the .msi method from before, and you added PowerShell to the PATH environment variable. If you’ve done this, then all you need to do to start PowerShell is type pwsh into the Windows search bar and click on the application. Alternatively, you can right-click the Start menu and type pwsh in the Run box. Or, you could just hold down the Windows key and press R, which would call up the Run box as well.
If you didn’t add PowerShell to the path, you will need to type the full path to the executable pwsh, as in C:\program files\PowerShell\7\pwsh.
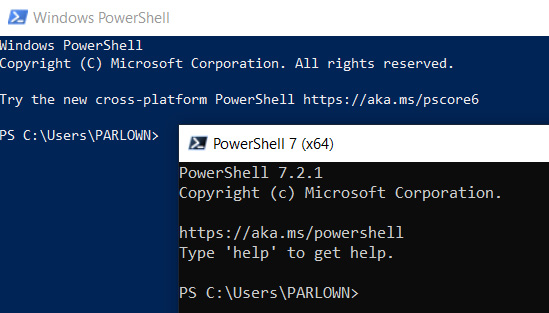
The first thing you will notice if you’ve been paying attention to the preceding screenshots or you’ve followed along is that the console window that comes up has a black background. This differentiates it from Windows PowerShell:

Figure 1.8 – Two different versions of PowerShell
If you have installed PowerShell on Linux or macOS, then open a Terminal and type pwsh – the Terminal will switch to a PowerShell prompt.
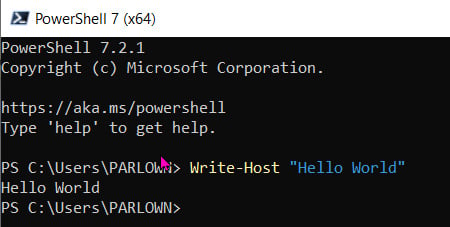
It is traditional in most programming books that the first thing you do is coax your application to produce the words "Hello World" onscreen, and there’s no reason we should be any different. Type the following into the console and press Enter:
Write-Host "Hello World"
You should get something like this:

Figure 1.9 – Hello yourself
If you did it, congratulations! You’ve just run your first PowerShell command, or cmdlet, as they are called.
Notice that the console automatically colors things that it recognizes or expects; cmdlets are yellow, strings are blue. It’s also very forgiving – if you had forgotten the inverted commas, then "Hello World" would not have been blue, but PowerShell would have interpreted it correctly anyway.
Note
Be careful with this; while PowerShell is quite clever, it won’t always interpret input the way you hope. It’s best to tell it explicitly what type of input you are giving it. More on this later.
The most likely cause of an error is that you misspelled the cmdlet or didn’t close the inverted commas, as illustrated in the next figure. You’ll see a helpful red error message telling you what you’ve done wrong and suggesting ways to fix it. I have come to cherish these error messages:

Figure 1.10 – Three ways to be wrong
In the third attempt, I didn’t close the inverted commas, so PowerShell was expecting more input. It told us this with >> on the line below. It also told us that it didn’t think the cmdlet would run as you have written it by coloring the > in the Command Prompt in red.
Note that unlike in some environments, capitalization here doesn’t matter; write-host is functionally the same as Write-Host.
Running PowerShell with administrator privileges
By default, PowerShell will run under the account that launches it, but it will only have standard user privileges. If you need access to your local machine that would normally require administrator privileges, then PowerShell will either fail to run some cmdlets or give you a User Account Control (UAC) prompt. To prevent this, you need to start PowerShell with administrator privileges. There are many ways to do this, but here are two of the most common.
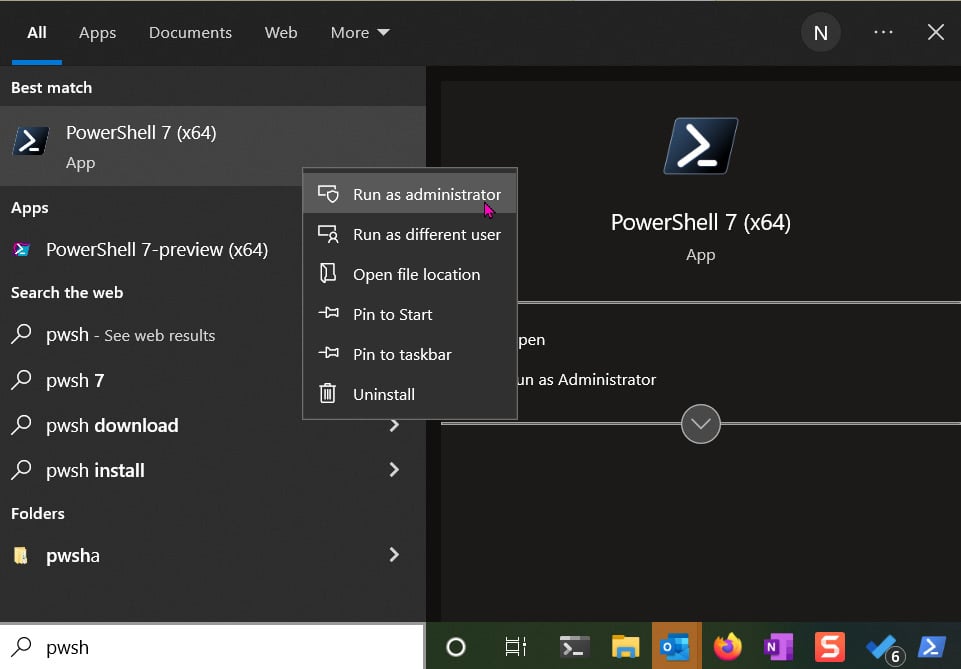
Firstly, you can open the search bar, type pwsh, and then right-click on the PowerShell 7 icon and select Run as administrator:

Figure 1.11 – Starting PowerShell as an administrator
The second, slightly more impressive method is to hit the Windows key + R to bring up the Run box, type pwsh, and then hold down Ctrl + Shift + Enter. This will start PowerShell as an admin.
PowerShell clearly shows whether it is running with admin privileges in the window title. Here are two PowerShell sessions running the same cmdlet. The lower window is running with admin privileges:

Figure 1.12 – Sometimes you have to be an admin
If administrator mode is something you are likely to use a lot, then it’s easiest to just right-click the PowerShell icon when it’s running and select Pin to taskbar. Then you can right-click the pinned icon whenever you need it and select Run as administrator.
Autocomplete
By now, you’re probably getting a little tired of having to type a lot of long and unfamiliar cmdlets in. Let me show you a great feature of the shell: autocomplete. Try this – in your shell, type the following without pressing Enter:
Stop-s
Now press the Tab key. Cool, isn’t it? But it’s not the cmdlet we want. Press the Tab key again. You should now have the Stop-Service cmdlet fully typed. Now, add a space, type -, and press the Tab key again. Keep pressing the Tab key until you’ve gone through all the possible parameters for the Stop-Service cmdlet. Press Esc when you’ve done that.
This is a great way to avoid typing out loads of letters, but it’s also a really good way of checking that what you are doing will work. If autocomplete doesn’t work, then the chances are that the cmdlet, parameter, or option you want isn’t available on this machine.
In the next chapter, we’ll look at some other ways of starting and using PowerShell, but for now, you’re all set with what you need.


