Implementing and Managing Domains
The managed domain is a part of the Microsoft 365 tenant for its entire life cycle. While it is a fully functioning domain namespace (complete with its own Microsoft-managed publicly available domain namespace), most organizations will want to use their organization’s domain name—especially when it comes to sending and receiving email or communicating via Microsoft Teams. You cannot add custom DNS records to the managed namespace.
Organizations can use any public domain name with Microsoft 365. Microsoft supports configuring up to 900 domains in a tenant; you can configure both top-level domains (such as contoso.com) as well as subdomains (such as businessunit.contoso.com) with your Microsoft 365 tenant.
Acquiring a Domain Name
Many organizations begin their Microsoft 365 journey with an existing domain name. In addition, you can purchase new domain names to be associated with your tenant.
Third-party Registrar
Most large organizations have existing relationships with third-party domain registrars, such as Network Solutions or GoDaddy. You can use any ICANN-accredited registrar in your region to purchase domain names.
About ICANN
The Internet Corporation for Assigned Names and Numbers (ICANN) is a non-profit organization tasked with providing guidance and policy around the internet’s unique identifiers (domains). It was chartered in 1998. Prior to 1998, Network Solutions operated the global Domain Name System (DNS) registry under a subcontract from the United States Defense Information Systems Agency.
You can search a list of domain registrars here: https://www.icann.org/en/accredited-registrars.
Microsoft
In addition to choosing a third-party registrar, organizations may also wish to use Microsoft as the registrar. Depending on your subscription, you may be able to directly purchase domain names from within the Microsoft 365 admin center, as shown in Figure 1.5:

Figure 1.5 – Purchasing a domain through the Microsoft 365 admin center
When purchasing a domain through Microsoft, you can select from the following top-level domains:
.biz.com.info.me.mobi.net.org.tv.co.uk.org.uk
Domain purchases will be billed separately from your Microsoft 365 subscription services. When purchasing a domain from Microsoft, you’ll have limited ability to manage the DNS records. If you require custom configuration (such as configuring an MX record to point to a non-Microsoft 365 server), you’ll want to purchase a domain separately.
Configuring a Domain Name
Configuring a domain for your tenant is a simple procedure and requires access to your organization’s public DNS service provider. Many large organizations may host DNS themselves, while other organizations choose to pay service providers (such as the domain registrar) to host the services.
In order to be compatible with Microsoft 365, a DNS service must support configuring the following types of records:
- Canonical Name (CNAME): CNAME records are alias records for a domain, allowing a name to point to another name as a reference. For example, let’s say you have a website named
www.contoso.comthat resolves to an IP address of1.2.3.4.Later, you want to start building websites forna.contoso.comandeu.contoso.comon the same web server. You might implement a CNAME record forna.contoso.comto point towww.contoso.com. - Text (TXT): A TXT record is a DNS record used to store unstructured information. Request for Comments (RFC) 1035 (https://tools.ietf.org/html/rfc1035) specifies that the value must be text strings and gives no specific format for the value data. Over the years, Sender Policy Framework (SPF), DomainKeys Identified Mail (DKIM), and other authentication and verification data have been published as TXT records. In addition to SPF and DKIM, the Microsoft 365 domain addition process requires the administrator to place a certain value in a TXT record to confirm ownership of the domain.
- Service Locator (SRV): An SRV record is used to specify a combination of a host in addition to a port for a particular internet protocol or service.
- Mail Exchanger (MX): The MX record is used to identify which hosts (servers or other devices) are responsible for handling mail for a domain.
In order to use a custom domain (sometimes referred to as a vanity domain) with Microsoft 365, you’ll need to add it to your tenant.
To add a custom domain, follow these steps:
- Navigate to the Microsoft 365 admin center (https://admin.microsoft.com) and log in.
- Expand Settings and select Domains.

Figure 1.6 – Domains page of the Microsoft 365 admin center
- Click Add domain.
- On the Add domain page, enter the custom domain name you wish to add to your Microsoft 365 tenant. Select Use this domain to continue.
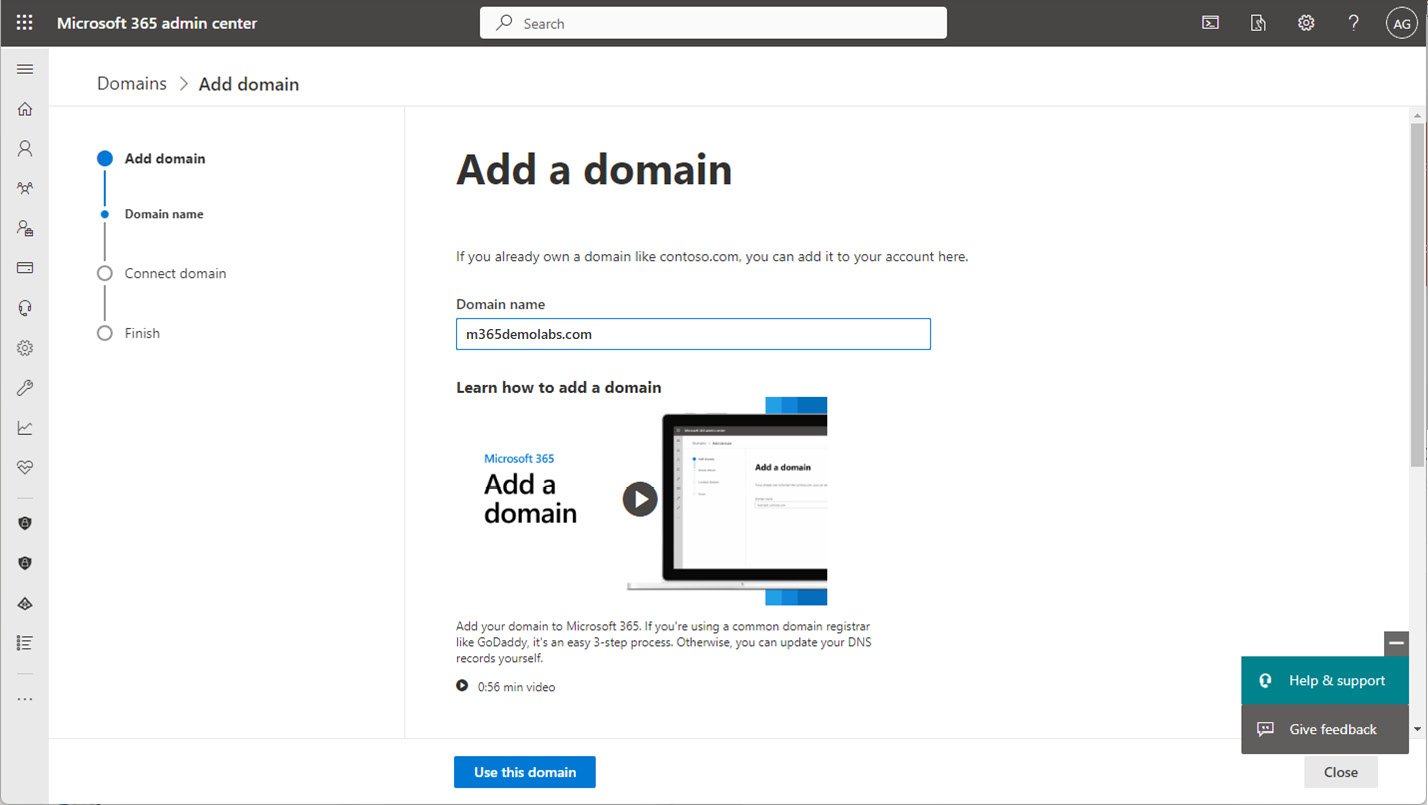
Figure 1.7 – Add domain page
- If your domain is registered at a host that supports Domain Connect, you can provide your credentials to the Microsoft 365 Add domain wizard and click Verify. Microsoft will automatically configure the necessary domain records and complete the entire DNS setup for you. You can also select More options to see all of the potential verification methods available, as shown in Figure 1.8:
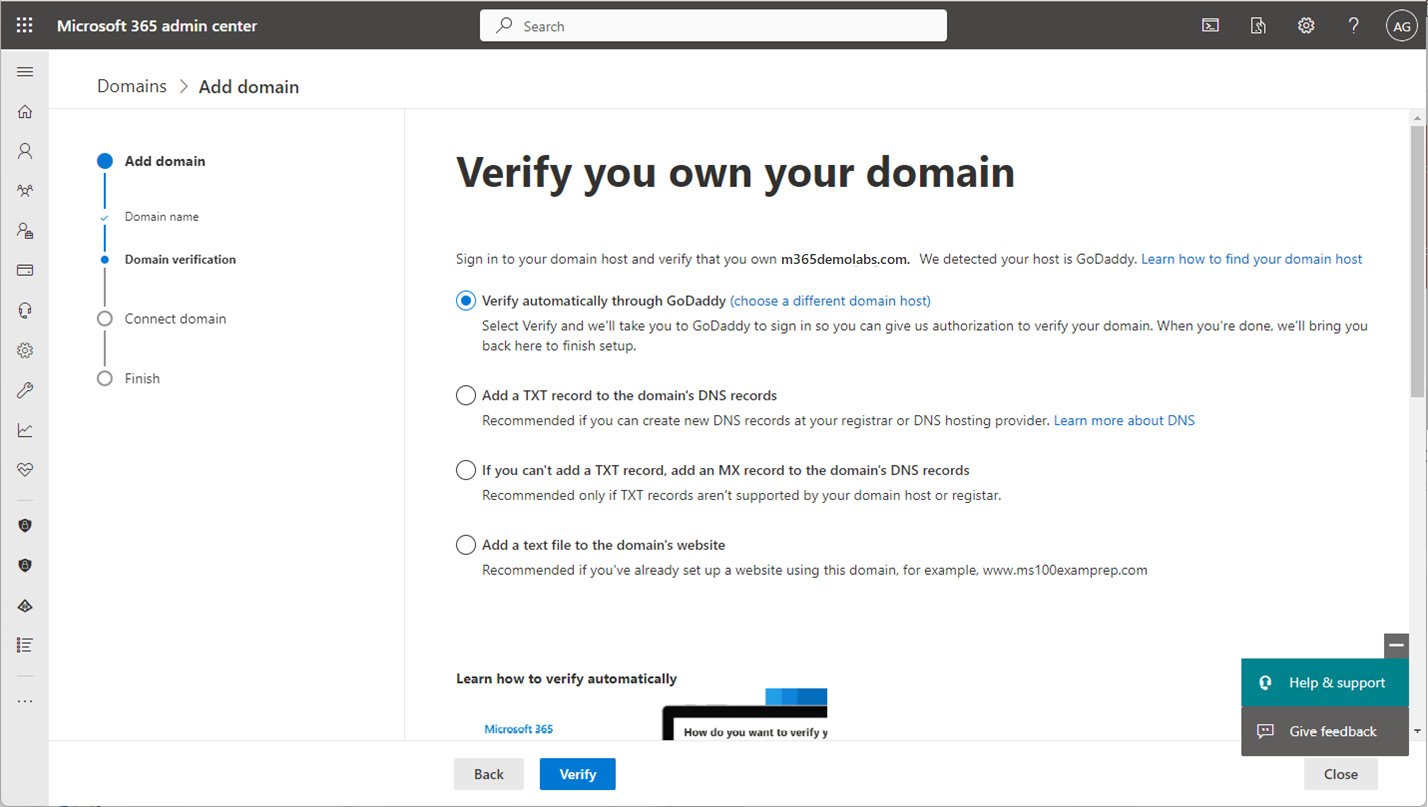
Figure 1.8 – Verify domain ownership
If you choose any of the additional verification options (such as Add a TXT record to the domain’s DNS records), you’ll need to manually add DNS records at your DNS service provider. Microsoft provides the value configuration parameters necessary for you to configure with your own service provider. After entering the values in your service provider’s DNS console, you can come back to the wizard and select Verify, as shown in Figure 1.9:
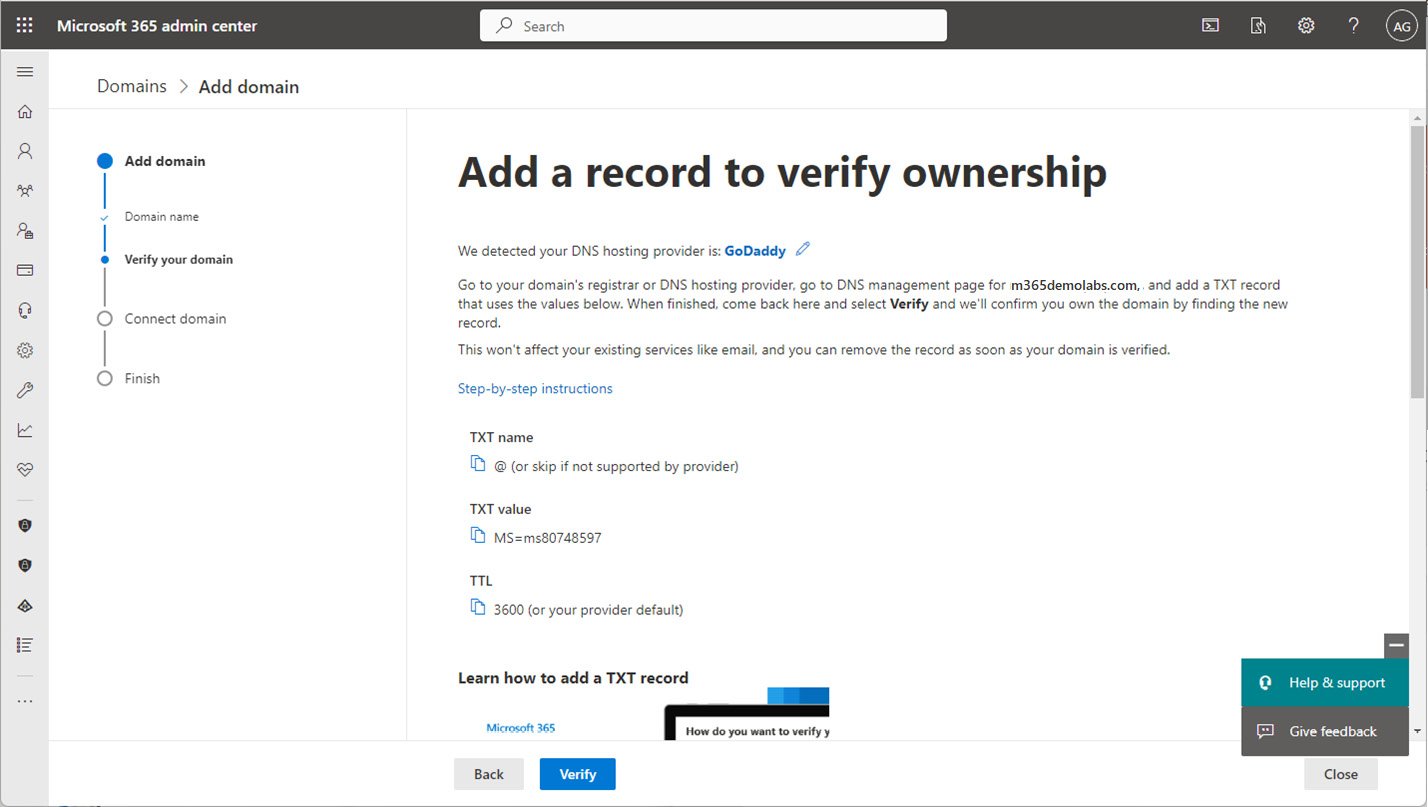
Figure 1.9 – Completing verification records manually
- If using a registrar that supports Domain Connect, enter the credentials for your registrar. When ready, click Connect. See Figure 1.10:
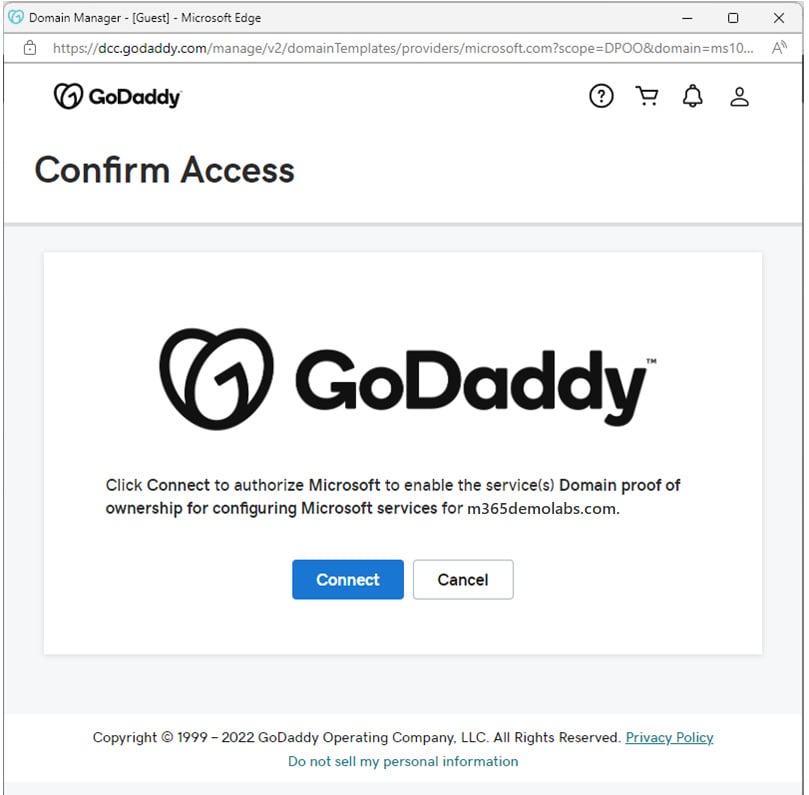
Figure 1.10 – Authorizing Domain Connect with GoDaddy to update DNS records
- Select Let Microsoft add your DNS records (recommended) to have the Microsoft 365 wizard update your organization’s DNS records at the registrar; however, if you are going to be configuring advanced scenarios such as Exchange Hybrid for mail coexistence and migration or have other complex requirements, you may want to consider managing the DNS records manually or opting out of select services. Click Continue.
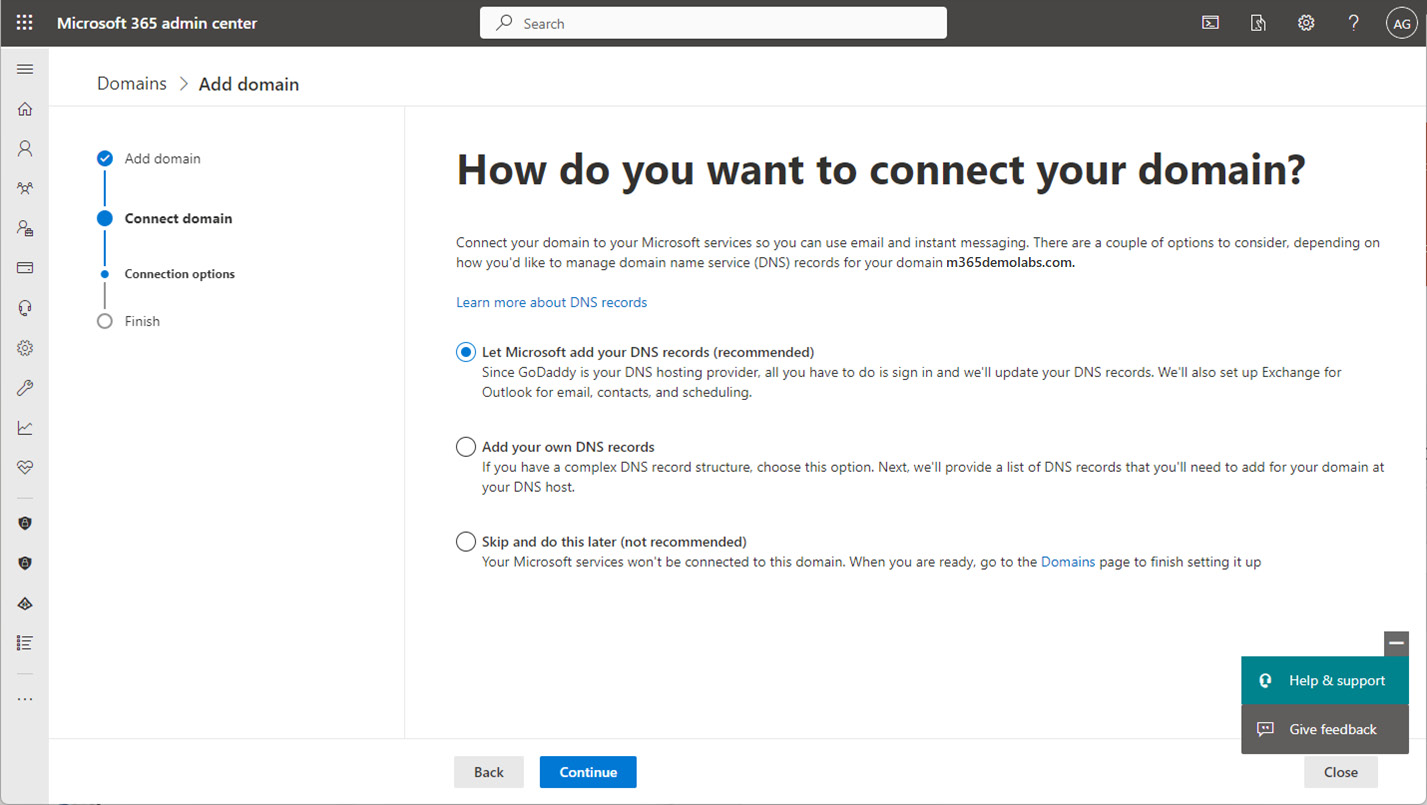
Figure 1.11 – Connecting domain to Microsoft 365
- Choose whether to allow Microsoft to add DNS records. Expand the Advanced options dropdown:
- The first checkbox, Exchange and Exchange Online Protection, manages DNS settings for Outlook and email delivery. If you have an existing Exchange Server deployment on-premises (or another mail service solution), you should clear this checkbox before continuing. You’ll need to come back to configure DNS settings to establish hybrid connectivity correctly. The default selected option means that Microsoft will make the following updates to your organization’s DNS:
- Your organization’s MX record will be updated to point to Exchange Online Protection.
- The Exchange Autodiscover record will be updated to point to
autodiscover.outlook.com. - Microsoft will update your organization’s SPF record with
v=spf1include:spf.protection.outlook.com -all.
- The first checkbox, Exchange and Exchange Online Protection, manages DNS settings for Outlook and email delivery. If you have an existing Exchange Server deployment on-premises (or another mail service solution), you should clear this checkbox before continuing. You’ll need to come back to configure DNS settings to establish hybrid connectivity correctly. The default selected option means that Microsoft will make the following updates to your organization’s DNS:
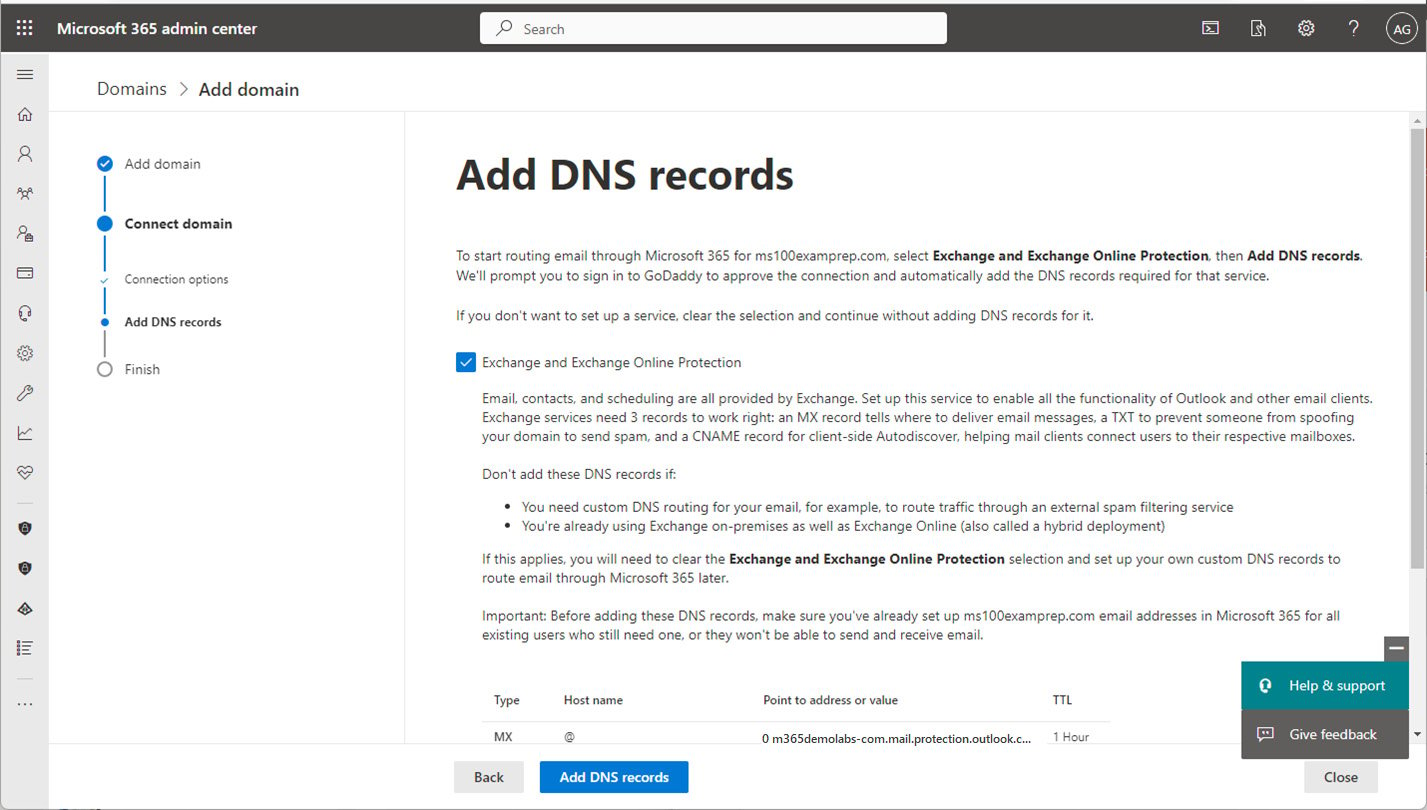
Figure 1.12 – Adding DNS records
- The second setting, Skype for Business, will configure DNS settings for Skype for Business. If you have an existing Skype for Business Online deployment or you’re using Skype for Business on-premises, you may need to clear this box until you verify your configuration:
- Microsoft will add two SRV records:
_sip._tls.@<domain>and_sipfederationtls._tcp@<domain>. - Microsoft will also add two CNAMEs for Lync:
sip.<domain>to point tosipdir.online.lync.comandlyncdiscover.<domain>to point towebdir.online.lync.com.
- Microsoft will add two SRV records:
- The third checkbox, Intune and Mobile Device Management for Microsoft 365, configures applicable DNS settings for device registration. It is recommended to leave this enabled:
- Microsoft will add the following CNAME entries to support mobile device registration and management:
enterpriseenrollment.<domain>toenterpriseenrollment.manage.microsoft.comandenterpriseregistration.<domain>toenterpriseregistration.windows.net.
- Microsoft will add the following CNAME entries to support mobile device registration and management:
- Click Add DNS records.
- If prompted, click Connect to authorize Microsoft to update your registrar’s DNS settings.
- Click Done to exit the wizard or View all domains to go back to the Domains page if you need to add more domains.
You can continue adding as many domains as you need (up to the tenant maximum of 900 domains).
Adding a Domain Deep Dive
To review alternative steps and more information about the domain addition process, see https://learn.microsoft.com/en-us/microsoft-365/admin/setup/add-domain.
Managing DNS Records Manually
If you’ve opted to manage DNS records manually, you may need to go back to the Microsoft 365 admin center and view the settings. To do this, you can navigate to the Domains page, select your domain, and then select Manage DNS, as shown in Figure 1.13:

Figure 1.13 – Managing DNS settings for a domain
On the Connect domain page, click More options to expand the options, and then select Add your own DNS records. From here, you can view the specific DNS settings necessary per service by record type. You can also download a CSV file or a zone file that can be uploaded to your own DNS server. See Figure 1.14:
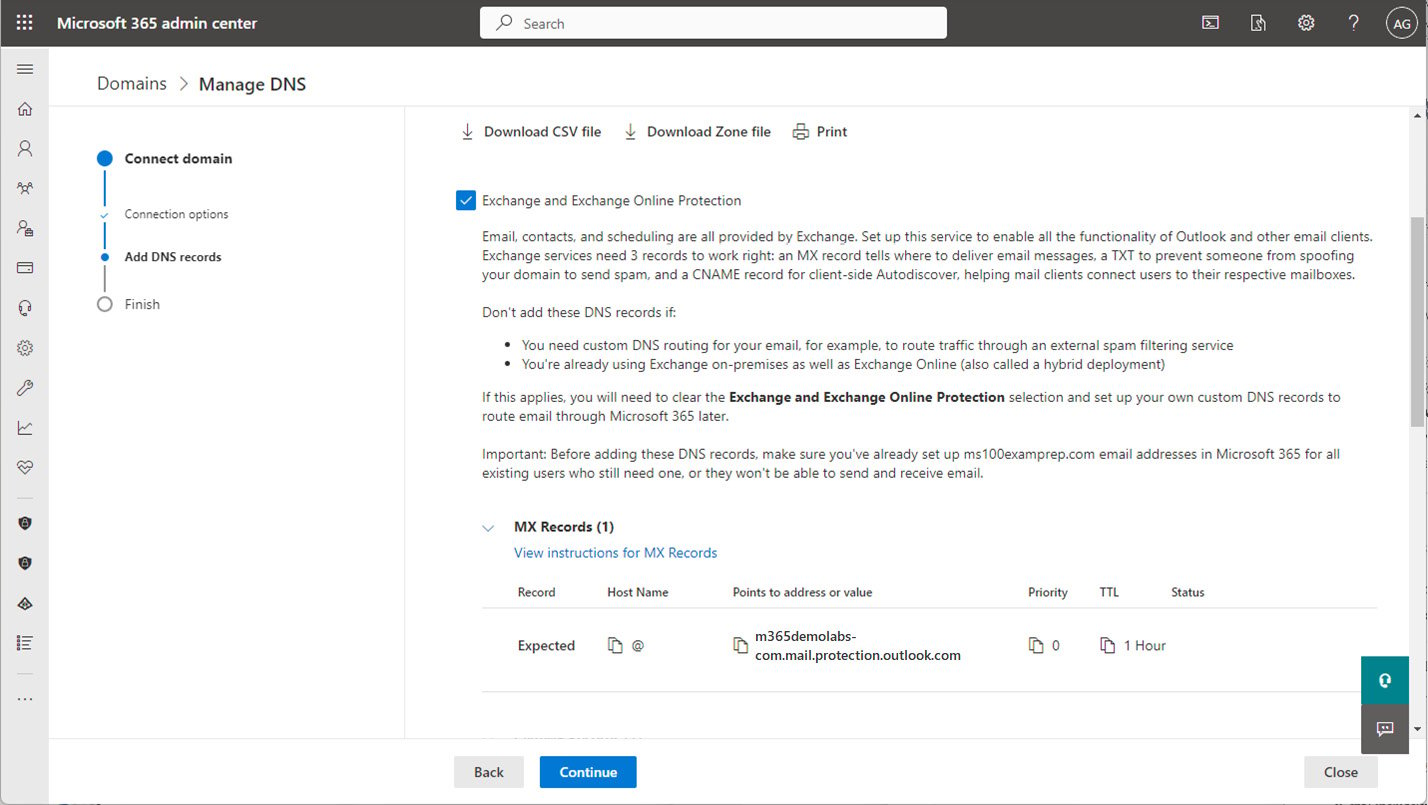
Figure 1.14 – Viewing DNS settings
The CSV output is formatted as columns, while the zone file output is formatted for use with standard DNS services and can be imported or appended to BIND or Microsoft DNS server zone files.
Configuring a Default Domain
After adding a domain, Microsoft 365 automatically sets the first custom domain as the default domain that will be used when creating new users. However, if you have additional domains, you may choose to select a different domain to be used as the default domain when creating objects.
To manage which domain will be set as your primary domain, select the domain from the Domains page and then click Set as default to update the setting, as shown in Figure 1.15:

Figure 1.15 – Setting the default domain
The default domain will be selected automatically when creating cloud-based users and groups, though it can be changed.
Custom Domains and Synchronization
When creating new cloud-based objects, you can select from any of the domains available in your tenant. However, when synchronizing from an on-premises directory, objects will be configured with the same domain configured with the on-premises object. If the corresponding domain hasn’t been verified in the tenant, synchronized objects will be set to use the tenant-managed domain.
Next, you’ll look at the core organizational settings in a tenant.


