Search icon CANCEL
Subscription
0
Cart icon
Your Cart (0 item)
Close icon
You have no products in your basket yet
Save more on your purchases! discount-offer-chevron-icon
Savings automatically calculated. No voucher code required.
Arrow left icon
Explore Products
Best Sellers
New Releases
Books
Videos
Audiobooks
Learning Hub
Free Learning
Arrow right icon
Arrow up icon
GO TO TOP
Building Minecraft Server Modifications

You're reading from   Building Minecraft Server Modifications Discover how to program your own server plugins and augment your Minecraft server with Bukkit

Arrow left icon
Product type Paperback
Published in Sep 2013
Publisher Packt
ISBN-13 9781849696005
Length 142 pages
Edition 1st Edition
Languages
Concepts
Arrow right icon
Author (1):
Arrow left icon
Cody M. Sommer Cody M. Sommer
Author Profile Icon Cody M. Sommer
Cody M. Sommer
Arrow right icon
View More author details
Toc

Table of Contents (17) Chapters Close

Building Minecraft Server Modifications
Credits
About the Author
About the Reviewers
www.PacktPub.com
Preface
1. Deploying a CraftBukkit Server FREE CHAPTER 2. Learning the Bukkit API 3. Creating Your First Bukkit Plugin 4. Testing on the CraftBukkit Server 5. Plugin Commands 6. Player Permissions 7. The Bukkit Event System 8. Making Your Plugin Configurable 9. Saving Your Data 10. The Bukkit Scheduler Index

Building the JAR file


In order to install a plugin on our server we need the.jar file. The jar file is a Java executable that contains all of your written code which has been translated so that the computer can understand and run it.

In NetBeans there is a single button which we can click on to build our project. This will generate the .jar file that we need. Let's add a block of code to our project to automatically copy the created .jar file to a more convenient location. In NetBeans, click on the Files tab to access the build.xml for your project.
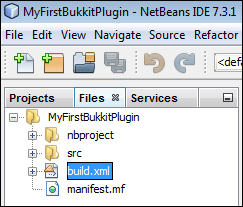
Open build.xml and add the following block of code after the import file line:

<target name="-post-jar">
  <copy file="${dist.jar}" todir="../Plugin Jars" failonerror="true"/>
</target>

This additional code will be executed after your jar is successfully built. It will copy the jar from the dist directory to the specified location. You can change "../Plugin Jars" to whichever directory you wish. Here, .. means to go up one folder...

lock icon The rest of the chapter is locked
Register for a free Packt account to unlock a world of extra content!
A free Packt account unlocks extra newsletters, articles, discounted offers, and much more. Start advancing your knowledge today.
Unlock this book and the full library FREE for 7 days
Get unlimited access to 7000+ expert-authored eBooks and videos courses covering every tech area you can think of
Renews at $19.99/month. Cancel anytime
Banner background image