Search icon CANCEL
Subscription
0
Cart icon
Close icon
You have no products in your basket yet
Save more on your purchases!
Savings automatically calculated. No voucher code required
Arrow left icon
All Products
Best Sellers
New Releases
Books
Videos
Audiobooks
Learning Hub
Newsletters
Free Learning
Arrow right icon
$9.99 | ALL EBOOKS & VIDEOS
Save more on purchases! Buy 2 and save 10%, Buy 3 and save 15%, Buy 5 and save 20%
Apache Spark 2.x Machine Learning Cookbook

Apache Spark 2.x Machine Learning Cookbook: Over 100 recipes to simplify machine learning model implementations with Spark

By Mohammed Guller , Siamak Amirghodsi , Shuen Mei , Meenakshi Rajendran , Broderick Hall
$54.99 $37.99
Book Sep 2017 666 pages 1st Edition
eBook
$43.99 $9.99
Print
$54.99 $37.99
Subscription
$15.99 Monthly
eBook
$43.99 $9.99
Print
$54.99 $37.99
Subscription
$15.99 Monthly

What do you get with Print?

Product feature icon Instant access to your digital eBook copy whilst your Print order is Shipped
Product feature icon Black & white paperback book shipped to your address
Product feature icon Download this book in EPUB and PDF formats
Product feature icon Access this title in our online reader with advanced features
Product feature icon DRM FREE - Read whenever, wherever and however you want
Buy Now
Table of content icon View table of contents Preview book icon Preview Book

Apache Spark 2.x Machine Learning Cookbook

Chapter 1. Practical Machine Learning with Spark Using Scala

In this chapter, we will cover:

  • Downloading and installing the JDK
  • Downloading and installing IntelliJ
  • Downloading and installing Spark
  • Configuring IntelliJ to work with Spark and run Spark ML sample codes
  • Running a sample ML code from Spark
  • Identifying data sources for practical machine learning
  • Running your first program using Apache Spark 2.0 with the IntelliJ IDE
  • How to add graphics to your Spark program

Introduction


With the recent advancements in cluster computing coupled with the rise of big data, the field of machine learning has been pushed to the forefront of computing. The need for an interactive platform that enables data science at scale has long been a dream that is now a reality.

The following three areas together have enabled and accelerated interactive data science at scale:

  • Apache Spark: A unified technology for data science that combines a fast compute engine and fault-tolerant data structures into a well-designed and integrated offering
  • Machine learning: A field of artificial intelligence enables machines to mimic some of the tasks originally reserved exclusively for the human brain
  • Scala: A modern JVM-based language that on traditional languages, but unites functional and object-oriented concepts without the verboseness of other languages

First, we need to set up the development environment, which will consist of the following components:

  • Spark
  • IntelliJ community edition IDE
  • Scala

The recipes in this chapter will give you detailed instructions for installing and configuring the IntelliJ IDE, Scala plugin, and Spark. After the development environment is set up, we'll proceed to run one of the Spark ML sample codes to test the setup.

Apache Spark

Apache Spark is as the de facto platform and trade for big data analytics and as a complement to the Hadoop paradigm. Spark enables a data scientist to work in the manner that is most conducive to their workflow right out of the box. Spark's approach is to process the workload in a completely distributed manner without the need for MapReduce (MR) or repeated writing of the intermediate results to a disk.

Spark provides an easy-to-use distributed framework in a unified technology stack, which has made it the platform of choice for data science projects, which more often than not require an iterative algorithm that eventually merges toward a solution. These algorithms, due to their inner workings, generate a large amount of intermediate results that need to go from one stage to the next during the intermediate steps. The need for an interactive tool with a robust native distributed machine learning library (MLlib) rules out a disk-based for most of the data science projects.

Spark has a different approach toward cluster computing. It solves the problem as a technology stack rather than as an ecosystem. A large number of centrally managed libraries combined with a lightning-fast compute engine that can support fault-tolerant data structures has poised Spark to take over Hadoop as the preferred big data platform for analytics.

Spark has a modular approach, as depicted in the following diagram:

Machine learning

The aim of learning is to produce machines and devices that can mimic human intelligence and automate some of the tasks that have been traditionally reserved for a human brain. Machine learning algorithms are designed to go through very large data sets in a relatively short time and approximate answers that would have taken a human much longer to process.

The field of machine learning can be classified into many forms and at a high level, it can be classified as supervised and unsupervised learning. Supervised learning algorithms are a class of ML algorithms that use a training set (that is, labeled data) to compute a probabilistic distribution or graphical model that in turn allows them to classify the new data points without further human intervention. Unsupervised learning is a type of machine learning algorithm used to draw inferences from datasets consisting of input data without labeled responses.

Out of the box, Spark offers a rich set of ML algorithms that can be deployed on large datasets without any further coding. The following figure depicts Spark's MLlib as a mind map. Spark's MLlib is designed to take advantage of parallelism while having fault-tolerant distributed data structures. Spark refers to such data structures as Resilient Distributed Datasets or RDDs:

Scala

Scala is a modern language that is emerging as an alternative to traditional programming languages such as Java and C++. Scala is a JVM-based language not only offers a concise syntax without the traditional boilerplate code, but also incorporates both object-oriented and programming into an extremely crisp and extraordinarily powerful type-safe language.

Scala takes a flexible and expressive approach, which makes it perfect for interacting with Spark's MLlib. The fact that Spark itself is written in Scala provides a strong evidence that the Scala language is a full-service programming language that can be used to create sophisticated system code with heavy performance needs.

Scala builds on Java's tradition by addressing some of its shortcomings, while avoiding an all-or-nothing approach. Scala code compiles into Java bytecode, which in turn makes it possible to coexist with rich Java libraries interchangeably. The ability to use Java libraries with Scala and vice versa provides continuity and a rich environment for software engineers to build modern and complex machine learning systems without being fully disconnected from the Java tradition and code base.

Scala fully supports a feature-rich functional programming paradigm with standard support for lambda, currying, type interface, immutability, lazy evaluation, and a pattern-matching paradigm reminiscent of Perl without the cryptic syntax. Scala is an excellent match for machine learning programming due to its support for algebra-friendly data types, anonymous functions, covariance, contra-variance, and higher-order functions.

Here's a hello world program in Scala:

object HelloWorld extends App { 
   println("Hello World!") 
 } 

Compiling and running HelloWorld in Scala looks like this:

The Apache Spark Machine Learning Cookbook takes a practical approach by offering a multi-disciplinary view with the developer in mind. This book focuses on the interactions and cohesiveness of machine learning, Apache Spark, and Scala. We also take an extra step and teach you how to set up and run a comprehensive development environment familiar to a developer and provide code snippets that you have to run in an interactive shell without the modern facilities that an IDE provides:

Software versions and libraries used in this book

The following table a detailed list of versions and libraries used in this book. If you follow the installation instructions covered in this chapter, it will include most of the items listed here. Any other JAR or library files that may be required for specific recipes are covered via additional installation instructions in the respective recipes:

Core systems

Version

Spark

2.0.0

Java

1.8

IntelliJ IDEA

2016.2.4

Scala-sdk

2.11.8

Miscellaneous JARs that will be required are as follows:

Miscellaneous JARs

Version

bliki-core

3.0.19

breeze-viz

0.12

Cloud9

1.5.0

Hadoop-streaming

2.2.0

JCommon

1.0.23

JFreeChart

1.0.19

lucene-analyzers-common

6.0.0

Lucene-Core

6.0.0

scopt

3.3.0

spark-streaming-flume-assembly

2.0.0

spark-streaming-kafka-0-8-assembly

2.0.0


We have additionally tested all the recipes in this book on Spark 2.1.1 and found that the programs executed as expected. It is recommended for learning purposes you use the software versions and libraries listed in these tables.

To stay current with the rapidly changing Spark landscape and documentation, the API links to the Spark documentation mentioned throughout this book point to the latest version of Spark 2.x.x, but the API references in the recipes are explicitly for Spark 2.0.0.

All the documentation links provided in this book will point to the latest documentation on Spark's website. If you prefer to look for documentation for a specific version of Spark (for example, Spark 2.0.0), look for relevant documentation on the Spark website using the following URL:

https://spark.apache.org/documentation.html

We've made the code as simple as possible for clarity purposes rather than demonstrating the advanced features of Scala.

Downloading and installing the JDK


The first step is to download the development environment that is required Scala/Spark development.

Getting ready

When you are ready to download and the JDK, access the following link:

http://www.oracle.com/technetwork/java/javase/downloads/index.html

How to do it...

After successful download, follow the on-screen instructions to install the JDK.

Downloading and installing IntelliJ


IntelliJ Community Edition is a IDE for Java SE, Groovy, Scala, and Kotlin development. To complete setting up your machine learning with the Spark environment, the IntelliJ IDE needs to be installed.

Getting ready

When you are ready to and install IntelliJ, access the following link:

https://www.jetbrains.com/idea/download/

How to do it...

At the time of writing, we are using IntelliJ version 15.x or later (for example, version 2016.2.4) to test the examples in the book, but feel free to download the latest version. Once the installation file is downloaded, double-click on the downloaded file (.exe) and begin to install the IDE. Leave all the installation options at the default settings if you do not want to make any changes. Follow the on-screen instructions to complete the installation:

Downloading and installing Spark


We proceed to and install Spark.

Getting ready

When you are ready to download and install Spark, access the Apache website at this link:

http://spark.apache.org/downloads.html


How to do it...

Go to the Apache website and select the required download parameters, as shown in this screenshot:

Make sure to accept the default choices (click on Next) and proceed with the installation.

Configuring IntelliJ to work with Spark and run Spark ML sample codes


We need to run some to ensure that the project settings are correct before being able to run the samples that are provided by Spark or any of the listed this book.

Getting ready

We need to be particularly careful when configuring the project structure and global libraries. After we set everything up, we proceed to run the sample ML code provided by the Spark team to verify the setup. Sample code can be found under the Spark directory or can be obtained by downloading the Spark source code with samples.

How to do it...

The following are the steps for configuring IntelliJ to work with Spark MLlib and for running the sample ML code provided by Spark in the examples directory. The examples directory can be found in your home directory for Spark. Use the Scala samples to proceed:

  1. Click on the Project Structure... option, as shown in the following screenshot, to configure project settings:
  1. Verify the settings:
  1. Configure Global Libraries. Select Scala SDK as your global library:
  1. Select the JARs for the new Scala SDK and let the download complete:
  1. Select the project name:
  1. Verify the settings and additional libraries:
  1. Add dependency JARs. Select modules under the Project Settings in the left-hand pane and click on dependencies to choose the required JARs, as shown in the following screenshot:
  1. Select the JAR files provided by Spark. Choose Spark's default installation directory and then select the lib directory:
  1. We then select the JAR files for examples that are provided for Spark out of the box.
  1. Add required JARs by verifying that you selected and imported all the JARs listed under External Libraries in the the left-hand pane:

The next step is to download and install the Flume and Kafka JARs. For the purposes of this book, we have used the Maven repo:

  1. Download and install the Kafka assembly:
  1. Download and install the Flume assembly:
  1. After the download is complete, move the downloaded JAR files to the lib directory of Spark. We used the C drive when we installed Spark:
  1. Open your IDE and verify that all the JARs under the External Libraries folder on the left, as shown in the following screenshot, are present in your setup:
  1. Build the example projects in Spark to verify the setup:
  1. Verify that the build was successful:

There's more...

Prior to Spark 2.0, we needed library from called Guava for facilitating I/O and for providing a set of rich methods of defining tables and then letting Spark broadcast them across the cluster. Due to dependency issues that were hard to work around, Spark 2.0 no longer uses the Guava library. Make sure you use the Guava library if you are using Spark versions prior to 2.0 (required in version 1.5.2). The library can be accessed at the following URL:

https://github.com/google/guava/wiki

You may want to use Guava version 15.0, which can be found here:

https://mvnrepository.com/artifact/com.google.guava/guava/15.0

If you are using installation instructions from previous blogs, make sure to exclude the Guava library from the installation set.

See also

If there are other third-party libraries or JARs required for the completion of the Spark installation, you can find those in the following repository:

https://repo1.maven.org/maven2/org/apache/spark/

Running a sample ML code from Spark


We can verify the setup by simply the sample code from the source tree and importing it into IntelliJ to make sure it runs.

Getting ready

We will first run the logistic regression code from the samples to verify installation. In the next section, we proceed to write our own version of the same program and examine the output in order to understand how it works.

How to do it...

  1. Go to the source directory and pick one of the ML sample code files to run. We've selected the logistic regression example.

Note

If you cannot find the source code in your directory, you can always download the Spark source, unzip, and then extract the examples directory accordingly.

  1. After selecting the example, select Edit Configurations..., as shown in the following screenshot:
  1. In the Configurations tab, define the following options:
    • VM options: The choice shown allows you to run a standalone Spark cluster
    • Program arguments: What we are supposed to pass into the program
  1. Run the logistic regression by going to Run 'LogisticRegressionExample', as shown in the following screenshot:
  1. Verify the exit code and make sure it is as shown in the following screenshot:

Identifying data sources for practical machine learning


Getting data for machine learning projects a challenge in the past. However, now there is a rich set of public data sources specifically suitable for machine learning.

Getting ready

In addition to the university and government sources, there are many other open sources of data that can be used to learn and code your own examples and projects. We will list the data sources and show you how to best obtain and download data for each chapter.

How to do it...

The following is a list of open source data worth exploring if you would like to develop applications in this field:

  • UCI machine learning repository: This is an extensive library with search functionality. At the time of writing, there were more than 350 datasets. You can click on the https://archive.ics.uci.edu/ml/index.html link to see all the datasets or look for a specific set using a simple search (Ctrl + F).
  • Kaggle datasets: You need to create an account, but you can download any sets for learning as well as for competing in machine learning competitions. The https://www.kaggle.com/competitions link provides details for exploring and learning more about Kaggle, and the inner workings of machine learning competitions.
  • MLdata.org: A public site open to all with a repository of datasets for machine learning enthusiasts.
  • Google Trends: You can find statistics on search volume (as a proportion of total search) for any given term since 2004 on http://www.google.com/trends/explore.
  • The CIA World Factbook: The https://www.cia.gov/library/publications/the-world-factbook/ link provides information on the history, population, economy, government, infrastructure, and military of 267 countries.

See also

Other sources for learning data:

There are some datasets (for example, text analytics in Spanish, and gene and IMF data) that might be of some interest to you:

Running your first program using Apache Spark 2.0 with the IntelliJ IDE


The purpose of this is to get you comfortable with compiling and running a recipe using the Spark 2.0 development environment you just set up. We will explore the components and steps in later chapters.

We are going to write our own version of the Spark 2.0.0 program and examine the output so we can understand how it works. To emphasize, this short recipe is only a simple RDD program with Scala sugar syntax to make sure you have set up your environment correctly before starting to work more complicated recipes.

How to do it...

  1. Start a new project in IntelliJ or in an IDE of your choice. Make sure that the necessary JAR files are included.
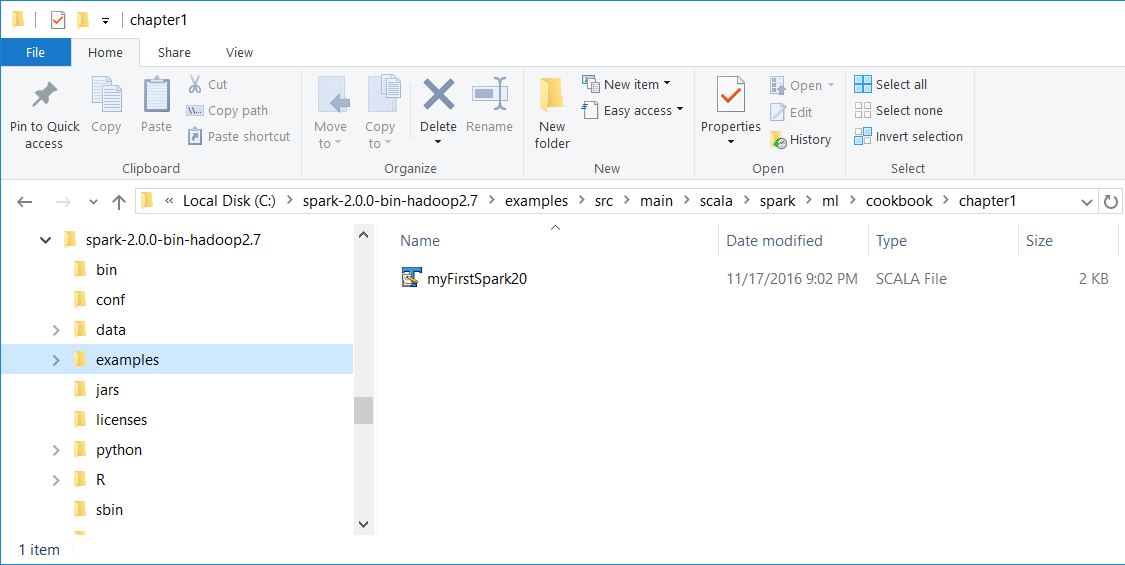
  2. Download the sample code for the book, find the myFirstSpark20.scala file, and place the code in the following directory.

We installed Spark 2.0 in the C:\spark-2.0.0-bin-hadoop2.7\ directory on a Windows machine.

  1. Place the myFirstSpark20.scala file in the C:\spark-2.0.0-bin-hadoop2.7\examples\src\main\scala\spark\ml\cookbook\chapter1 directory:

Mac users note that we installed Spark 2.0 in the /Users/USERNAME/spark/spark-2.0.0-bin-hadoop2.7/ directory on a Mac machine.

Place the myFirstSpark20.scala file in the /Users/USERNAME/spark/spark-2.0.0-bin-hadoop2.7/examples/src/main/scala/spark/ml/cookbook/chapter1 directory.

  1. Set up the package location where the program will reside:
package spark.ml.cookbook.chapter1 
  1. Import the necessary packages for the Spark session to gain access to the cluster and log4j.Logger to reduce the amount of output produced by Spark:
import org.apache.spark.sql.SparkSession 
import org.apache.log4j.Logger 
import org.apache.log4j.Level 
  1. Set output level to ERROR to reduce Spark's logging output:
Logger.getLogger("org").setLevel(Level.ERROR) 
  1. Initialize a Spark session by specifying configurations with the builder pattern, thus making an entry point available for the Spark cluster:
val spark = SparkSession 
.builder 
.master("local[*]")
 .appName("myFirstSpark20") 
.config("spark.sql.warehouse.dir", ".") 
.getOrCreate() 

The myFirstSpark20 object will run in local mode. The previous code block is a typical way to start creating a SparkSession object.

  1. We then create two array variables:
val x = Array(1.0,5.0,8.0,10.0,15.0,21.0,27.0,30.0,38.0,45.0,50.0,64.0) 
val y = Array(5.0,1.0,4.0,11.0,25.0,18.0,33.0,20.0,30.0,43.0,55.0,57.0) 
  1. We then let Spark create two RDDs based on the array created before:
val xRDD = spark.sparkContext.parallelize(x) 
val yRDD = spark.sparkContext.parallelize(y) 
  1. Next, we let Spark operate on the RDD; the zip() function will create a new RDD from the two RDDs mentioned before:
val zipedRDD = xRDD.zip(yRDD) 
zipedRDD.collect().foreach(println) 

In the console output at runtime (more details on how to run the program in the IntelliJ IDE in the following steps), you will see this:

  1. Now, we sum up the value for xRDD and yRDD and calculate the new zipedRDD sum value. We also calculate the item count for zipedRDD:
val xSum = zipedRDD.map(_._1).sum() 
val ySum = zipedRDD.map(_._2).sum() 
val xySum= zipedRDD.map(c => c._1 * c._2).sum() 
val n= zipedRDD.count() 
  1. We print out the value calculated previously in the console:
println("RDD X Sum: " +xSum) 
println("RDD Y Sum: " +ySum) 
println("RDD X*Y Sum: "+xySum) 
println("Total count: "+n) 

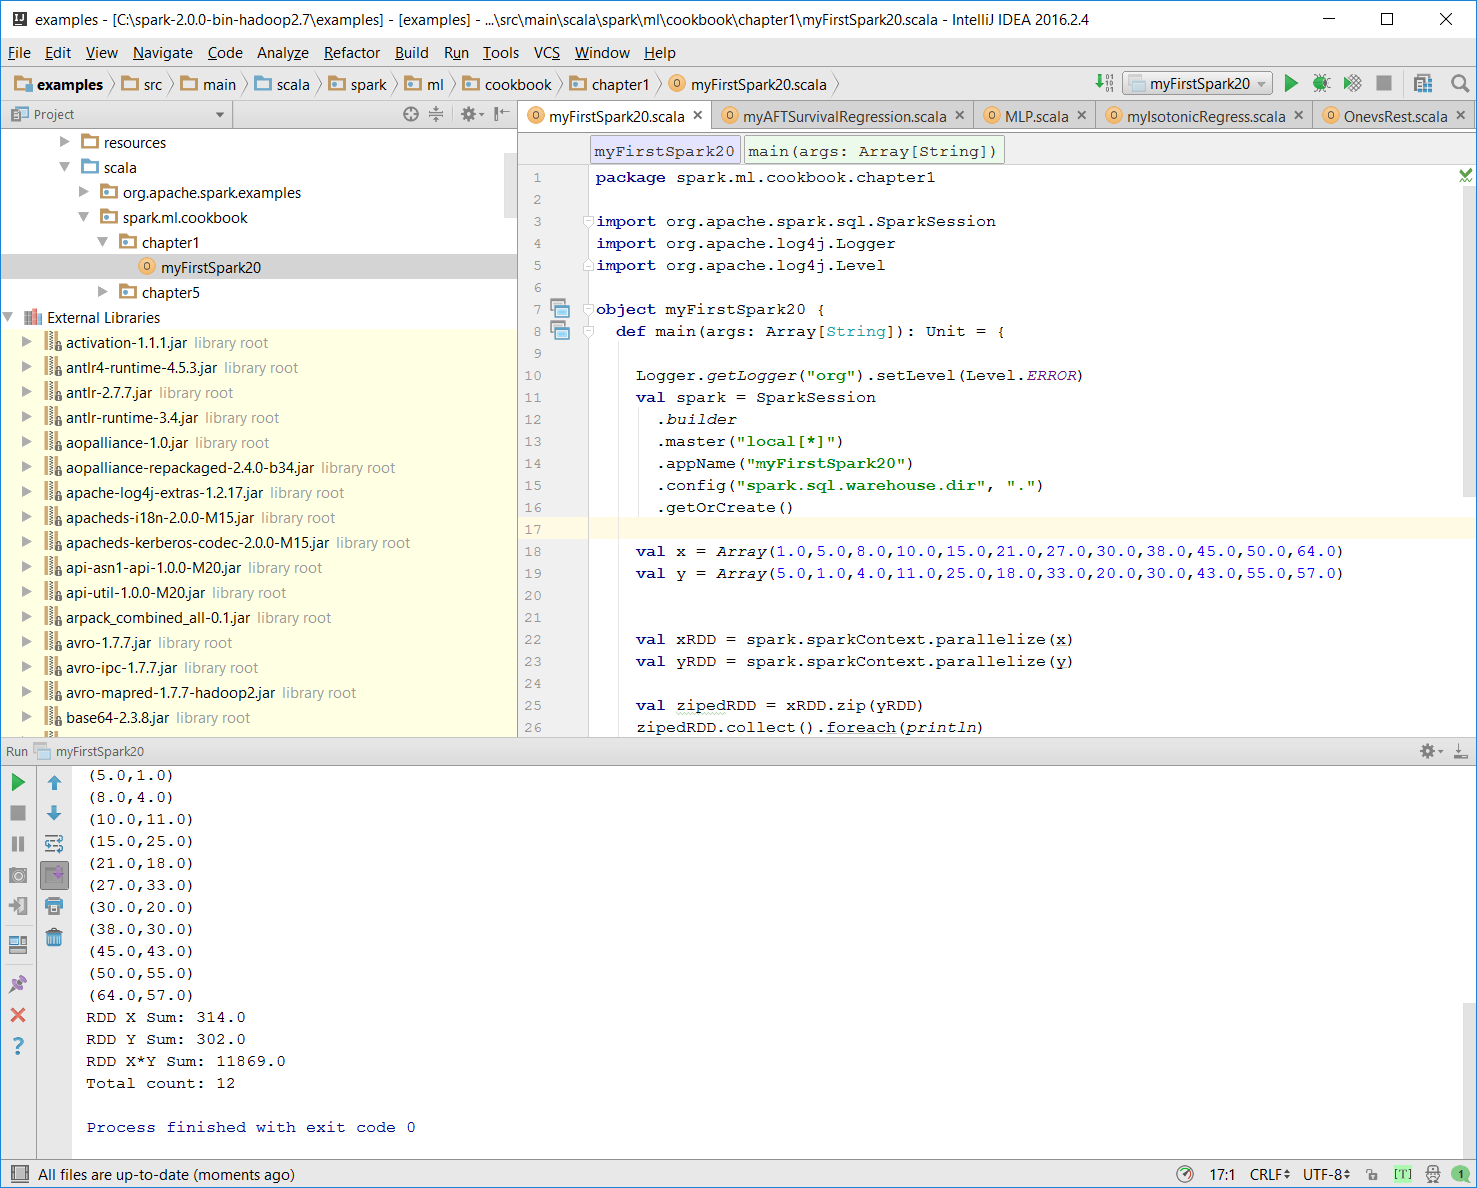
Here's the console output:

  1. We close the program by stopping the Spark session:
spark.stop() 
  1. Once the program is complete, the layout of myFirstSpark20.scala in the IntelliJ project explorer will look like the following:
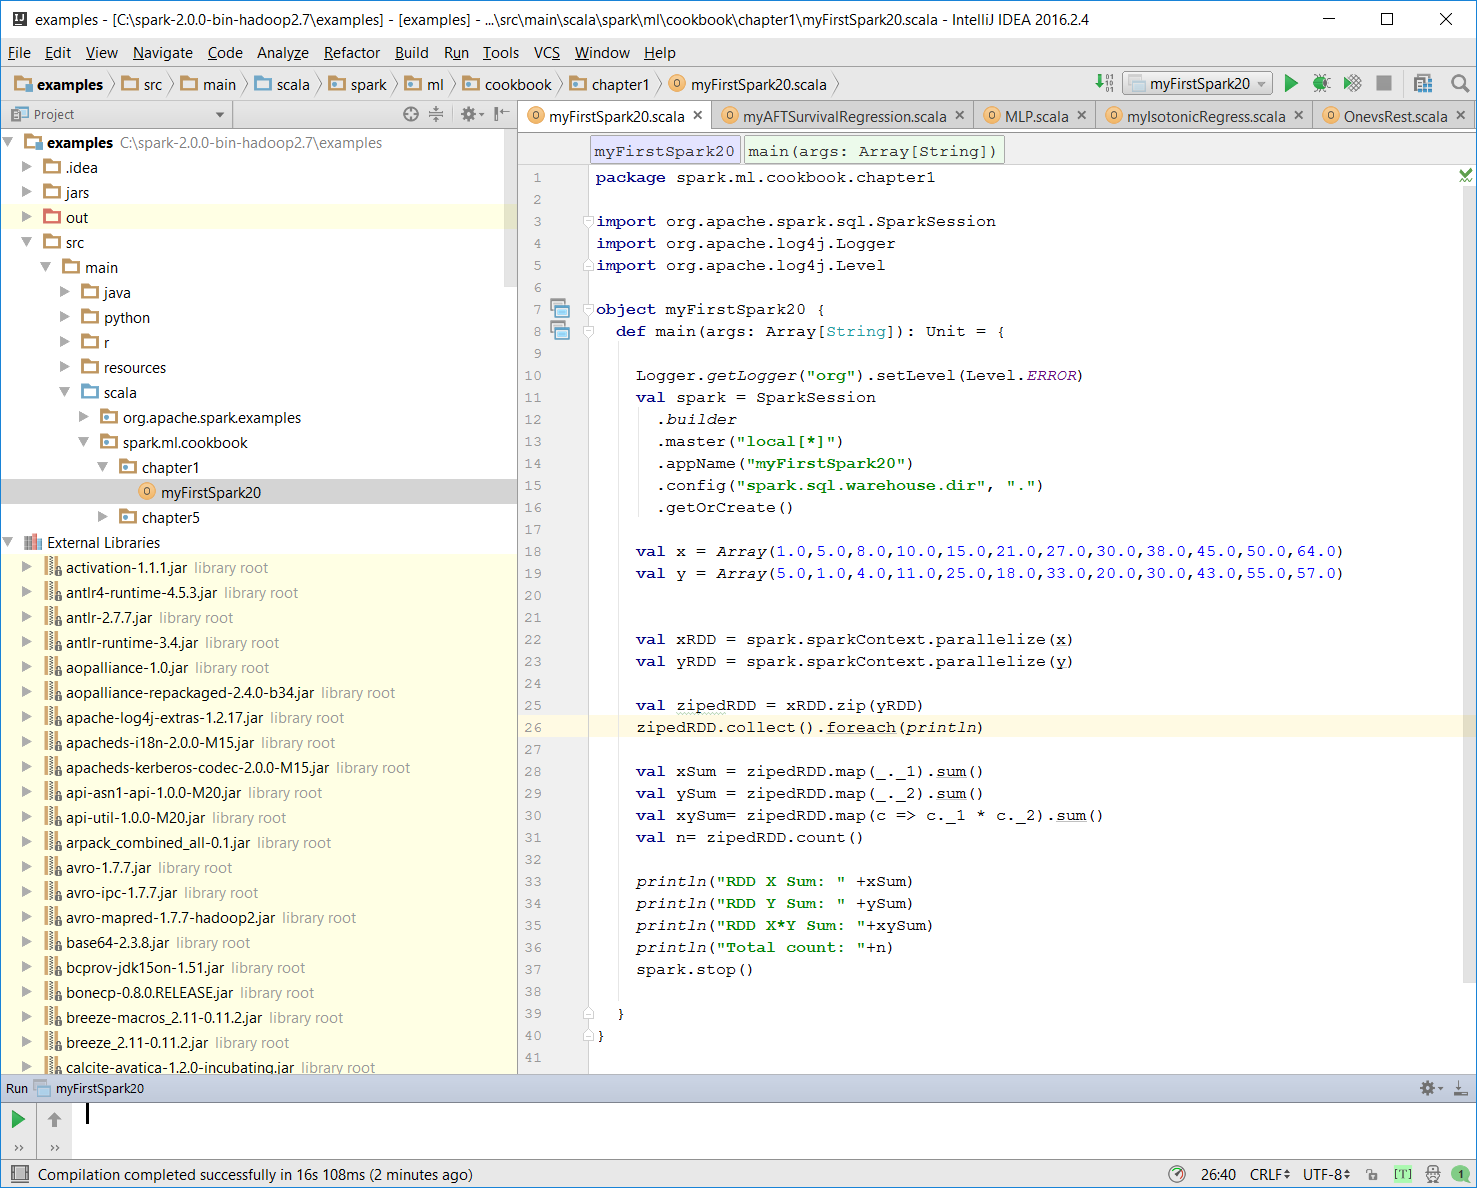
  1. Make sure there is no compiling error. You can test this by rebuilding the project:

Once the rebuild is complete, there should be a build completed message on the console:

Information: November 18, 2016, 11:46 AM - Compilation completed successfully with 1 warning in 55s 648ms
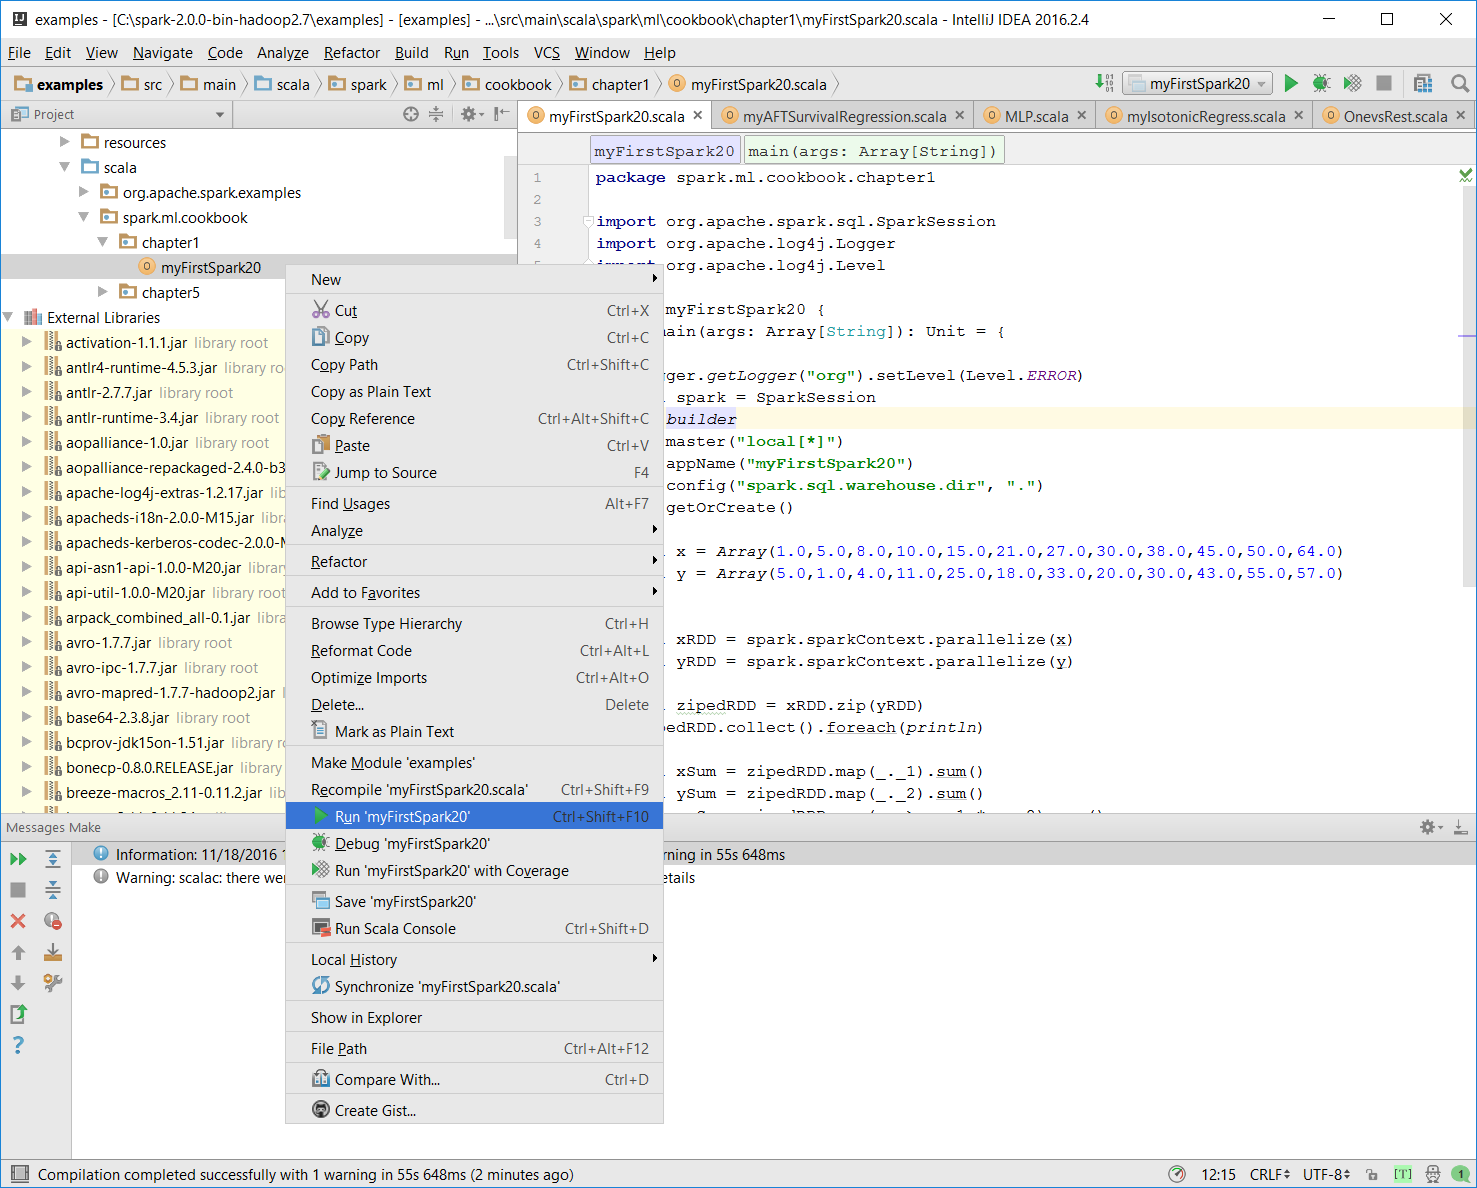
  1. You can run the previous program by right-clicking on the myFirstSpark20 object in the project explorer and selecting the context menu option (shown in the next screenshot) called Run myFirstSpark20.

Note

You can also use the Run menu from the menu bar to perform the same action.

  1. Once the program is successfully executed, you will see the following message:
Process finished with exit code 0

This is also shown in the following screenshot:

  1. Mac users with IntelliJ will be able to perform this action using the same context menu.

Note

Place the code in the correct path.

How it works...

In this example, we wrote our first Scala program, myFirstSpark20.scala, and displayed the steps to execute the program in IntelliJ. We placed the code in the path described in the steps for both Windows and Mac.

In the myFirstSpark20 code, we saw a typical way to create a SparkSession object and how to configure it to run in local mode using the master() function. We created two RDDs out of the array objects and used a simple zip() function to create a new RDD.

We also did a simple sum calculation on the RDDs that were created and then displayed the result in the console. Finally, we exited and released the resource by calling spark.stop().

There's more...

can be downloaded from http://spark.apache.org/downloads.html.

Documentation for Spark 2.0 related to RDD can be found at http://spark.apache.org/docs/latest/programming-guide.html#rdd-operations.

See also

How to add graphics to your Spark program


In this recipe, we discuss to use JFreeChart to add a chart to your Spark 2.0.0 program.

How to do it...

  1. Set up the JFreeChart library. JFreeChart JARs can be downloaded from the https://sourceforge.net/projects/jfreechart/files/ site.


  1. The JFreeChart version we have covered in this book is JFreeChart 1.0.19, as can be seen in the following screenshot. It can be downloaded from the https://sourceforge.net/projects/jfreechart/files/1.%20JFreeChart/1.0.19/jfreechart-1.0.19.zip/download site:
  1. Once the ZIP file is downloaded, extract it. We extracted the ZIP file under C:\ for a Windows machine, then proceed to find the lib directory under the extracted destination directory.
  2. We then find the two libraries we need (JFreeChart requires JCommon), JFreeChart-1.0.19.jar and JCommon-1.0.23:
  1. Now we copy the two previously mentioned JARs into the C:\spark-2.0.0-bin-hadoop2.7\examples\jars\ directory.


  1. This directory, as mentioned in the previous setup section, is in the classpath for the IntelliJ IDE project setting:

Note

In macOS, you need to place the previous two JARs in the /Users/USERNAME/spark/spark-2.0.0-bin-hadoop2.7/examples\jars\ directory.

  1. Start a new project in IntelliJ or in an IDE of your choice. Make sure that the necessary JAR files are included.
  2. Download the sample code for the book, find MyChart.scala, and place the code in the following directory.
  3. We installed Spark 2.0 in the C:\spark-2.0.0-bin-hadoop2.7\ directory in Windows. Place MyChart.scala in the C:\spark-2.0.0-bin-hadoop2.7\examples\src\main\scala\spark\ml\cookbook\chapter1 directory.
  4. Set up the package location where the program will reside:
  package spark.ml.cookbook.chapter1
  1. Import the necessary packages for the Spark session to gain access to the cluster and log4j.Logger to reduce the amount of output produced by Spark.
  2. Import necessary JFreeChart packages for the graphics:
import java.awt.Color 
import org.apache.log4j.{Level, Logger} 
import org.apache.spark.sql.SparkSession 
import org.jfree.chart.plot.{PlotOrientation, XYPlot} 
import org.jfree.chart.{ChartFactory, ChartFrame, JFreeChart} 
import org.jfree.data.xy.{XYSeries, XYSeriesCollection} 
import scala.util.Random 
  1. Set the output level to ERROR to reduce Spark's logging output:
Logger.getLogger("org").setLevel(Level.ERROR) 
  1. Initialize a Spark session specifying configurations with the builder pattern, thus making an entry point available for the Spark cluster:
val spark = SparkSession 
  .builder 
  .master("local[*]") 
  .appName("myChart") 
  .config("spark.sql.warehouse.dir", ".") 
  .getOrCreate() 
  1. The myChart object will run in local mode. The previous code block is a typical start to creating a SparkSession object.
  2. We then create an RDD using a random number and ZIP the number with its index:
val data = spark.sparkContext.parallelize(Random.shuffle(1 to 15).zipWithIndex) 
  1. We print out the RDD in the console:
data.foreach(println) 

Here is the console output:

  1. We then create a data series for JFreeChart to display:
val xy = new XYSeries("") 
data.collect().foreach{ case (y: Int, x: Int) => xy.add(x,y) } 
val dataset = new XYSeriesCollection(xy) 
  1. Next, we create a chart object from JFreeChart's ChartFactory and set up the basic configurations:
val chart = ChartFactory.createXYLineChart( 
  "MyChart",  // chart title 
  "x",               // x axis label 
  "y",                   // y axis label 
  dataset,                   // data 
  PlotOrientation.VERTICAL, 
  false,                    // include legend 
  true,                     // tooltips 
  false                     // urls 
)
  1. We get the plot object from the chart and prepare it to display graphics:
val plot = chart.getXYPlot() 
  1. We configure the plot first:
configurePlot(plot) 
  1. The configurePlot function is defined as follows; it sets up some basic color schema for the graphical part:
def configurePlot(plot: XYPlot): Unit = { 
  plot.setBackgroundPaint(Color.WHITE) 
  plot.setDomainGridlinePaint(Color.BLACK) 
  plot.setRangeGridlinePaint(Color.BLACK) 
  plot.setOutlineVisible(false) 
} 
  1. We now show the chart:
show(chart) 
  1. The show() function is defined as follows. It is a very standard frame-based graphic-displaying function:
def show(chart: JFreeChart) { 
  val frame = new ChartFrame("plot", chart) 
  frame.pack() 
  frame.setVisible(true) 
}
  1. Once show(chart) is executed successfully, the following frame will pop up:
  1. We close the program by stopping the Spark session:
spark.stop() 

How it works...

In this example, we wrote MyChart.scala and saw the steps for executing the program in IntelliJ. We placed code in the path described in the steps for both Windows and Mac.

In the code, we saw a typical way to create the SparkSession object and how to use the master() function. We created an RDD out of an array of random integers in the range of 1 to 15 and zipped it with the Index.

We then used JFreeChart to compose a basic chart that contains a simple x and y axis, and supplied the chart with the dataset we generated from the original RDD in the previous steps.

We set up the schema for the chart and called the show() function in JFreeChart to show a Frame with the x and y axes displayed as a linear graphical chart.

Finally, we exited and released the resource by calling spark.stop().

See also

Additional examples about the features and capabilities of JFreeChart can be found at the following website:

http://www.jfree.org/jfreechart/samples.html

Left arrow icon Right arrow icon
Download code icon Download Code

Key benefits

  • Solve the day-to-day problems of data science with Spark
  • This unique cookbook consists of exciting and intuitive numerical recipes
  • Optimize your work by acquiring, cleaning, analyzing, predicting, and visualizing your data

Description

Machine learning aims to extract knowledge from data, relying on fundamental concepts in computer science, statistics, probability, and optimization. Learning about algorithms enables a wide range of applications, from everyday tasks such as product recommendations and spam filtering to cutting edge applications such as self-driving cars and personalized medicine. You will gain hands-on experience of applying these principles using Apache Spark, a resilient cluster computing system well suited for large-scale machine learning tasks. This book begins with a quick overview of setting up the necessary IDEs to facilitate the execution of code examples that will be covered in various chapters. It also highlights some key issues developers face while working with machine learning algorithms on the Spark platform. We progress by uncovering the various Spark APIs and the implementation of ML algorithms with developing classification systems, recommendation engines, text analytics, clustering, and learning systems. Toward the final chapters, we’ll focus on building high-end applications and explain various unsupervised methodologies and challenges to tackle when implementing with big data ML systems.

What you will learn

[*]Get to know how Scala and Spark go hand-in-hand for developers when developing ML systems with Spark [*]Build a recommendation engine that scales with Spark [*]Find out how to build unsupervised clustering systems to classify data in Spark [*]Build machine learning systems with the Decision Tree and Ensemble models in Spark [*]Deal with the curse of high-dimensionality in big data using Spark [*]Implement Text analytics for Search Engines in Spark [*]Streaming Machine Learning System implementation using Spark
Estimated delivery fee Deliver to Turkey

Standard delivery 10 - 13 business days

$12.95

Premium delivery 3 - 6 business days

$34.95
(Includes tracking information)

Product Details

Country selected

Publication date : Sep 22, 2017
Length 666 pages
Edition : 1st Edition
Language : English
ISBN-13 : 9781783551606
Vendor :
Apache
Category :

What do you get with Print?

Product feature icon Instant access to your digital eBook copy whilst your Print order is Shipped
Product feature icon Black & white paperback book shipped to your address
Product feature icon Download this book in EPUB and PDF formats
Product feature icon Access this title in our online reader with advanced features
Product feature icon DRM FREE - Read whenever, wherever and however you want
Buy Now
Estimated delivery fee Deliver to Turkey

Standard delivery 10 - 13 business days

$12.95

Premium delivery 3 - 6 business days

$34.95
(Includes tracking information)

Product Details


Publication date : Sep 22, 2017
Length 666 pages
Edition : 1st Edition
Language : English
ISBN-13 : 9781783551606
Vendor :
Apache
Category :

Table of Contents

20 Chapters
Title Page Chevron down icon Chevron up icon
Credits Chevron down icon Chevron up icon
About the Authors Chevron down icon Chevron up icon
About the Reviewer Chevron down icon Chevron up icon
www.PacktPub.com Chevron down icon Chevron up icon
Customer Feedback Chevron down icon Chevron up icon
Preface Chevron down icon Chevron up icon
1. Practical Machine Learning with Spark Using Scala Chevron down icon Chevron up icon
2. Just Enough Linear Algebra for Machine Learning with Spark Chevron down icon Chevron up icon
3. Spark's Three Data Musketeers for Machine Learning - Perfect Together Chevron down icon Chevron up icon
4. Common Recipes for Implementing a Robust Machine Learning System Chevron down icon Chevron up icon
5. Practical Machine Learning with Regression and Classification in Spark 2.0 - Part I Chevron down icon Chevron up icon
6. Practical Machine Learning with Regression and Classification in Spark 2.0 - Part II Chevron down icon Chevron up icon
7. Recommendation Engine that Scales with Spark Chevron down icon Chevron up icon
8. Unsupervised Clustering with Apache Spark 2.0 Chevron down icon Chevron up icon
9. Optimization - Going Down the Hill with Gradient Descent Chevron down icon Chevron up icon
10. Building Machine Learning Systems with Decision Tree and Ensemble Models Chevron down icon Chevron up icon
11. Curse of High-Dimensionality in Big Data Chevron down icon Chevron up icon
12. Implementing Text Analytics with Spark 2.0 ML Library Chevron down icon Chevron up icon
13. Spark Streaming and Machine Learning Library Chevron down icon Chevron up icon

Customer reviews

Top Reviews
Rating distribution
Empty star icon Empty star icon Empty star icon Empty star icon Empty star icon 0
(0 Ratings)
5 star 0%
4 star 0%
3 star 0%
2 star 0%
1 star 0%
Top Reviews
No reviews found
Get free access to Packt library with over 7500+ books and video courses for 7 days!
Start Free Trial

FAQs

What is the delivery time and cost of print book? Chevron down icon Chevron up icon

Shipping Details

USA:

'

Economy: Delivery to most addresses in the US within 10-15 business days

Premium: Trackable Delivery to most addresses in the US within 3-8 business days

UK:

Economy: Delivery to most addresses in the U.K. within 7-9 business days.
Shipments are not trackable

Premium: Trackable delivery to most addresses in the U.K. within 3-4 business days!
Add one extra business day for deliveries to Northern Ireland and Scottish Highlands and islands

EU:

Premium: Trackable delivery to most EU destinations within 4-9 business days.

Australia:

Economy: Can deliver to P. O. Boxes and private residences.
Trackable service with delivery to addresses in Australia only.
Delivery time ranges from 7-9 business days for VIC and 8-10 business days for Interstate metro
Delivery time is up to 15 business days for remote areas of WA, NT & QLD.

Premium: Delivery to addresses in Australia only
Trackable delivery to most P. O. Boxes and private residences in Australia within 4-5 days based on the distance to a destination following dispatch.

India:

Premium: Delivery to most Indian addresses within 5-6 business days

Rest of the World:

Premium: Countries in the American continent: Trackable delivery to most countries within 4-7 business days

Asia:

Premium: Delivery to most Asian addresses within 5-9 business days

Disclaimer:
All orders received before 5 PM U.K time would start printing from the next business day. So the estimated delivery times start from the next day as well. Orders received after 5 PM U.K time (in our internal systems) on a business day or anytime on the weekend will begin printing the second to next business day. For example, an order placed at 11 AM today will begin printing tomorrow, whereas an order placed at 9 PM tonight will begin printing the day after tomorrow.


Unfortunately, due to several restrictions, we are unable to ship to the following countries:

  1. Afghanistan
  2. American Samoa
  3. Belarus
  4. Brunei Darussalam
  5. Central African Republic
  6. The Democratic Republic of Congo
  7. Eritrea
  8. Guinea-bissau
  9. Iran
  10. Lebanon
  11. Libiya Arab Jamahriya
  12. Somalia
  13. Sudan
  14. Russian Federation
  15. Syrian Arab Republic
  16. Ukraine
  17. Venezuela
What is custom duty/charge? Chevron down icon Chevron up icon

Customs duty are charges levied on goods when they cross international borders. It is a tax that is imposed on imported goods. These duties are charged by special authorities and bodies created by local governments and are meant to protect local industries, economies, and businesses.

Do I have to pay customs charges for the print book order? Chevron down icon Chevron up icon

The orders shipped to the countries that are listed under EU27 will not bear custom charges. They are paid by Packt as part of the order.

List of EU27 countries: www.gov.uk/eu-eea:

A custom duty or localized taxes may be applicable on the shipment and would be charged by the recipient country outside of the EU27 which should be paid by the customer and these duties are not included in the shipping charges been charged on the order.

How do I know my custom duty charges? Chevron down icon Chevron up icon

The amount of duty payable varies greatly depending on the imported goods, the country of origin and several other factors like the total invoice amount or dimensions like weight, and other such criteria applicable in your country.

For example:

  • If you live in Mexico, and the declared value of your ordered items is over $ 50, for you to receive a package, you will have to pay additional import tax of 19% which will be $ 9.50 to the courier service.
  • Whereas if you live in Turkey, and the declared value of your ordered items is over € 22, for you to receive a package, you will have to pay additional import tax of 18% which will be € 3.96 to the courier service.
How can I cancel my order? Chevron down icon Chevron up icon

Cancellation Policy for Published Printed Books:

You can cancel any order within 1 hour of placing the order. Simply contact customercare@packt.com with your order details or payment transaction id. If your order has already started the shipment process, we will do our best to stop it. However, if it is already on the way to you then when you receive it, you can contact us at customercare@packt.com using the returns and refund process.

Please understand that Packt Publishing cannot provide refunds or cancel any order except for the cases described in our Return Policy (i.e. Packt Publishing agrees to replace your printed book because it arrives damaged or material defect in book), Packt Publishing will not accept returns.

What is your returns and refunds policy? Chevron down icon Chevron up icon

Return Policy:

We want you to be happy with your purchase from Packtpub.com. We will not hassle you with returning print books to us. If the print book you receive from us is incorrect, damaged, doesn't work or is unacceptably late, please contact Customer Relations Team on customercare@packt.com with the order number and issue details as explained below:

  1. If you ordered (eBook, Video or Print Book) incorrectly or accidentally, please contact Customer Relations Team on customercare@packt.com within one hour of placing the order and we will replace/refund you the item cost.
  2. Sadly, if your eBook or Video file is faulty or a fault occurs during the eBook or Video being made available to you, i.e. during download then you should contact Customer Relations Team within 14 days of purchase on customercare@packt.com who will be able to resolve this issue for you.
  3. You will have a choice of replacement or refund of the problem items.(damaged, defective or incorrect)
  4. Once Customer Care Team confirms that you will be refunded, you should receive the refund within 10 to 12 working days.
  5. If you are only requesting a refund of one book from a multiple order, then we will refund you the appropriate single item.
  6. Where the items were shipped under a free shipping offer, there will be no shipping costs to refund.

On the off chance your printed book arrives damaged, with book material defect, contact our Customer Relation Team on customercare@packt.com within 14 days of receipt of the book with appropriate evidence of damage and we will work with you to secure a replacement copy, if necessary. Please note that each printed book you order from us is individually made by Packt's professional book-printing partner which is on a print-on-demand basis.

What tax is charged? Chevron down icon Chevron up icon

Currently, no tax is charged on the purchase of any print book (subject to change based on the laws and regulations). A localized VAT fee is charged only to our European and UK customers on eBooks, Video and subscriptions that they buy. GST is charged to Indian customers for eBooks and video purchases.

What payment methods can I use? Chevron down icon Chevron up icon

You can pay with the following card types:

  1. Visa Debit
  2. Visa Credit
  3. MasterCard
  4. PayPal
What is the delivery time and cost of print books? Chevron down icon Chevron up icon

Shipping Details

USA:

'

Economy: Delivery to most addresses in the US within 10-15 business days

Premium: Trackable Delivery to most addresses in the US within 3-8 business days

UK:

Economy: Delivery to most addresses in the U.K. within 7-9 business days.
Shipments are not trackable

Premium: Trackable delivery to most addresses in the U.K. within 3-4 business days!
Add one extra business day for deliveries to Northern Ireland and Scottish Highlands and islands

EU:

Premium: Trackable delivery to most EU destinations within 4-9 business days.

Australia:

Economy: Can deliver to P. O. Boxes and private residences.
Trackable service with delivery to addresses in Australia only.
Delivery time ranges from 7-9 business days for VIC and 8-10 business days for Interstate metro
Delivery time is up to 15 business days for remote areas of WA, NT & QLD.

Premium: Delivery to addresses in Australia only
Trackable delivery to most P. O. Boxes and private residences in Australia within 4-5 days based on the distance to a destination following dispatch.

India:

Premium: Delivery to most Indian addresses within 5-6 business days

Rest of the World:

Premium: Countries in the American continent: Trackable delivery to most countries within 4-7 business days

Asia:

Premium: Delivery to most Asian addresses within 5-9 business days

Disclaimer:
All orders received before 5 PM U.K time would start printing from the next business day. So the estimated delivery times start from the next day as well. Orders received after 5 PM U.K time (in our internal systems) on a business day or anytime on the weekend will begin printing the second to next business day. For example, an order placed at 11 AM today will begin printing tomorrow, whereas an order placed at 9 PM tonight will begin printing the day after tomorrow.


Unfortunately, due to several restrictions, we are unable to ship to the following countries:

  1. Afghanistan
  2. American Samoa
  3. Belarus
  4. Brunei Darussalam
  5. Central African Republic
  6. The Democratic Republic of Congo
  7. Eritrea
  8. Guinea-bissau
  9. Iran
  10. Lebanon
  11. Libiya Arab Jamahriya
  12. Somalia
  13. Sudan
  14. Russian Federation
  15. Syrian Arab Republic
  16. Ukraine
  17. Venezuela