Creating a user template
User templates save user administrators time by applying pre-selected licenses, applications, assigned domains, and metadata (such as Office information) to users created using that template. In this recipe, we'll cover the steps to creating a user template.
Getting ready
You must be an O365 administrator to manage users and user templates.
How to do it…
- Go to the Microsoft 365 Admin Center at http://admin.microsoft.com.
- Select Users > Active users.
- Select User Templates > Add template from the ribbon menu:

Figure 2.17 – Add template option available upon clicking User templates in the Active users page
- Name your template (this appears on the User templates menu as an option later) and give it a clear description. Click Next:

Figure 2.18 – The first screen of creating a user template including name and description fields
- Choose to which domain users under this template should be added. This is useful when your organization encompasses multiple business units or company names operating under different domains or even subdomains. Also, choose whether these users will have an autogenerated or standard password and if that should be changed by the user on their first sign-in. Click Next:

Figure 2.19 – The second screen, Basics, when creating a user template
- Choose which location and licenses will be applied to these users, then scroll down to the next section Licenses:

Figure 2.20 – The third screen, Licenses, when creating a user template
- All the apps within each of the licenses you selected in the preceding screenshot appear automatically, allowing you to choose specific apps to enable/disable for users created with this template. When satisfied, click Next:

Figure 2.21 – Available apps for all licenses
- On the Optional settings page, choose which (if any) administrator roles to apply to these users, then complete the Profile info section with info that should be applied by default to all users created using this template. Click Next when finished to review your template:

Figure 2.22 – The fourth screen, Optional settings, when creating a user template
- If satisfied with the template, choose Finish adding; otherwise, choose Edit in the respective section to make changes first:

Figure 2.23 – The final screen, Finish, for confirmation of details in a new user template
- Your template will show a confirmation message. Close this when finished:

Figure 2.24 – The confirmation message with optional Next steps after creating a user template
- Now, when you go to create new users, you'll be able to save time by selecting the template to pre-fill much of the data:

Figure 2.25 – A newly created user template now available for selection
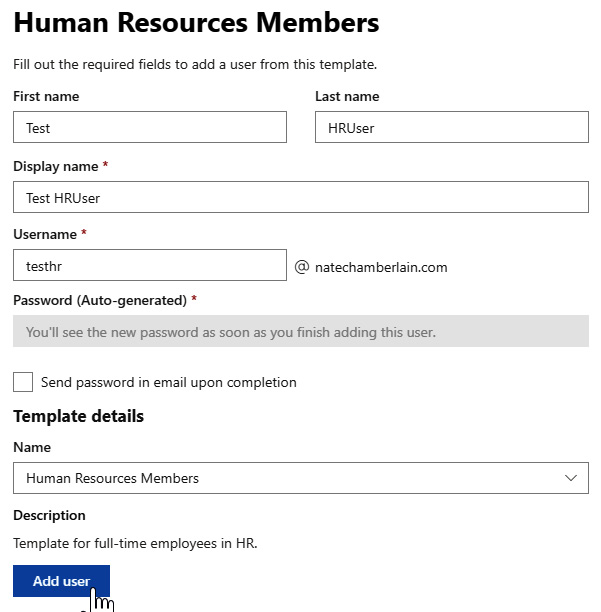
- When selected, you'll have minimal information to complete for adding the new user under that template. As seen here, it's basically just name, display name, and username:

Figure 2.26 – Screen shown once the existing user template is selected for creating a new user
How it works…
In this recipe, you configured a user template to save you time when creating additional users who will have very similar, if not identical, profile parameters such as office location, department, and so on.
User templates are saved configurations for certain user types that allow administrators to apply consistent licenses, app permissions, domains, and office contact information to users belonging to a common group or role.
Once a template, such as Human Resources Members, is created, it simply needs to be selected the next time an HR employee is onboarded. The new user's name is entered and all the preconfigured settings for the template are applied, making the process much more efficient.
There's more…
You cannot edit a user template later. Once it's created, that template remains the same until it is deleted and potentially replaced by a new template. This helps ensure consistency of the users created with the template throughout its life cycle.
See also
- Check out Lori Craw's article on user templates on TechCommunity: https://techcommunity.microsoft.com/t5/microsoft-365-blog/new-to-admin-center-templates-for-adding-users-faster/ba-p/856424


