Sheet Metal properties
Sheet Metal properties are global settings that apply to the entire part. This section shows how to adjust these properties and what they actually mean. The section contains some background theory that is fairly dry but is an important foundation for understanding Sheet Metal. Some of this underlying theory will become much clearer once we actually start to use and demonstrate the tools later in the book, so don't worry too much if certain parts of it still appear a little confusing at this stage.
There are four Sheet Metal properties:
- Sheet Thickness
- Bend Radius
- Bend Allowance
- Auto Relief
Editing the Sheet Metal properties and adjusting the Sheet Thickness
As previously mentioned, Sheet Metal parts are usually made from sheets with a constant thickness. Therefore, the thickness of a part is an important aspect of Sheet Metal.
To edit the Sheet Metal properties of a part, simply left- or right-click on the Sheet-Metal folder in the FeatureManager Design Tree (labeled ii in Figure 1.7) and select Edit Feature.
To set the thickness, adjust the value under the Thickness field (labeled i in Figure 1.8) and press the green OK check mark. For example, try setting 2mm thickness and pressing OK. You should now see that the thickness of the Base Flange has changed from 1mm to 2mm.
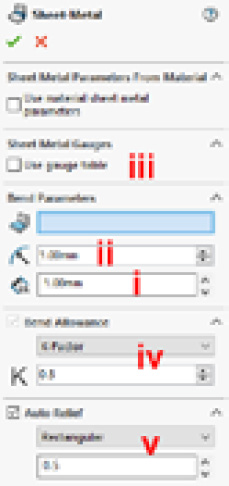
Figure 1.8: Sheet Metal properties
This Thickness setting is global throughout the entire part, so any new features that are added, such as Edge Flanges, will also be made using this same thickness. Editing one single value in the Sheet-Metal folder provides a very simple way to adjust the entire part and all of the features that make it up.
Editing the Bend Radius
Along with the thickness, another very important property of Sheet Metal parts is the Bend Radius.
Whenever a flat sheet of metal is bent or folded to create 3D parts, the corners that are created by the bending process will never be completely square. Even with a very thin and flexible material, such as aluminium foil, a small bend radius is needed.
This is also true in SolidWorks Sheet Metal: a bend radius is always required (Figure 1.9), even if it is tiny.
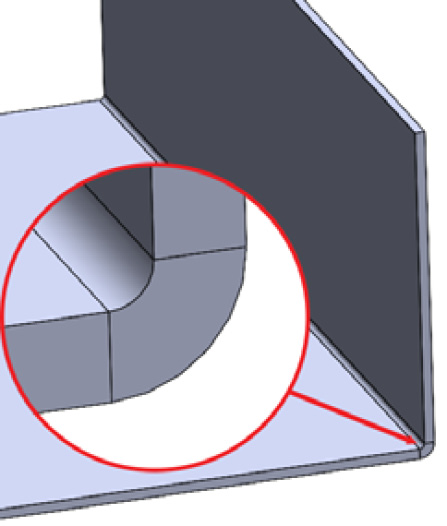
Figure 1.9: A bend radius is always needed
In SolidWorks Sheet Metal the Bend Radius refers to the size of the inside of bends, and it can be set in the Sheet Metal properties.
Simply edit the Sheet Metal properties and adjust the value (labeled ii in Figure 1.8).
By default, the Bend Radius that is set in the Sheet Metal properties will apply to any features that are added to the part, although the Bend Radius can be overridden for specific bends, and this will be covered later in the book.
What size should we set the Bend Radius to?
Although setting the Bend Radius value itself is straightforward, how do we actually know what value to use for it? Bend Radius depends on a number of factors, such as the material type, the manufacturing method, and the thickness of the material. In general, as the sheet thickness increases, the bend radius value also increases. To visualize this, think about bending a very thin sheet of metal foil, compared to bending a thick plate—the thinner sheet will allow a much tighter bend to be created.
General figures for steel bending might be something like this:
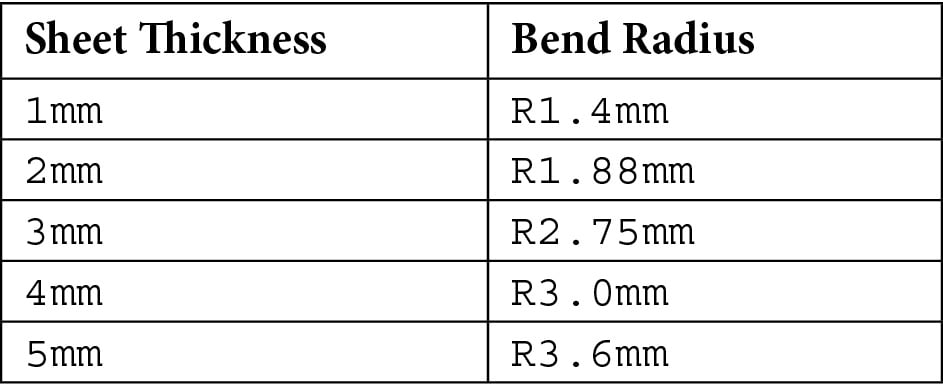
There are a number of ways to determine the Bend Radius.
- Speak to your manufacturer. The most reliable method of determining the Bend Radius is usually to talk directly to the people making your parts. Tell them what you're planning to create, and the material type and thickness, and they should be able to recommend certain settings to use.
- Search online or in reference books. Try searching for a phrase such as
1mm thick steel bending radius. The results should give you a good idea of suitable values to start your design, which can then be fine-tuned at a later stage by adjusting the Sheet Metal properties. - Use the SolidWorks Gauge Tables. Gauge numbers are a way of measuring the thickness of metal sheets based on weight. SolidWorks contains gauge tables that are a list of preset sizes that are built into SolidWorks Sheet Metal. They can be used to find common Bend Radius values.
To activate the Gauge Tables:
- Put a check in the Use gauge table box at the top of the Sheet Metal properties (labeled iii in Figure 1.8). A table can then be selected from the drop-down list.
Note
SolidWorks Gauge Tables require Microsoft Excel to be installed on the computer and will not work without it.
- Try selecting a table such as the
SAMPLE TABLE – STEEL(Figure 1.10). The thickness of the Sheet Metal part can now be set using the gauge numbers from the dropdown list, rather than the specific thickness value. - Experiment with different sizes to see how the gauge number relates to actual thickness:
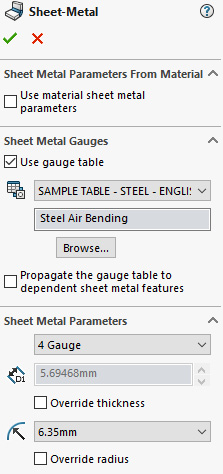
Figure 1.10: Using the Gauge Tables
Note
A higher gauge number corresponds to a thinner sheet. It can be seen in Figure 1.10 that 4 Gauge steel is 5.69mm thick, whereas 16 Gauge steel is only 1.51mm thick.
As the gauge number is changed, you'll notice that the Bend Radius value also automatically changes to correspond to the new sheet sizes. As expected, thicker sheets require a higher Bend Radius value.
Exercise Caution When Using Gauge Numbers!
Gauge numbers are specific to the material used, so confusion is easily caused. For example, a given gauge number of steel is not the same thickness as one in aluminum. 16 Gauge steel is 1.52mm thick, but 16 Gauge aluminum is only 1.29mm thick. For this reason, many international standards organizations recommend against the use of gauge numbers and instead suggest specifying the sheet thickness using dimensions.
The Gauge Tables can give a good indication of bend radii, but I recommend using them as a guide only, and instead directly setting and specifying sheet thicknesses.
The Bend Radius is a vital aspect of SolidWorks Sheet Metal and is needed for every bent part. It can be set in the Sheet Metal properties as a global value, but can also be overridden for certain bends if needed.
Get an idea of the Bend Radius needed by either speaking to your manufacturer, searching online, or using Gauge Tables. However, if using gauge numbers and tables, be careful to ensure your material choice is correct and clearly marked on any drawings. It is wise to use gauge tables as a guide only, and instead (or in addition to this) specify an exact sheet thickness.
Understanding the Bend Allowance
The next Sheet Metal property that affects your models is the Bend Allowance property (labeled iv in Figure 1.8). This allows us to accurately calculate the size of bent parts once they have been unfolded into a flat sheet.
To understand what exactly the Bend Allowance property is and why it is important, let's look at a simple part from the side. This consists of a Base Flange and one single Edge Flange, as illustrated in Figure 1.11.
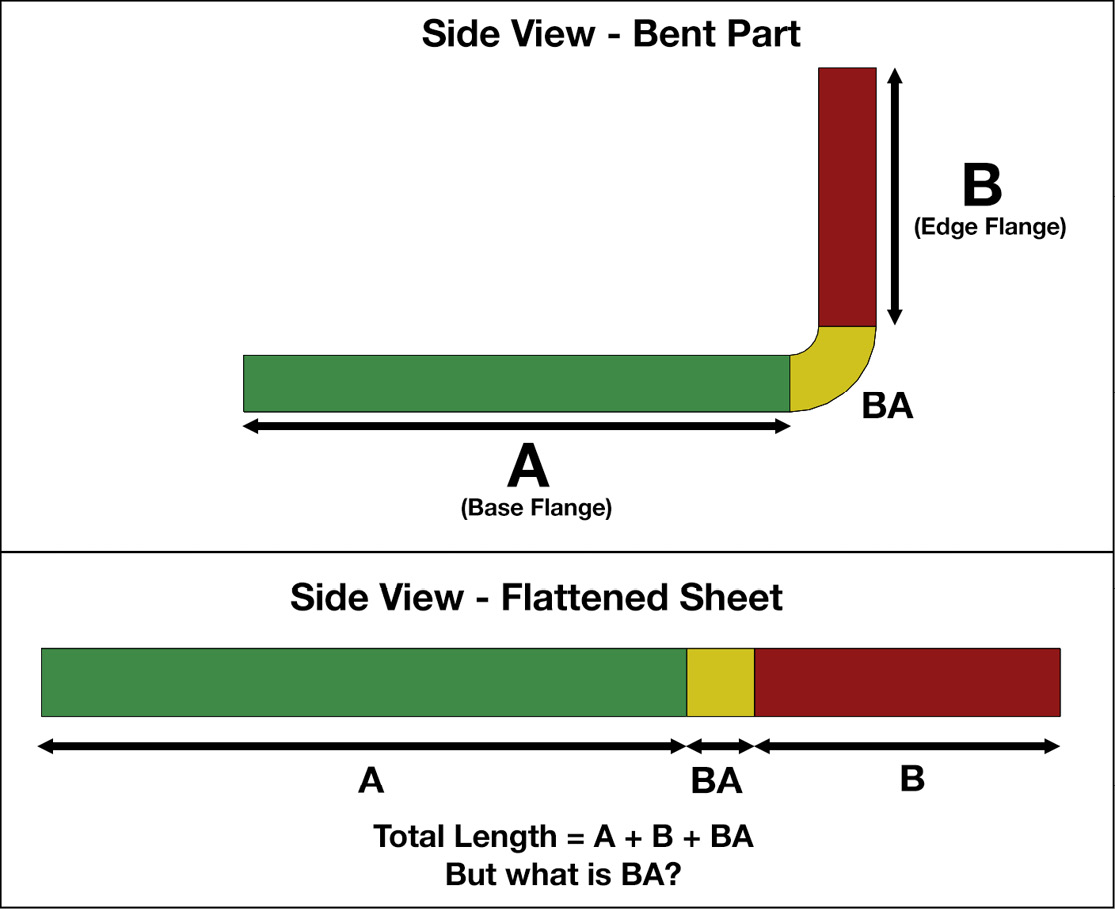
Figure 1.11: Understanding the Bend Allowance property
We can see that the size of the Sheet Metal part will be the length of the Base Flange (A in Figure 1.11) plus the length of the Edge Flange (B in Figure 1.11), plus the size of the area of the bend itself (BA or Bend Allowance in Figure 1.11). Therefore, when the part is flattened, the total size of the sheet that we require will be A + B + BA.
However, depending on how and where the bend length (BA) is measured, we may end up with different values. For example, if the inside of the bend is measured, the length may be 5mm, but if the outside of the bend is measured then the length will be longer— 15mm in this case, as illustrated in Figure 1.12.
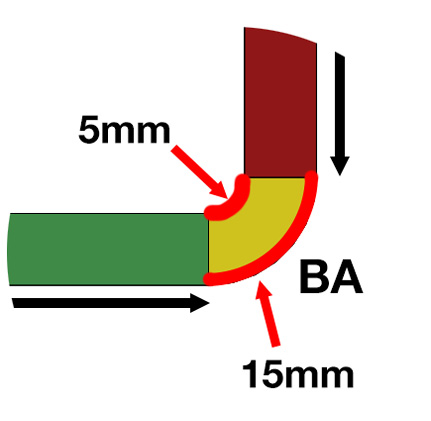
Figure 1.12: The size of the bend depends on where exactly is measured
The length of BA is determined by the Bend Allowance in the Sheet Metal properties, and there are a number of different options to set the Bend Allowance.
These Bend Allowance options are:
- Bend Table
- K-Factor
- Bend Allowance
- Bend Deduction
- Bend Calculation
Each option will give slightly different end results, but if you're unsure which option to use, then it's usually best to use the K-Factor bend allowance.
What Is the K-Factor Bend Allowance?
K-Factor is a way of working out the size needed for bends in sheet metal. Whenever a metal sheet is bent, there will always be a region of the bend, inside the bend, where the material is compressed, and another region, outside of the bend, where the material is stretched. At a certain point within a cross-section of the sheet, there will be a boundary where the compression and stretching exactly cancel each other out. Along this boundary, there will be no change of length in the material. The K-Factor is the name given to a line along this boundary, where no change in length occurs between flat and folded parts (Figure 1.13).
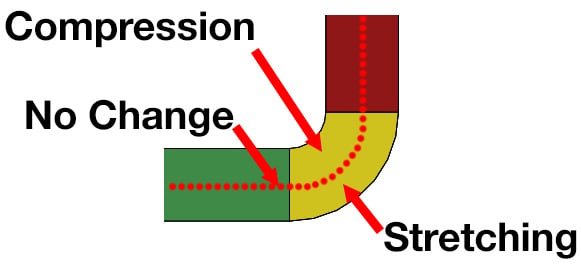
Figure 1.13: The K-Factor is an imaginary line through a cross-section of the material, where there is no change in size between the bent part and the flat part
The K-Factor is a ratio, so it will always be between 0 and 1. The inside of the bend is a K-Factor of 0 and the outside of the bend is a K-Factor of 1. Therefore, the middle of the bend is a K-Factor of 0.5, as illustrated in Figure 1.14.
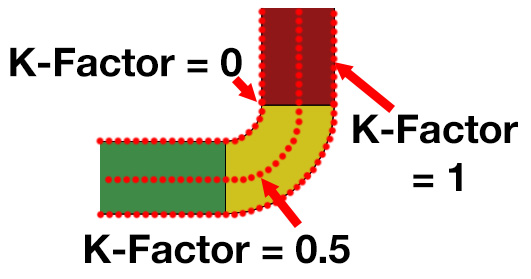
Figure 1.14: The K-Factor is a ratio indicating a line through a cross-section of the bend
What Value of K-Factor Should I Use?
The K-Factor depends on a number of factors, such as material and bending type. If you're unsure about what to use, then a K-Factor of 0.5 is usually a good estimate for most parts and materials.
You can also try asking your manufacturer what value they recommend you should use.
The K-Factor is the easiest way to work out Bend Allowances and can easily be changed at a later stage if needed, by editing the Sheet Metal properties.
Other Bend Allowance options
As well as the K-Factor, there are also some other ways of calculating the Bend Allowance. If you are unfamiliar with these methods, then it is highly recommended that you use the K-Factor option, as detailed previously. The other Bend Allowance options are:
- Bend Allowance: This allows you to specifically define the length of the Bend Allowance. This can be useful if a manufacturer gives you a certain value to use. However, this option should be used with care as any value can be inputted. Therefore, if an incorrect value is used, this can result in completely wrong sizes on Flat Pattern parts.
- Bend Deduction: This option is somewhat similar to the Bend Allowance option but it measures the outside length of the folded part, then removes (or deducts) a certain value. Again, if you are unfamiliar with this method, use it cautiously, as using the wrong Bend Deduction value can give unusable results.
- Bend Table: This option allows a Bend Table to be created in Microsoft Excel. This table can specify Bend Allowance or Deduction values based on exact bend details, such as the radius and angle.
- Bend Calculation: Finally, the Bend Calculation option allows the use of equations to calculate the bending allowance based on factors such as the material's thickness, K-Factor, and the bend radius.
The Bend Allowance option is an important factor in ensuring that you are able to use the correct size of flat sheet to make your final, bent parts. A number of options are available, but if you're unfamiliar with Bend Allowance, then it is recommended that you simply use the K-Factor option. A K-Factor value of 0.5 gives a good estimation for most parts, and your manufacturer should be able to advise you in more detail, based on the material type and your exact part details.
Auto Relief options
The final Sheet Metal property is Auto Relief. This is a way of automatically adding relief cuts to bends if they are required. Figure 1.15 shows a simple Base Flange with an Edge Flange that only runs part of the way along the edge. In order to create this specific type of bend, Auto Relief cuts are needed; otherwise, the metal won't be able to bend correctly:
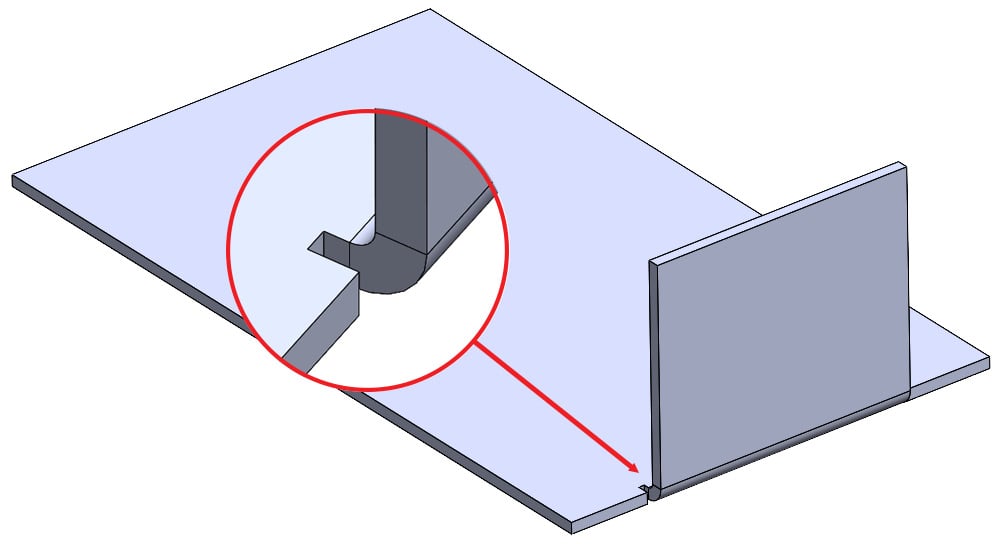
Figure 1.15: An example of an Auto Relief cut
Auto Relief cuts aren't needed on all bend types and will be automatically added when they are required. However, the exact type of relief cut is what is specified in the Auto Relief option.
The three types are:
- Rectangular: This gives a rectangular cut (see Figure 1.16). The size of the cut is determined by the ratio number and is related to the thickness of the sheet—for example, a ratio of
0.5and a sheet thickness of1mmwill give a relief cut 0.5mm wide, which extends 0.5mm beyond the bend region. Note: the relief ratio has to be between 0.05 and 2.0. - Obround: This gives a more rounded cut (see Figure 1.16) and also uses a ratio based on the thickness of the sheet in the same way as the Rectangular option.
- Tear: This option essentially tears the metal, without providing a visible cut area. This is the minimum that is needed to be able to flatten and bend the part.
All three options are depicted here:

Figure 1.16: Auto Relief examples; left to right: Rectangular, Obround, Tear
Auto Relief cuts are an important requirement for some bend types but they will be added automatically, so this option can usually be set to Rectangular or Obround with a ratio of 0.5 unless you have specific requirements.
A recap of Sheet Metal properties
Sheet Metal properties are an important way of defining your Sheet Metal part. They can be adjusted by editing the Sheet-Metal folder within the FeatureManager Design Tree. They generally apply to the whole part, although they can often be overridden for specific features.
The four options are:
- Thickness: This determines the thickness of the sheet used to create the Base Flange and subsequent features.
- Bend Radius: This sets the internal size of bends. A Bend Radius is always required for bent edges in SolidWorks Sheet Metal.
- Bend Allowance: This allows us to accurately calculate the correct size of flat sheet that can be used to create bent parts. There are a number of ways to calculate the Bend Allowance, but if you are unsure, then the best option is usually a K-Factor value of 0.5.
- Auto Relief: Some bends require relief cuts in order for them to be flattened or folded correctly. These will be added automatically if needed, but this option controls the size and type of cut.
Now that we have learned the basics of Sheet Metal properties and creating Base Flanges, we can go on to explore how 3D parts can be flattened, as well as more advanced types of Base Flanges.


