Unboxing and powering up your BeagleBone
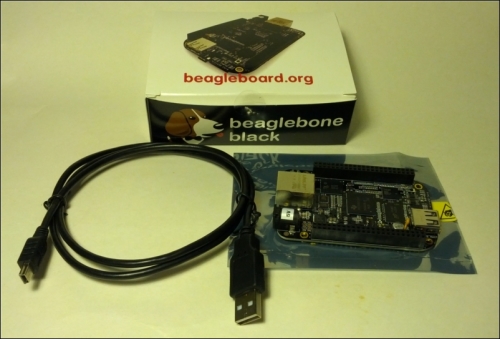
For the BBB, the box will contain the BBB board in an ESD-safe protective bag (a silver-colored bag), and a USB cable with a mini connector on one end and a standard USB A connector on the other.
Note
The BeagleBone boards are sensitive to static electricity; hence, store the board in the protective ESD bag when not in use.
You can see the BeagleBone Black board with its contents in the following image:

For the BBW, the contents are similar except that it also contains a microSD card along with a microSD to full-size SD adapter. For the purposes of this book, the SD adapter is not needed but more advanced uses, such as recovery of the board, might require the adapter. You can see the BeagleBone White board with its contents in the following image:

In order to power up the BeagleBone for the first time, a desktop or a laptop with a USB port should be available. If possible, do not use an external hub. If you must use a hub, be sure to use a self-power hub (a hub that has its own power supply). The board as shipped is designed to work with most desktop/laptops. However, there are some corner case configurations, which we will address later. The board has been tested with systems that run Linux, Windows, and Mac OS. The configuration is generally the easiest with a Linux system but it is not necessary.
Note
This book will focus on Linux and Windows. The Mac OS configuration should be similar. The overall process is described at http://beagleboard.org/static/beaglebone/latest/README.htm and http://beagleboard.org/Getting%20Started.
For the BBW users, the microSD card should be inserted at this point prior to connecting the mini USB cable; the BBB users can proceed to connecting the mini USB cable.
Note
The microSD card only fits in one way. If it does not appear to fit, remove and flip it over. Do not force the card.
Regardless of the operating system, the first step is to plug the mini USB cable into the BeagleBone.
Note
The mini USB connector is at the bottom of the board under the LEDs, next to the big silver RJ45 jack. The USB port is marked as USB.
When the BeagleBone is powered on from the machine, a blue power LED will immediately light. If the LED doesn't glow or if it just blinks on briefly, it is possible that your machine might fall in the corner case category and you might need the power adapter as described later. The earlier URL mentions additional steps but other steps such as upgrading to the latest image are optional. Similarly, configuring the board for serial access is also optional.
The exercises in this book should work fine with the shipping images. An image here refers to the system software. Usually, updating the system software will add new features and fix bugs. The system software shipped with the board should be enough for the exercises in this book. So, you can use it to develop an understanding of the BeagleBone before diving into its upgrades. In Chapter 2, Software in the BeagleBone, we will look at the system software in more detail. You can see how the USB cables connect to the BeagleBone Black and BeagleBone White in the following image:

The standard BeagleBone software at the time of writing this book provides two standard USB functions for the BBB and one additional function for the BBW out of the box. They are as follows:
- USB mass storage: This is a standard USB way of providing access to a storage device. Other examples of UMS devices are the USB thumb drives; most include drivers to support UMS.
- USB Ethernet: This is one of the many methods of providing a virtual-network interface with USB. The configuration supports the Remote Network Driver Interface Specification (RNDIS) method so that it can work out of the box with Windows without sacrificing the Linux compatibility. The net result is a virtual-network interface that appears on both Linux and Windows.
- (BBW only) FTDI serial adapter: This is a combination serial port adapter connected to a serial console and a JTAG interface. It is implemented as an additional piece of hardware on the BBW. This hardware is combined with the preceding two functions implemented by the Linux system running on the BeagleBone with an onboard hub. The exercises in this book will not use this part of the BBW.


