Installing MariaDB on Windows
There are two types of MariaDB downloads for Windows: ZIP files and MSI packages. As mentioned previously, the ZIP files are similar to the Linux binary .tar.gz files and they are only recommended for those who know that they want it.
If we are starting out with MariaDB for Windows, it is recommended to use the MSI packages. The following are the steps to do just that:
- Download the MSI package from https://downloads.mariadb.org/ location. First click on the series that we want (whatever is the current stable version, most likely), then locate the Windows 64-bit or Windows 32-bit MSI package. For most Windows PCs, the 64-bit MSI package is probably the one that we want, especially if we have more than 4 GB of RAM. If you're unsure, the 32-bit package will work on both 32-bit and 64-bit Windows computers.
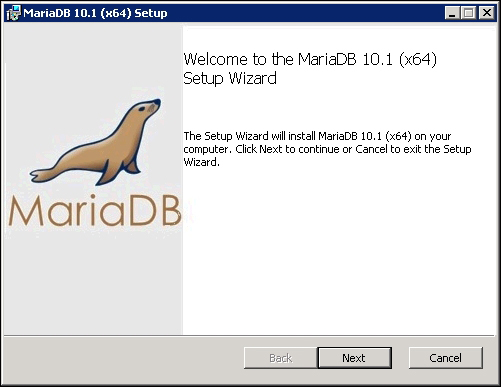
- Once the download has finished, launch the MSI installer by double-clicking on it. Depending on the local Windows settings, you may be promoted to launch the installer automatically. The installer will walk us through installing MariaDB.

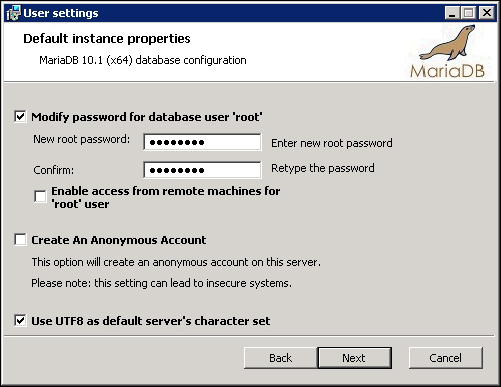
- If we are installing MariaDB for the first time, we must be sure to set the MariaDB
rootuser password when prompted. This is done by checking the Modify password for database user 'root' checkbox and then filling in our chosen password two times in the provided textboxes. - Unless you need to, don't check the Enable access from remote machines for 'root' user or the Create An Anonymous Account checkboxes. We'll cover creating regular user accounts in Chapter 4, Administering MariaDB.
- The Use UTF8 as the default server's character set checkbox is unchecked by default, but it's a good idea to check it, as shown in the following screenshot:

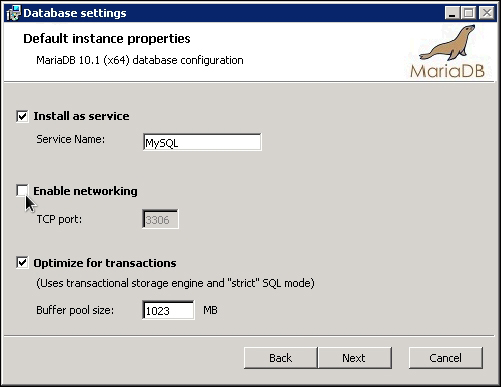
- The Install as service box is checked by default, and it is recommended to keep it that way so that MariaDB starts up when the computer is booted.
- The Service Name textbox has the default value
MySQLfor compatibility reasons, but we can rename it if we like. This name is what Windows uses to identify the running service, and it does not affect MariaDB so, it is okay to rename or keep it as the default name. - Check the Enable networking option if you need to access your databases from a different computer. If you don't need remote access, it's best to uncheck this box. As with the service name, there is a default TCP port, number
3306, which we can change if we want to, but it is usually best to stick with the default unless there is a specific reason not to. - The Optimize for transactions checkbox is also checked by default. This is the recommended setting, as shown here:

- One easy way to help the MariaDB developers is to check the Enable the Feedback plugin checkbox, as shown in the following screenshot. When enabled, the feedback plugin submits anonymous usage information to the MariaDB Foundation. This information includes things such as what plugins are enabled, how much memory MariaDB uses, and the operating system that we are using. MariaDB developers use this information to guide MariaDB development.

- There are other settings that we can make through the installer. All of them can be changed later by editing the
my.inifile. We will be covering this in Chapter 2, Configuring MariaDB, so we don't need to worry about them right away. - If our version of Windows has user account control enabled, a pop-up window will appear during the installation asking if we want to allow the installer to install MariaDB. For obvious reasons, we will need to click on Yes.
- Once the installation is complete, there will be a
MariaDBfolder added to the start or the programs menu. There will be various links under this, including one to themysqlcommand-line client application. We will be using this application in Chapters 5-7.Tip
If we already have an older version of MariaDB or MySQL running on our machine, we will be prompted to upgrade the data files to the correct format for the version we are installing. It is highly recommended to do that.
- Eventually, we will be presented with a dialog box containing an installation complete message and a Finish button. At this point, MariaDB is installed and running on our Windows-based computer. Congratulations! Click on Finish to quit the installer.
To install MariaDB on Mac OS X or Linux, read on; otherwise, feel free to skip those sections.


