Search icon CANCEL
Subscription
0
Cart icon
Your Cart (0 item)
Close icon
You have no products in your basket yet
Arrow left icon
Explore Products
Best Sellers
New Releases
Books
Videos
Audiobooks
Learning Hub
Free Learning
Arrow right icon
Arrow up icon
GO TO TOP
Docker on Amazon Web Services

You're reading from   Docker on Amazon Web Services Build, deploy, and manage your container applications at scale

Arrow left icon
Product type Paperback
Published in Aug 2018
Publisher Packt
ISBN-13 9781788626507
Length 822 pages
Edition 1st Edition
Tools
Arrow right icon
Author (1):
Arrow left icon
Justin Menga Justin Menga
Author Profile Icon Justin Menga
Justin Menga
Arrow right icon
View More author details
Toc

Table of Contents (20) Chapters Close

Preface 1. Container and Docker Fundamentals 2. Building Applications Using Docker FREE CHAPTER 3. Getting Started with AWS 4. Introduction to ECS 5. Publishing Docker Images Using ECR 6. Building Custom ECS Container Instances 7. Creating ECS Clusters 8. Deploying Applications Using ECS 9. Managing Secrets 10. Isolating Network Access 11. Managing ECS Infrastructure Life Cycle 12. ECS Auto Scaling 13. Continuously Delivering ECS Applications 14. Fargate and ECS Service Discovery 15. Elastic Beanstalk 16. Docker Swarm in AWS 17. Elastic Kubernetes Service 18. Assessments 19. Other Books You May Enjoy

Installing the sample application

Now that you have set up your local environment to support Docker and the various tools required to complete this book, it's time to install the sample application for this course.

The sample application is a simple Todo items web service called todobackend that provides a REST API that allows you to create, read, update, and delete Todo items (for example, Wash the car or Walk the dog).  This application is a Python application based on Django, which is a popular framework for creating web applications. You can read more about this at https://www.djangoproject.com/.  Don't worry if you are not familiar with Python – the sample application is already created for you and all you need to do as you read through this book is build and test the application, package and publish the application as a Docker image, and then deploy your application using the various container management platforms discussed in this book.

Forking the sample application

To install the sample application, you will need to fork the application from GitHub (we will discuss what this means shortly), which requires you to have an active GitHub account.  If you already have a GitHub account, you can skip this step, however if you don't have an account, you can sign up for a free account at https://github.com:

Signing up for GitHub

Once you have an active GitHub account, you can access the sample application repository at https://github.com/docker-in-aws/todobackend.  Rather than clone the repository, a better approach is to fork the repository, which means that a new repository will be created in your own GitHub account that is linked to the original todobackend repository (hence the term fork).  Forking is a popular pattern in the open source community, and allows you to make your own independent changes to the forked repository.  This is particularly useful for this book, as you will be making your own changes to the todobackend repository, adding a local Docker workflow to build, test, and publish the sample application as a Docker image, and other changes as you progress throughout this book.

To fork the repository, click on the fork button that is located in the top right hand corner:

Forking the todobackend repository

A few seconds a after clicking the fork button, a new repository should be created with the name <your-github-username>/todobackend.  At this point, you can now clone your fork of the repository by clicking on the Clone or download button.  If you have just set up a new account, choose the Clone with HTTPS option and copy the URL that's presented:
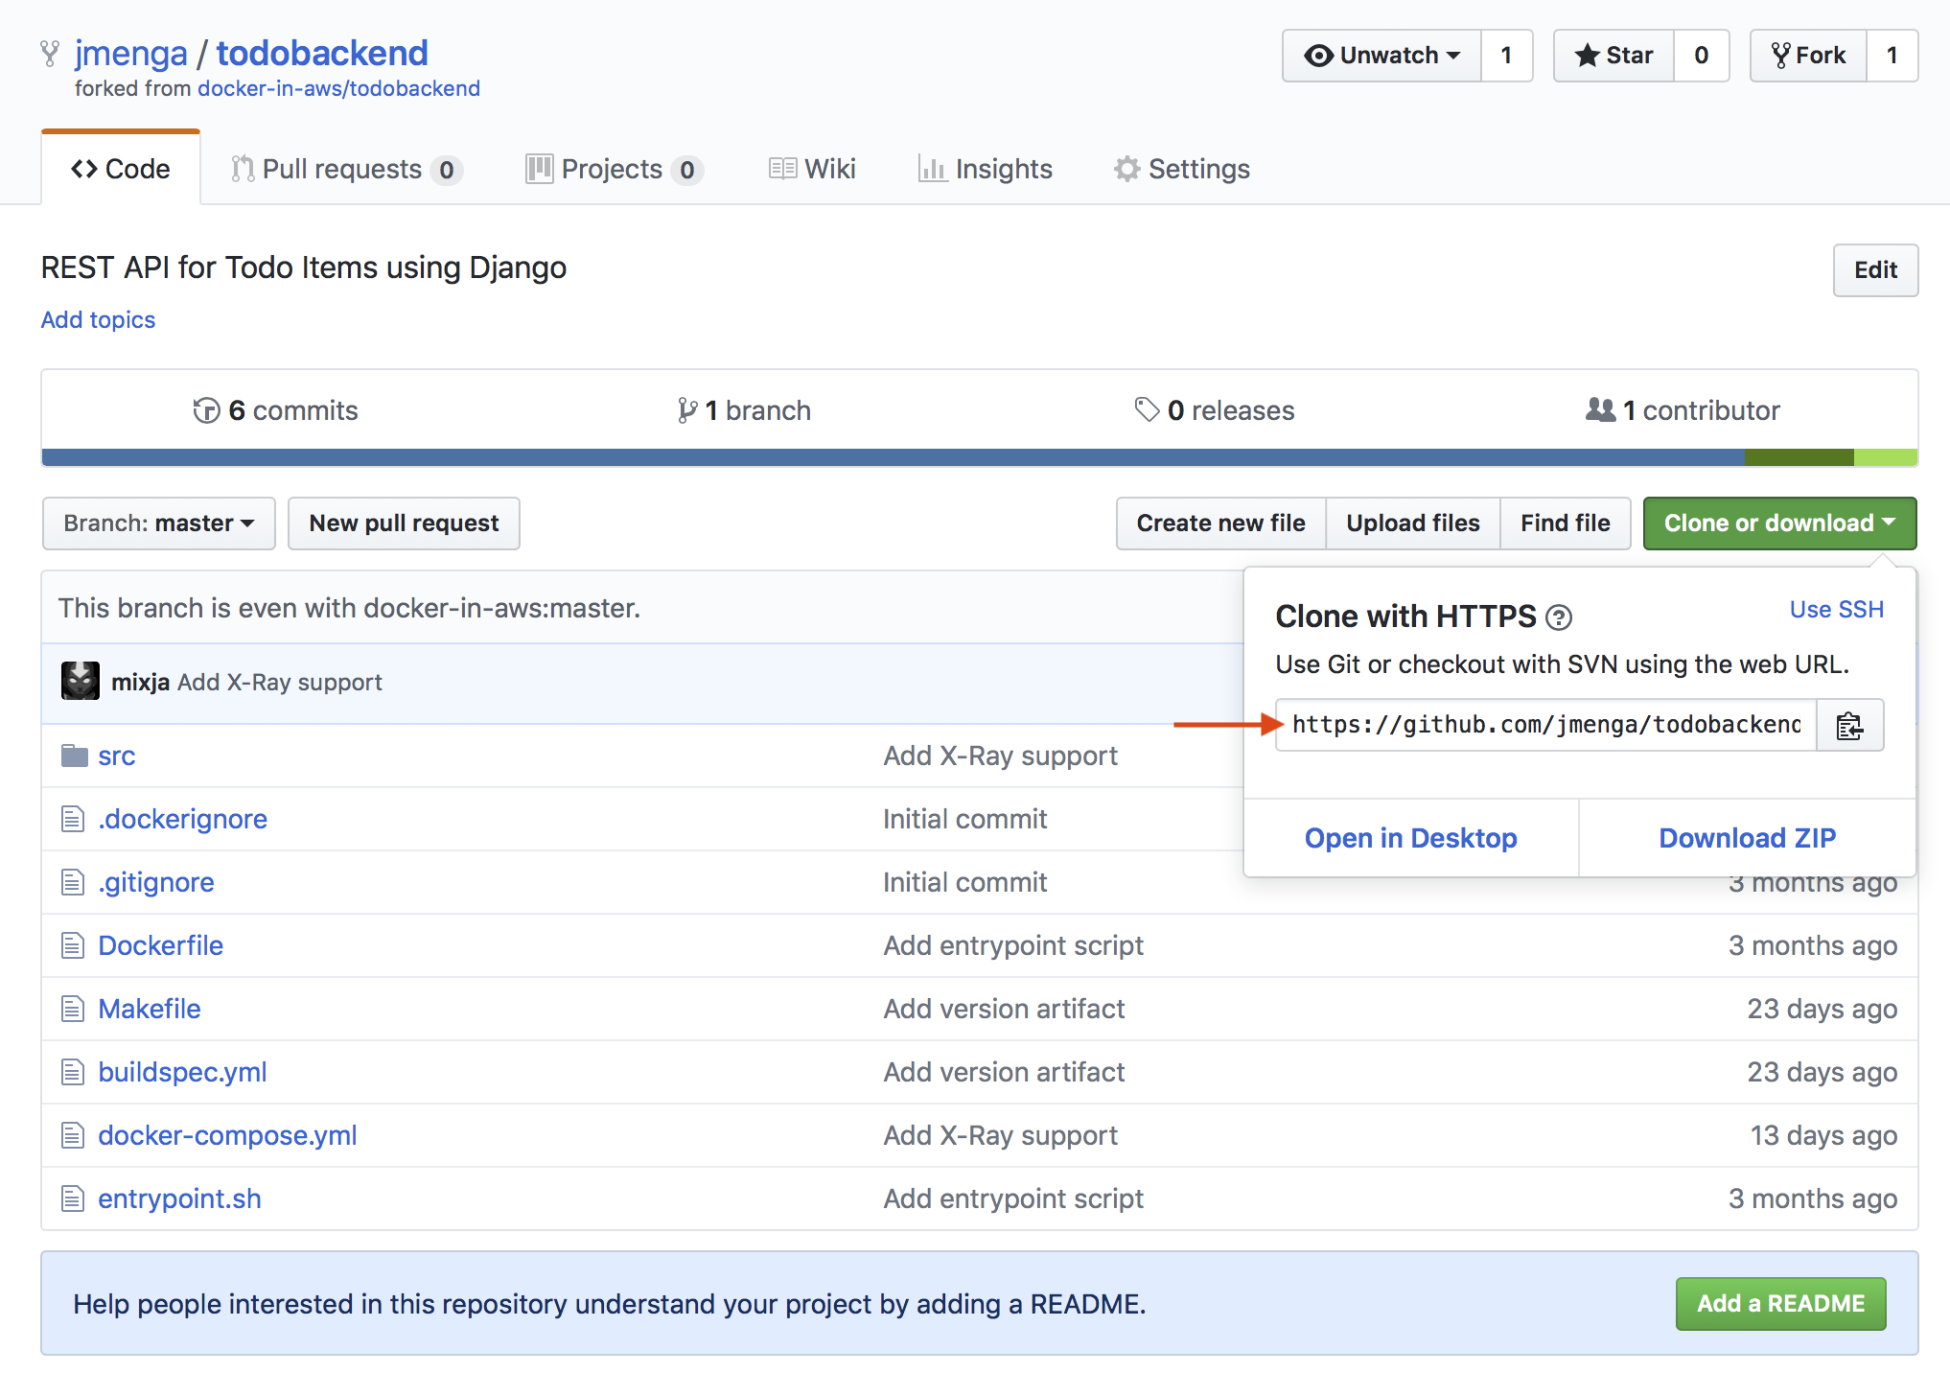
Getting the Git URL for the todobackend repository

Open a new terminal and run the git clone <repository-url> command, where <repository-url> is the URL you copied in the preceding example, and then go into the newly created todobackend folder:

> git clone https://github.com/<your-username>/todobackend.git
Cloning into 'todobackend'...
remote: Counting objects: 231, done.
remote: Total 231 (delta 0), reused 0 (delta 0), pack-reused 231
Receiving objects: 100% (231/231), 31.75 KiB | 184.00 KiB/s, done. Resolving deltas: 100% (89/89), done.
> cd todobackend
todobackend>

As you work through this chapter, I encourage you to commit any changes you make frequently, along with descriptive messages that clearly identify the changes you make. 

The sample repository includes a branch called final, which represents the final state of the repository after completing all chapters in this took.  You can use this as a reference point if you run into any issues by running the command git checkout final.  You can switch back to the master branch by running git checkout master.

If you are unfamiliar with Git, you can refer to any of the numerous tutorials online (for example, https://www.atlassian.com/git/tutorials), however in general you will need to perform the following commands when committing a change:

> git pull
Already up to date.
> git diff
diff --git a/Dockerfile b/Dockerfile
index e56b47f..4a73ce3 100644
--- a/Dockerfile
+++ b/Dockerfile
-COPY --from=build /build /build
-COPY --from=build /app /app
-WORKDIR /app
+# Create app user
+RUN addgroup -g 1000 app && \
+ adduser -u 1000 -G app -D app

+# Copy and install application source and pre-built dependencies
> git status
On branch master
Your branch is up to date with 'origin/master'.

Changes not staged for commit:
(use "git add <file>..." to update what will be committed)
(use "git checkout -- <file>..." to discard changes in working directory)

modified: src/todobackend/settings.py
modified: src/todobackend/wsgi.py

Untracked files:
(use "git add <file>..." to include in what will be committed)

docker-compose.yml
src/acceptance.bats
> git add -A
> git commit -a -m "Some commit message"
> git push -u origin master
> git push

You should always check frequently that you have the most up-to-date version of the repository by running the git pull command, as this avoids messy automatic merges and push failures, particularly when you are working with other people that may be collaborating on your project.  Next, you can use the git diff command to show, at a content level, any changes you have made to existing files, while the git status command shows, at a file level, changes to existing files and also identifies any new files that you may have added to the repository.  The git add -A command adds all new files to the repository, and the git commit -a -m "<message>" command commits all changes (including any files you have added with git add -A) with the specified message.  Finally, you can push your changes using the git push command – the first time you push, you must specify the remote branch at the origin using the git push -u origin <branch> command – after which you can just use the shorter git push variant to push your changes.

A common mistake is to forget to add new files to your Git repository, which may not be apparent until you clone the repository to a different machine.  Always ensure that you run the git status command to identify any new files that are not currently being tracked before committing your changes.

Running the sample application locally

Now that you have downloaded the source code for the sample application locally, you can now build and run the application locally. When you are packaging an application into a Docker image, you need to understand at a detailed level how to build and run your application, so running the application locally is the first step in the journey of being able to build a container for your application.

Installing application dependencies

To run the application, you need to first install any dependencies that the application requires. The sample application includes a file called requirements.txt in the src folder, which lists all required Python packages that must be installed for the application to run:

Django==2.0
django-cors-headers==2.1.0
djangorestframework==3.7.3
mysql-connector-python==8.0.11
pytz==2017.3
uwsgi==2.0.17

To install these requirements, ensure you have changed to the src folder and configure the PIP package manager to read the requirements file using the -r flag.  Note that the best practice for day to day development is to install your application dependencies in a virtual environment (see https://packaging.python.org/guides/installing-using-pip-and-virtualenv/) however given we are installing the application mainly for demonstration purposes, I won't be taking this approach here:

todobackend> cd src
src> pip3 install -r requirements.txt --user
Collecting Django==2.0 (from -r requirements.txt (line 1))
...
...
Successfully installed Django-2.0 django-cors-headers-2.1.0 djangorestframework-3.7.3 mysql-connector-python-8.0.11 pytz-2017.3 uwsgi-2.0.17
Over time, the specific versions of each dependency may change to ensure that the sample application continues to work as expected.

Running database migrations

With the application dependencies installed, you can run the python3 manage.py command to perform various Django management functions, such as running tests, generating static web content, running database migrations, and running a local instance of your web application.

In a local development context, you first need to run database migrations, which means your local database will be initialized with an appropriate database schema, as configured by your application. By default, Django uses the lightweight SQLite database that's included with Python, which is suitable for development purposes and requires no setup to get up and running. Therefore, you simply run the python3 manage.py migrate command, which will run all database migrations that are configured in the application automatically for you:

src> python3 manage.py migrate
Operations to perform:
Apply all migrations: admin, auth, contenttypes, sessions, todo
Running migrations:
Applying contenttypes.0001_initial... OK
Applying auth.0001_initial... OK
Applying admin.0001_initial... OK
Applying admin.0002_logentry_remove_auto_add... OK
Applying contenttypes.0002_remove_content_type_name... OK
Applying auth.0002_alter_permission_name_max_length... OK
Applying auth.0003_alter_user_email_max_length... OK
Applying auth.0004_alter_user_username_opts... OK
Applying auth.0005_alter_user_last_login_null... OK
Applying auth.0006_require_contenttypes_0002... OK
Applying auth.0007_alter_validators_add_error_messages... OK
Applying auth.0008_alter_user_username_max_length... OK
Applying auth.0009_alter_user_last_name_max_length... OK
Applying sessions.0001_initial... OK
Applying todo.0001_initial... OK

When you run Django migrations, Django will automatically detect if an existing schema is in place, and create a new schema if one does not exist (this is the case in the preceding example). If you run the migrations again, notice that Django detects that an up-to-date schema is already in place, and therefore nothing is applied:

src> python3 manage.py migrate
Operations to perform:
Apply all migrations: admin, auth, contenttypes, sessions, todo
Running migrations:
No migrations to apply.

Running the local development web server

With the local SQLite database now in place, you can run your application by executing the python3 manage.py runserver command, which starts a local development web server on port 8000:

src> python3 manage.py runserver
Performing system checks...

System check identified no issues (0 silenced).
July 02, 2018 - 07:23:49
Django version 2.0, using settings 'todobackend.settings'
Starting development server at http://127.0.0.1:8000/
Quit the server with CONTROL-C.

If you open a browser to http://localhost:8000/, you should see a web page titled Django REST framework:

The todobackend application

This page is the root of the application, and you can see that the Django REST framework provides a graphical interface for navigating the API when you use a browser.  If you use the curl command instead of a browser, notice that Django detects a simple HTTP client and just returns a JSON response:

src> curl localhost:8000
{"todos":"http://localhost:8000/todos"}

If you click on the hypermedia link for the todos item (http://localhost:8000/todos), you will be presented with a list of Todo items, which is currently empty:

Todo Item List

Notice that you can create a new Todo item with a title and order using the web interface, which will populate the list of Todo items once you click on the POST button:

Creating a Todo Item

Of course, you also can use the command line and the curl command to create new Todo items, list all Todo items, and update Todo items:

> curl -X POST -H "Content-Type: application/json" localhost:8000/todos \
-d '{"title": "Wash the car", "order": 2}'
{"url":"http://localhost:8000/todos/2","title":"Wash the car","completed":false,"order":2}

> curl -s localhost:8000/todos | jq
[
{
"url": "http://localhost:8000/todos/1",
"title": "Walk the dog",
"completed": false,
"order": 1
},
{
"url": "http://localhost:8000/todos/2",
"title": "Wash the car",
"completed": false,
"order": 2
}
]

> curl -X PATCH -H "Content-Type: application/json" localhost:8000/todos/2 \
-d '{"completed": true}'
{"url":"http://localhost:8000/todos/2","title":"Wash the car","completed":true,"order":1}

In the preceding example, you first create a new Todo item using the HTTP POST method, and then verify that the Todos list now contains two Todo items, piping the output of the curl command to the jq utility you installed previously to format the returned items.  Finally, you use the HTTP PATCH method to make a partial update to the Todo item, marking the item as completed.

All of the Todo items you created and modified will be persisted in the application database, which in this case is a SQLite database running on your development machine.

Testing the sample application locally

Now that you have had a walkthrough of the sample application, let's take a look at how you can run tests locally to verify that the application is functioning as expected.  The todobackend application includes a small set of tests for Todo items that are located in the src/todo/tests.py file.  Understanding how these tests are written is outside the scope of this book, however knowing how to run these tests is critical in being able to test, build, and ultimately package the application into a Docker image.

When testing your application, it is very common to have additional dependencies that are specific to application testing, and are not required if you are building your application to run in production.  This sample application defines test dependencies in a file called src/requirements_test.txt, which imports all of the core application dependencies in src/requirements.txt and adds additional test-specific dependencies:

-r requirements.txt
colorama==0.3.9
coverage==4.4.2
django-nose==1.4.5
nose==1.3.7
pinocchio==0.4.2

To install these requirements, you need to the run the PIP package manager, referencing the requirements_test.txt file:

src> pip3 install -r requirements_test.txt --user
Requirement already satisfied: Django==2.0 in /usr/local/lib/python3.7/site-packages (from -r requirements.txt (line 1)) (2.0)
Requirement already satisfied: django-cors-headers==2.1.0 in /usr/local/lib/python3.7/site-packages (from -r requirements.txt (line 2)) (2.1.0)
...
...
Installing collected packages: django-coverage, nose, django-nose, pinocchio
Successfully installed django-nose-1.4.5 pinocchio-0.4.2

You can now run tests for the sample application by running the python3 manage.py test command, passing in the --settings flag, which allows you specify a custom settings configuration. In the sample application, there are additional test settings which are defined in the src/todobackend/settings_test.py file that extend the default settings included in src/todobackend/settings.py, which add testing enhancements such as specs style formatting and code coverage statistics:

src> python3 manage.py test --settings todobackend.settings_test
Creating test database for alias 'default'...

Ensure we can create a new todo item
- item has correct title
- item was created
- received 201 created status code
- received location header hyperlink

Ensure we can delete all todo items
- all items were deleted
- received 204 no content status code

Ensure we can delete a todo item
- received 204 no content status code
- the item was deleted

Ensure we can update an existing todo item using PATCH
- item was updated
- received 200 ok status code

Ensure we can update an existing todo item using PUT
- item was updated
- received 200 created status code

----------------------------------------------------------------------
XML: /Users/jmenga/todobackend/src/unittests.xml
Name Stmts Miss Cover
-----------------------------------------------------
todo/__init__.py 0 0 100%
todo/admin.py 1 1 0%
todo/migrations/0001_initial.py 5 0 100%
todo/migrations/__init__.py 0 0 100%
todo/models.py 6 6 0%
todo/serializers.py 7 0 100%
todo/urls.py 6 0 100%
todo/views.py 17 0 100%
-----------------------------------------------------
TOTAL 42 7 83%
----------------------------------------------------------------------
Ran 12 tests in 0.281s

OK

Destroying test database for alias 'default'...

Notice that Django test runner scans the various folders in the repository for tests, creates a test database, and then runs each test.  After all tests are complete, the test runner automatically destroys the test database, so you don't have to perform any manual setup or cleanup tasks.

lock icon The rest of the chapter is locked
Register for a free Packt account to unlock a world of extra content!
A free Packt account unlocks extra newsletters, articles, discounted offers, and much more. Start advancing your knowledge today.
Unlock this book and the full library FREE for 7 days
Get unlimited access to 7000+ expert-authored eBooks and videos courses covering every tech area you can think of
Renews at $19.99/month. Cancel anytime
Banner background image