Chapter 6. Validation
We can never rely on the data entered by users. Sometimes they might be ignorant about the application and thus they may be entering incorrect data unknowingly. At other times, some malign users may want to corrupt the application by entering inappropriate data into it. In either case, we need to validate the input data before storing the data for further processing.
In this chapter, you'll be learning about the following topics:
- Different types of validation
- Server-side validation with an example
- Client-side validation with an example
- Unobtrusive JavaScript validation using jQuery unobtrusive libraries, where we don't have to write separate code for validation
In an ideal case, users will enter valid data in a proper format in your application. But, as you might realize, the real world is not so ideal. Users will enter incorrect data in your application. As a developer, it is the responsibility of us to validate the user input in our application. If the entered input is not valid, you need to inform the user, saying what has gone wrong, so that the user can correct the input data and submit the form again.
Validation can be done on the client-side or the server-side or at both ends. If the validation is done before sending the data to the server, it is called client-side validation. For example, if the user does not enter any data in a mandatory field, we can validate (by finding the data that is not entered) the form, at the client-side itself. There is no need to send the form data to the server. JavaScript is the most commonly used language being used for client-side validation.

If the validation is done at the server-side (sending the form data to the server), it is called server-side validation. For instance, you might want to validate data entered by the user against the data in the database. In this case, it is preferable to do server-side validation as we cannot have all the data in the database at the client-side.
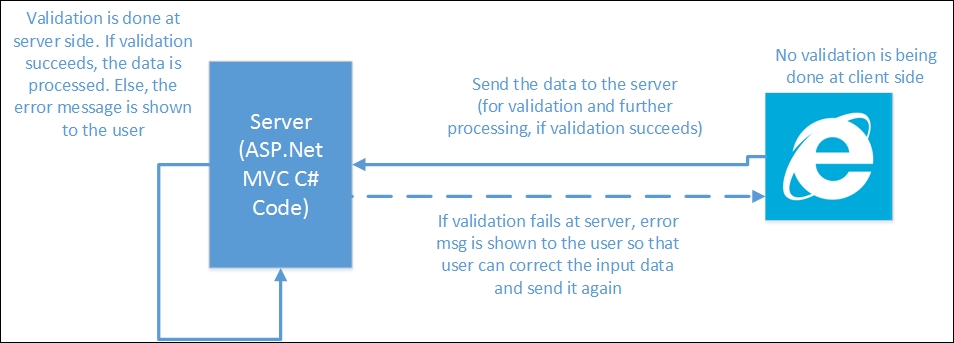
Client-side and server-side validation
In the real world, it's not a case of either server-side or client-side validation. We can have both types of validation at the same time. In fact, it is recommended to validate the data at both ends to avoid unnecessary processing.
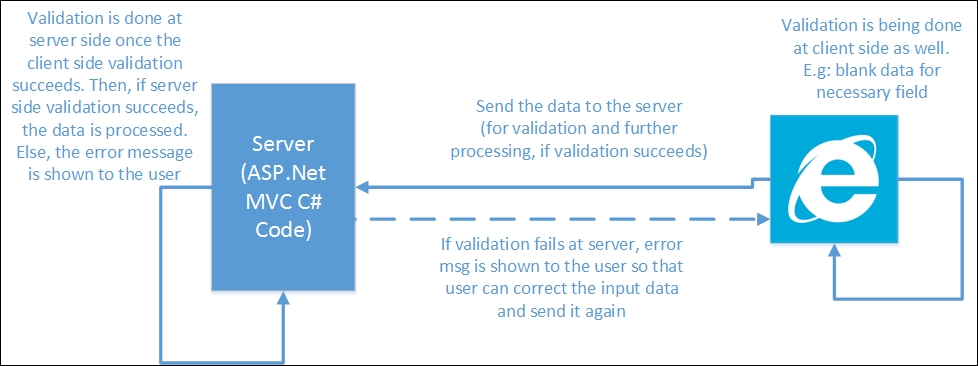
The preceding figure shows the validation is being performed at both the client-side and the server-side. If the data is not entered into the required field, we can catch that issue at the client-side itself. There is no need to send the data to the server to finally find out that there is no data entered. Once all the required data is entered, the data is sent back to the server to validate the entered data based on some business logic. If the validation fails, the form data is sent again to the browser with the error message so that the user can send the data again.
We have covered enough theory about the need for validation and the types of validations typically used in the application. Let us get our hands dirty by adding validation to the application that we built in the previous chapter.
The following screenshot is the form that we have built in the previous chapter. There is nothing fancy in this form—just three fields. When a user enters the data in the form, the data is stored in the database and the entire employee information is fetched back and shown in a tabular format.
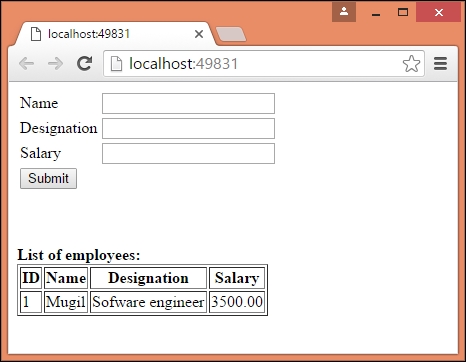
In the existing application that we have built, we do not show any message to the user even when the user does not enter any information in any of the fields and submits it. Instead, we silently store the default values for the fields (empty values for string types and 0.00 for decimal types) as shown in the following screenshot:
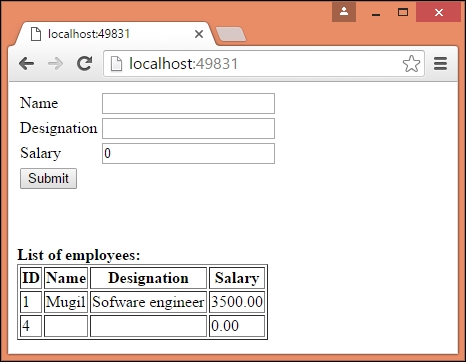
But this should not be the case. We should inform the user saying that the data entered is not valid and ask the user to correct the input data.
Server-side validation
Let us continue with the application that we built in the previous chapter. To do server-side validation, we need to do the following:
- Add Data Annotation attributes to the
ViewModelsmodel class. The input data is validated against this metadata and the model state is updated automatically. - Update the
viewmethod to display the validation message for each of the fields. Thespantag helper with theasp-validation-forattribute will be used to display the validation error message. - Update the controller action method to verify the model state. If the model state is valid, we insert the data into the database. Otherwise, the View model is updated and the
viewmethod is rendered again with the validation error message so that the user can update with valid input data and submit the form again.
Updating View models with the Data Annotation attribute
The Data Annotation attributes defines the validation rules for the properties of the Model/ViewModel. If the input data does not match with the attribute definition in the model, the validation will fail, which in turn makes the associated model state invalid.
There are several Data Annotation attributes available to validate the data. The following are the most commonly used Data Annotations attributes:
- Required: This attribute indicates the property is required.
- Range: This attribute defines the minimum and maximum constraints.
- MinLength: This defines the minimum length a property must have in order for the validation to succeed.
- MaxLength: As the name implies, this attribute defines the maximum length of the property. If the length of the property value exceeds the maximum length, the validation would fail.
- RegularExpression: We can use a regular expression for data validation if we use this attribute.
As Data Annotation attributes are available in the System.ComponentModel.DataAnnotations namespace, we need to include this namespace. The following is the updated View model code:
using System;
using System.Collections.Generic;
using System.ComponentModel.DataAnnotations;
using System.Linq;
using System.Threading.Tasks;
using Validation.Models;

namespace Validation.ViewModels
{
    public class EmployeeAddViewModel
    {
        public List<Employee> EmployeesList { get; set; }
        [Required(ErrorMessage ="Employee Name is required")]
        public string Name { get; set; }

        [Required(ErrorMessage ="Employee Designation is required")]
        [MinLength(5, ErrorMessage = "Minimum length of designation should be 5 characters")]
        public string Designation { get; set; }

        [Required]
        [Range(1000,9999.99)]
        public decimal Salary { get; set; }
    }
}
We have added Data Annotation attributes for all the three properties—Name, Designation, and Salary.
The ErrorMessage attribute displays a message to be displayed when the validation fails. If there is a failure of validation and if there is no ErrorMessage mentioned, the default error message will be displayed.
Updating the View model to display the validation error message
For each of the fields, we have added a span tag where the error message is displayed in a red color when the validation fails. When the validation succeeds, there will be no error message displayed. The attribute value of asp-validation-for represents the field name for which the validation error message has to be displayed. For example, we have used the span tag with the asp-validation-for attribute and with the value Name, which tells ASP.NET MVC to display the validation error message for the Name field:
<form asp-controller="Employee" asp-action="Index">
        <table>
            <tr>
                <td><label asp-for="Name"></label></td>
                <td><input asp-for="Name" /></td>
                <td><span asp-validation-for="Name" style="color:red"></span></td>
            </tr>
            <tr>
                <td><label asp-for="Designation"></label> </td>
                <td><input asp-for="Designation" /></td>
                <td><span asp-validation-for="Designation" style="color:red"></span> </td>
            </tr>
            <tr>
                <td><label asp-for="Salary"></label></td>
                <td><input asp-for="Salary"></td>
                <td> <span asp-validation-for="Salary" style="color:red"></span> </td>
            </tr>
            <tr>
                <td colspan="2"><input type="submit" id="submitbutton" value="Submit" /></td>
            </tr>
        </table>
    </form>
Updating the controller action method to verify the model state
The model state is automatically updated based on the Data Annotation attribute specified on our View model and the input data. We are verifying whether the model state is valid in the following Index method, which is a POST action method. If the model state is valid (when the validation succeeds), we save the entered data to the database. If the validation fails, then the ModelState is set to invalid automatically. Then, we would populate the ViewModel with the entered data and render the View method again so that the user can correct the input data and re-submit the data:
[HttpPost]
    public IActionResult Index(EmployeeAddViewModel employeeAddViewModel)
{
        if (ModelState.IsValid)
        {
            using (var db = new EmployeeDbContext())
            {
                Employee newEmployee = new Employee
                {
                    Name = employeeAddViewModel.Name,
                    Designation = employeeAddViewModel.Designation,
                    Salary = employeeAddViewModel.Salary
                };
                db.Employees.Add(newEmployee);
                db.SaveChanges();
                //Redirect to get Index GET method
                return RedirectToAction("Index");
            }
        }
        using (var db = new EmployeeDbContext())
        {
            employeeAddViewModel.EmployeesList = db.Employees.ToList();
        }
        return View(employeeAddViewModel);
}
When you run the application after making aforementioned changes and submit the form without entering the values, error messages will be displayed beside the fields as shown in the following screenshot. Please note that, even in the case of a validation error, we display the employees' data in the following table, which is achieved by using the code block in the previous code snippet.
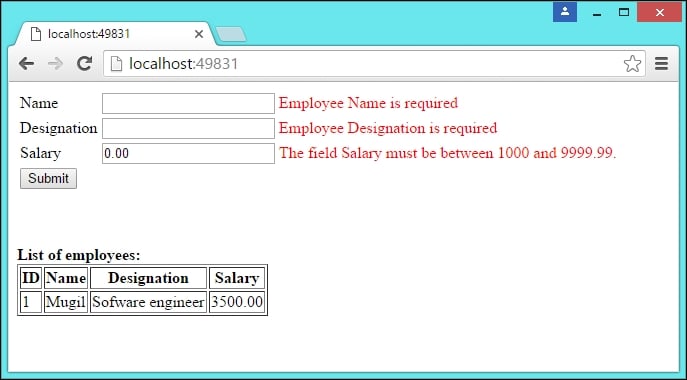
There are a few things to be noted in the previous validation and its error message:
- If the validation fails, error messages are displayed as expected.
- If there is more than one validation for a field, it will display one error message at a time. For example, we have a couple of validations for Designation field—the
RequiredandMinLengthattributes. If there is no data entered for the field, only the required field error message will be displayed. Only when the required field error is resolved (by entering some characters in the field), the second validation error message will be displayed. - If no error message is available and if the validation fails, the default error message is displayed. We have not given any error message for the Salary field. So, when the validation fails for that field, ASP.NET MVC displays the default error message based on the field name and the type of validation failure.

The preceding figure depicts the high-level sequence of events in server-side validation and is described as follows:
- The user enters the invalid data.
- Based on the Data Annotations attribute in the View model, the model state is updated automatically. This happens during the model binding process where the data in the
viewmethod is mapped to the data in the model or View model. - In the controller's action method, we are verifying the model state.
- If the model state is valid, we are saving the entered data to the database.
- If the model state is not valid, we are rending the View model again with the validation error message so that the user can correct the input data and submit the form again with the valid input data.
Updating View models with the Data Annotation attribute
The Data Annotation attributes defines the validation rules for the properties of the Model/ViewModel. If the input data does not match with the attribute definition in the model, the validation will fail, which in turn makes the associated model state invalid.
There are several Data Annotation attributes available to validate the data. The following are the most commonly used Data Annotations attributes:
- Required: This attribute indicates the property is required.
- Range: This attribute defines the minimum and maximum constraints.
- MinLength: This defines the minimum length a property must have in order for the validation to succeed.
- MaxLength: As the name implies, this attribute defines the maximum length of the property. If the length of the property value exceeds the maximum length, the validation would fail.
- RegularExpression: We can use a regular expression for data validation if we use this attribute.
As Data Annotation attributes are available in the System.ComponentModel.DataAnnotations namespace, we need to include this namespace. The following is the updated View model code:
using System;
using System.Collections.Generic;
using System.ComponentModel.DataAnnotations;
using System.Linq;
using System.Threading.Tasks;
using Validation.Models;

namespace Validation.ViewModels
{
    public class EmployeeAddViewModel
    {
        public List<Employee> EmployeesList { get; set; }
        [Required(ErrorMessage ="Employee Name is required")]
        public string Name { get; set; }

        [Required(ErrorMessage ="Employee Designation is required")]
        [MinLength(5, ErrorMessage = "Minimum length of designation should be 5 characters")]
        public string Designation { get; set; }

        [Required]
        [Range(1000,9999.99)]
        public decimal Salary { get; set; }
    }
}
We have added Data Annotation attributes for all the three properties—Name, Designation, and Salary.
The ErrorMessage attribute displays a message to be displayed when the validation fails. If there is a failure of validation and if there is no ErrorMessage mentioned, the default error message will be displayed.
Updating the View model to display the validation error message
For each of the fields, we have added a span tag where the error message is displayed in a red color when the validation fails. When the validation succeeds, there will be no error message displayed. The attribute value of asp-validation-for represents the field name for which the validation error message has to be displayed. For example, we have used the span tag with the asp-validation-for attribute and with the value Name, which tells ASP.NET MVC to display the validation error message for the Name field:
<form asp-controller="Employee" asp-action="Index">
        <table>
            <tr>
                <td><label asp-for="Name"></label></td>
                <td><input asp-for="Name" /></td>
                <td><span asp-validation-for="Name" style="color:red"></span></td>
            </tr>
            <tr>
                <td><label asp-for="Designation"></label> </td>
                <td><input asp-for="Designation" /></td>
                <td><span asp-validation-for="Designation" style="color:red"></span> </td>
            </tr>
            <tr>
                <td><label asp-for="Salary"></label></td>
                <td><input asp-for="Salary"></td>
                <td> <span asp-validation-for="Salary" style="color:red"></span> </td>
            </tr>
            <tr>
                <td colspan="2"><input type="submit" id="submitbutton" value="Submit" /></td>
            </tr>
        </table>
    </form>
Updating the controller action method to verify the model state
The model state is automatically updated based on the Data Annotation attribute specified on our View model and the input data. We are verifying whether the model state is valid in the following Index method, which is a POST action method. If the model state is valid (when the validation succeeds), we save the entered data to the database. If the validation fails, then the ModelState is set to invalid automatically. Then, we would populate the ViewModel with the entered data and render the View method again so that the user can correct the input data and re-submit the data:
[HttpPost]
    public IActionResult Index(EmployeeAddViewModel employeeAddViewModel)
{
        if (ModelState.IsValid)
        {
            using (var db = new EmployeeDbContext())
            {
                Employee newEmployee = new Employee
                {
                    Name = employeeAddViewModel.Name,
                    Designation = employeeAddViewModel.Designation,
                    Salary = employeeAddViewModel.Salary
                };
                db.Employees.Add(newEmployee);
                db.SaveChanges();
                //Redirect to get Index GET method
                return RedirectToAction("Index");
            }
        }
        using (var db = new EmployeeDbContext())
        {
            employeeAddViewModel.EmployeesList = db.Employees.ToList();
        }
        return View(employeeAddViewModel);
}
When you run the application after making aforementioned changes and submit the form without entering the values, error messages will be displayed beside the fields as shown in the following screenshot. Please note that, even in the case of a validation error, we display the employees' data in the following table, which is achieved by using the code block in the previous code snippet.

There are a few things to be noted in the previous validation and its error message:
- If the validation fails, error messages are displayed as expected.
- If there is more than one validation for a field, it will display one error message at a time. For example, we have a couple of validations for Designation field—the
RequiredandMinLengthattributes. If there is no data entered for the field, only the required field error message will be displayed. Only when the required field error is resolved (by entering some characters in the field), the second validation error message will be displayed. - If no error message is available and if the validation fails, the default error message is displayed. We have not given any error message for the Salary field. So, when the validation fails for that field, ASP.NET MVC displays the default error message based on the field name and the type of validation failure.

The preceding figure depicts the high-level sequence of events in server-side validation and is described as follows:
- The user enters the invalid data.
- Based on the Data Annotations attribute in the View model, the model state is updated automatically. This happens during the model binding process where the data in the
viewmethod is mapped to the data in the model or View model. - In the controller's action method, we are verifying the model state.
- If the model state is valid, we are saving the entered data to the database.
- If the model state is not valid, we are rending the View model again with the validation error message so that the user can correct the input data and submit the form again with the valid input data.
Updating the View model to display the validation error message
For each of the fields, we have added a span tag where the error message is displayed in a red color when the validation fails. When the validation succeeds, there will be no error message displayed. The attribute value of asp-validation-for represents the field name for which the validation error message has to be displayed. For example, we have used the span tag with the asp-validation-for attribute and with the value Name, which tells ASP.NET MVC to display the validation error message for the Name field:
<form asp-controller="Employee" asp-action="Index">
        <table>
            <tr>
                <td><label asp-for="Name"></label></td>
                <td><input asp-for="Name" /></td>
                <td><span asp-validation-for="Name" style="color:red"></span></td>
            </tr>
            <tr>
                <td><label asp-for="Designation"></label> </td>
                <td><input asp-for="Designation" /></td>
                <td><span asp-validation-for="Designation" style="color:red"></span> </td>
            </tr>
            <tr>
                <td><label asp-for="Salary"></label></td>
                <td><input asp-for="Salary"></td>
                <td> <span asp-validation-for="Salary" style="color:red"></span> </td>
            </tr>
            <tr>
                <td colspan="2"><input type="submit" id="submitbutton" value="Submit" /></td>
            </tr>
        </table>
    </form>
Updating the controller action method to verify the model state
The model state is automatically updated based on the Data Annotation attribute specified on our View model and the input data. We are verifying whether the model state is valid in the following Index method, which is a POST action method. If the model state is valid (when the validation succeeds), we save the entered data to the database. If the validation fails, then the ModelState is set to invalid automatically. Then, we would populate the ViewModel with the entered data and render the View method again so that the user can correct the input data and re-submit the data:
[HttpPost]
    public IActionResult Index(EmployeeAddViewModel employeeAddViewModel)
{
        if (ModelState.IsValid)
        {
            using (var db = new EmployeeDbContext())
            {
                Employee newEmployee = new Employee
                {
                    Name = employeeAddViewModel.Name,
                    Designation = employeeAddViewModel.Designation,
                    Salary = employeeAddViewModel.Salary
                };
                db.Employees.Add(newEmployee);
                db.SaveChanges();
                //Redirect to get Index GET method
                return RedirectToAction("Index");
            }
        }
        using (var db = new EmployeeDbContext())
        {
            employeeAddViewModel.EmployeesList = db.Employees.ToList();
        }
        return View(employeeAddViewModel);
}
When you run the application after making aforementioned changes and submit the form without entering the values, error messages will be displayed beside the fields as shown in the following screenshot. Please note that, even in the case of a validation error, we display the employees' data in the following table, which is achieved by using the code block in the previous code snippet.

There are a few things to be noted in the previous validation and its error message:
- If the validation fails, error messages are displayed as expected.
- If there is more than one validation for a field, it will display one error message at a time. For example, we have a couple of validations for Designation field—the
RequiredandMinLengthattributes. If there is no data entered for the field, only the required field error message will be displayed. Only when the required field error is resolved (by entering some characters in the field), the second validation error message will be displayed. - If no error message is available and if the validation fails, the default error message is displayed. We have not given any error message for the Salary field. So, when the validation fails for that field, ASP.NET MVC displays the default error message based on the field name and the type of validation failure.

The preceding figure depicts the high-level sequence of events in server-side validation and is described as follows:
- The user enters the invalid data.
- Based on the Data Annotations attribute in the View model, the model state is updated automatically. This happens during the model binding process where the data in the
viewmethod is mapped to the data in the model or View model. - In the controller's action method, we are verifying the model state.
- If the model state is valid, we are saving the entered data to the database.
- If the model state is not valid, we are rending the View model again with the validation error message so that the user can correct the input data and submit the form again with the valid input data.
Updating the controller action method to verify the model state
The model state is automatically updated based on the Data Annotation attribute specified on our View model and the input data. We are verifying whether the model state is valid in the following Index method, which is a POST action method. If the model state is valid (when the validation succeeds), we save the entered data to the database. If the validation fails, then the ModelState is set to invalid automatically. Then, we would populate the ViewModel with the entered data and render the View method again so that the user can correct the input data and re-submit the data:
[HttpPost]
    public IActionResult Index(EmployeeAddViewModel employeeAddViewModel)
{
        if (ModelState.IsValid)
        {
            using (var db = new EmployeeDbContext())
            {
                Employee newEmployee = new Employee
                {
                    Name = employeeAddViewModel.Name,
                    Designation = employeeAddViewModel.Designation,
                    Salary = employeeAddViewModel.Salary
                };
                db.Employees.Add(newEmployee);
                db.SaveChanges();
                //Redirect to get Index GET method
                return RedirectToAction("Index");
            }
        }
        using (var db = new EmployeeDbContext())
        {
            employeeAddViewModel.EmployeesList = db.Employees.ToList();
        }
        return View(employeeAddViewModel);
}
When you run the application after making aforementioned changes and submit the form without entering the values, error messages will be displayed beside the fields as shown in the following screenshot. Please note that, even in the case of a validation error, we display the employees' data in the following table, which is achieved by using the code block in the previous code snippet.

There are a few things to be noted in the previous validation and its error message:
- If the validation fails, error messages are displayed as expected.
- If there is more than one validation for a field, it will display one error message at a time. For example, we have a couple of validations for Designation field—the
RequiredandMinLengthattributes. If there is no data entered for the field, only the required field error message will be displayed. Only when the required field error is resolved (by entering some characters in the field), the second validation error message will be displayed. - If no error message is available and if the validation fails, the default error message is displayed. We have not given any error message for the Salary field. So, when the validation fails for that field, ASP.NET MVC displays the default error message based on the field name and the type of validation failure.

The preceding figure depicts the high-level sequence of events in server-side validation and is described as follows:
- The user enters the invalid data.
- Based on the Data Annotations attribute in the View model, the model state is updated automatically. This happens during the model binding process where the data in the
viewmethod is mapped to the data in the model or View model. - In the controller's action method, we are verifying the model state.
- If the model state is valid, we are saving the entered data to the database.
- If the model state is not valid, we are rending the View model again with the validation error message so that the user can correct the input data and submit the form again with the valid input data.
Client-side validation
There are scenarios where we don't need to go to the server to validate the input data. In the preceding example of the server-side validation, we do not need to go to the server to verify whether the user has entered the data for the Name field. We can validate at the client-side itself. This prevents round-trips to the server and reduces the server load.
We are going to use JavaScript to validate the data from the client-side. JavaScript is a high-level, interpreted language which is primarily used in client-side programming.
Note
These days, JavaScript is also being used at the server-side as part of Node.js.
We are going to make a couple of changes in our View model (Index.cshtml file) to validate the form at the client-side:
- Changes in the form: add the
idattribute to all thespantags so that we can access this HTML element to display the HTML error message. On submission of the form, call a JavaScript function to validate the input data. - Add the script HTML element and create a JavaScript function to validate the input data.
In the following code, we are calling the validateForm JavaScript function on submission of the form. If the validateForm function returns true, the data will be sent to the server. Otherwise, the data will not be sent. We have added the id attribute for all the span tags so that we can identify the span tags and display the validation error messages over there:
<form asp-controller="Employee" asp-action="Index" onsubmit="return validateForm()">
        <table>
            <tr>
                <td><label asp-for="Name"></label></td>
                <td><input asp-for="Name" /></td>
                <td><span id="validationName" asp-validation-for="Name" style="color:red"></span></td>
            </tr>
            <tr>
                <td><label asp-for="Designation"></label> </td>
                <td><input asp-for="Designation" /></td>
                <td><span id="validationDesignation" asp-validation-for="Designation" style="color:red"></span> </td>
            </tr>
            <tr>
                <td><label asp-for="Salary"></label></td>
                <td><input asp-for="Salary"></td>
                <td> <span id="validationSalary" asp-validation-for="Salary" style="color:red"></span> </td>
            </tr>
            <tr>
                <td colspan="2"><input type="submit" id="submitbutton" value="Submit" /></td>
            </tr>
        </table>
</form>
We have added the JavaScript function to validate all three fields. We get the values of all the three fields and we store them in separate variables. Then we verify whether the value of each of the variables is null or empty. If the value is empty, we get the span element for the respective field and set the text context with the validation error message:
<script type="text/javascript">
        function validateForm() {
            var isValidForm = true;
            var nameValue = document.getElementById("Name").value;
            var designationValue = document.getElementById("Designation").value;
            var salaryValue = document.getElementById("Salary").value;

            //Validate the name field
            if (nameValue == null || nameValue == "") {
                document.getElementById("validationName").textContent = "Employee Name is required - from client side";
                isValidForm = false;
            }

            //validate the designation field
            if (designationValue == null || designationValue == "") {
                document.getElementById("validationDesignation").textContent = "Employee Designation is required - from client side";
                isValidForm = false;
            }

            //validate the salary field - if it is empty
            if (salaryValue == null || salaryValue == "") {
                document.getElementById("validationSalary").textContent = "Employee Salary is required - from client side";
                isValidForm = false;
            }else if (Number(salaryValue) == NaN || Number(salaryValue)<=0.0) {
                document.getElementById("validationSalary").textContent = "Please enter valid number for salary field - from client side";
                isValidForm = false;
            }


            return isValidForm;

        }

</script>
When you run the application and submit the form without entering the data, you'll get the error message generated from the client-side itself without ever going to the server.
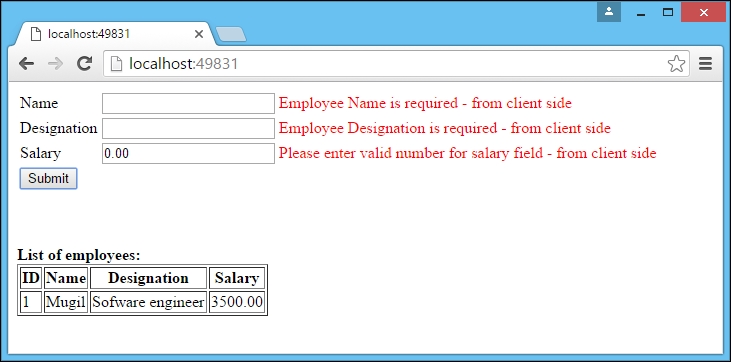
In real-world applications, we would not be hand coding the validation code at the JavaScript. Instead, most applications use unobtrusive validation, where we do not write JavaScript code for validating each of the fields. Simply adding the respective JavaScript libraries will do.
You might wonder how the fields get validated without ever writing the code. The magic lies in the data- attributes added to the input HTML elements based on the Data Annotation attributes. This jQuery unobtrusive library gets a list of fields for which data- attributes are added and it gets validated.
Run the application and press Ctrl + U to see the source code. The source code will look something like the following:
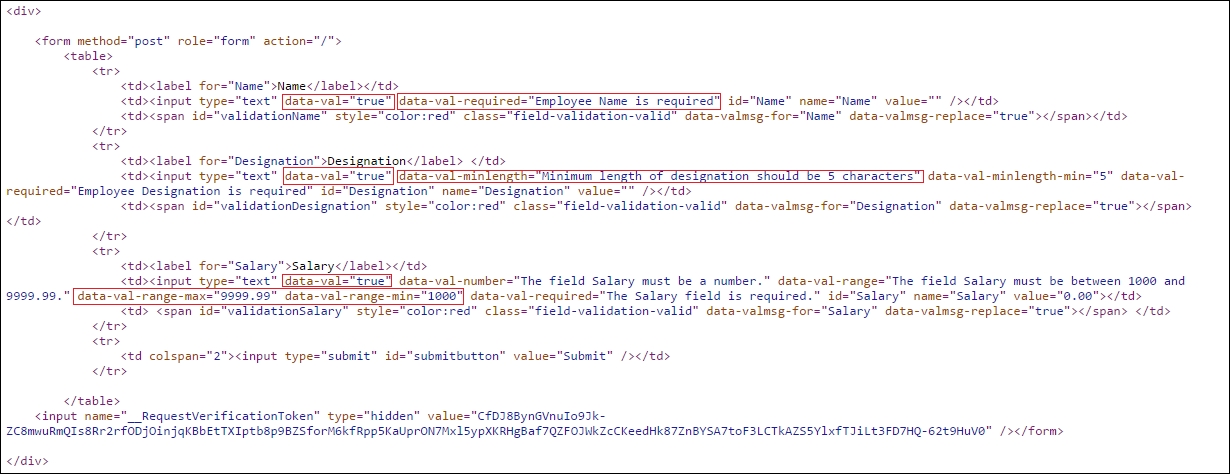
Different attributes will be added to different kinds of Data Annotation attributes. For the fields to be validated, the data-val attribute would be set to true. For the properties which are marked as required in the View model, the data-val-required attribute will have the value of the error message of the associated property.
Implementation
There will be a layout file (_Layout.cshtml) to define the layout structure of your web application. As JavaScript libraries are going to be used in all the pages, this is the right place to add common functionalities such as unobtrusive validation. Just add the JavaScript libraries (highlighted in bold) to the layout file (_Layout.cshtml) so that they will be available for all the View files:
<!DOCTYPE html>
<html>
<head>
    <meta name="viewport" content="width=device-width" />
    <title>@ViewBag.Title</title>
</head>
<body>
    <div>
        @RenderBody()
    </div>

    <script src="http://ajax.aspnetcdn.com/ajax/jQuery/jquery-2.2.3.js"></script>
    <script src="https://ajax.aspnetcdn.com/ajax/jquery.validate/1.14.0/jquery.validate.min.js"></script>
    <script src="https://ajax.aspnetcdn.com/ajax/mvc/5.2.3/jquery.validate.unobtrusive.min.js"></script>
</body>
</html>
There is no change to the View model except for the removal of the JavaScript function we wrote earlier for validating the fields. The complete code for the view is as following:
@model Validation.ViewModels.EmployeeAddViewModel

<div>

    <form asp-controller="Employee" asp-action="Index" method="post" role="form">
        <table>
            <tr>
                <td><label asp-for="Name"></label></td>
                <td><input asp-for="Name" /></td>
                <td><span id="validationName" asp-validation-for="Name" style="color:red"></span></td>
            </tr>
            <tr>
                <td><label asp-for="Designation"></label> </td>
                <td><input asp-for="Designation" /></td>
                <td><span id="validationDesignation" asp-validation-for="Designation" style="color:red"></span> </td>
            </tr>
            <tr>
                <td><label asp-for="Salary"></label></td>
                <td><input asp-for="Salary"></td>
                <td> <span id="validationSalary" asp-validation-for="Salary" style="color:red"></span> </td>
            </tr>
            <tr>
                <td colspan="2"><input type="submit" id="submitbutton" value="Submit" /></td>
            </tr>

        </table>
    </form>

</div>

<br /><br /> <br />

<b> List of employees:</b> <br />
<div>
    <table border="1">
        <tr>
            <th> ID </th>
            <th> Name </th>
            <th> Designation </th>
            <th> Salary </th>
        </tr>
        @foreach (var employee in Model.EmployeesList)
        {
            <tr>
                <td>@employee.EmployeeId</td>
                <td>@employee.Name</td>
                <td>@employee.Designation</td>
                <td>@employee.Salary</td>
            </tr>
        }
    </table>

</div>

The preceding diagram depicts the unobtrusive client validation process:
- Data Annotations are added to
Model/ViewModels. - The view takes
Model/ViewModelsand generates the HTML. - The generated HTML from the View model contains
data-*attributes:- For the fields for which the
Requiredattribute is set, thedata-val-requiredattribute is created with the error message as its value. - For the fields with the
MinLengthData Annotation attribute, thedata-val-minlengthattribute is set with the error message as its value. - For the range Data Annotation, the
data-val-rangeattribute is set with the error message as its value. Thedata-val-range-maxrepresents the maximum value in the range and thedata-val-range-minattribute represents the minimum value in the range.
- For the fields for which the
- The jQuery unobtrusive validation library reads these elements with
data-*attributes and does the client-side validation. This allows the developer to not write the separation validation code using JavaScript as everything is resolved by the configuration itself.
Summary
In this chapter, we have learned about the need for validation and the different kinds of validation available. We have even discussed how client-side and server-side validation work, along with the pros and cons of each type of validation. Later, we made code changes to validate the input data at the server-side. Then we used JavaScript to validate the input data in the client-side itself. Finally, we used the jQuery unobtrusive library to do the client-side validation without ever writing the JavaScript code to validate the input data at the client-side.
In the next chapter, we will discuss the routing principle and how to customize it. In an earlier chapter, we saw the basics of routing in an ASP.NET 5 application. Now we are going to explore the topic in depth.


