Search icon CANCEL
Subscription
0
Cart icon
Your Cart (0 item)
Close icon
You have no products in your basket yet
Arrow left icon
Explore Products
Best Sellers
New Releases
Books
Videos
Audiobooks
Learning Hub
Newsletter Hub
Free Learning
Arrow right icon
timer SALE ENDS IN
0 Days
:
00 Hours
:
00 Minutes
:
00 Seconds
Arrow up icon
GO TO TOP
3D Printing Blueprints

You're reading from   3D Printing Blueprints Using the free open-source Blender software, anyone can design models for 3D printing. Fantastic fun and a great experience whether or not you have a 3D printer, this book is a crash course in the new technology.

Arrow left icon
Product type Paperback
Published in Aug 2013
Publisher Packt
ISBN-13 9781849697088
Length 310 pages
Edition 1st Edition
Tools
Concepts
Arrow right icon
Author (1):
Arrow left icon
Joe Larson Joe Larson
Author Profile Icon Joe Larson
Joe Larson
Arrow right icon
View More author details
Toc

Table of Contents (17) Chapters Close

3D Printing Blueprints
Credits
About the Author
About the Reviewers
www.PacktPub.com
Preface
1. Design Tools and Basics FREE CHAPTER 2. Mini Mug 3. Face Illusion Vase 4. SD Card Holder Ring 5. Modular Robot Toy 6. D6 Spinner 7. Teddy Bear Figurine 8. Repairing Bad Models 9. Stretchy Bracelet 10. Measuring – Tips and Tricks Index

Trimming the fat


After the file is saved, open Blender, clear the scene, and save the scene in Documents\MakerbotBlueprints\Ch 8 Scan Repair and name the file Lion Cleanup.blend:

Import the file to be cleaned up by clicking on the menu options File | Import | Wavefront (.obj):
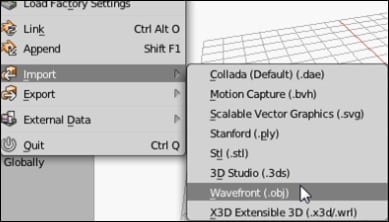
Double-click on the CH8_LionCapture.obj file. The file is very large and may take even a high-end machine a few seconds to process. When imported, it may be difficult to find the subject of the scan in all the extra data. The subject will be near the middle. Zoom in and adjust the view until the lion in the middle is framed in the view.
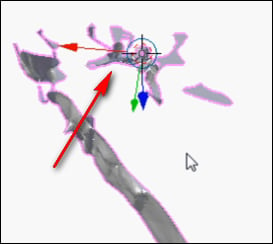
When zoomed in, it becomes clear that the lion is at a strange angle to the work plane.
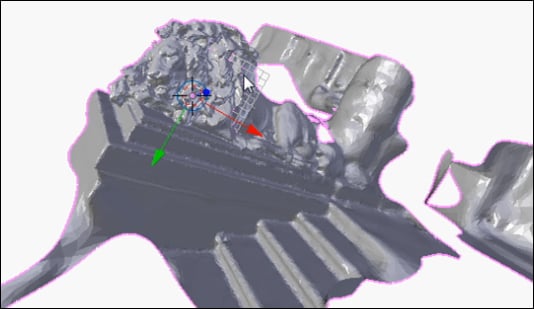
3D scans often capture more than the focus of the scan. All that extra, loose geometry needs to be separated and eliminated, which will make the model much easier to manage. To do this the Separate command will be used:

  1. Select (right-click) the scanned object.

  2. Press Tab to enter Edit Mode.

  3. In the menu at...

lock icon The rest of the chapter is locked
Register for a free Packt account to unlock a world of extra content!
A free Packt account unlocks extra newsletters, articles, discounted offers, and much more. Start advancing your knowledge today.
Unlock this book and the full library FREE for 7 days
Get unlimited access to 7000+ expert-authored eBooks and videos courses covering every tech area you can think of
Renews at $19.99/month. Cancel anytime