Once you have a local repository in place, this recipe describes the steps required to add files and start tracking their revisions over time. To have the flexibility to create multiple plugins, as discussed throughout this cookbook, without having to worry about adding each of them to the repository individually, we will add the entire WordPress plugin directory to your local repository.
Importing initial files to a local Subversion repository
Getting ready
You should have already installed a Subversion client on your computer and created a local repository, as described in the Creating a local Subversion repository recipe. These steps will be slightly different based on the Subversion client that you have selected and your operating system.
How to do it...
- Navigate to the wp-content/plugins directory of your local WordPress installation (for example, c:\WPDev\wp-content\plugins, if you followed the previous recipe) with the file explorer.
- Right-click on the folder and select the TortoiseSVN | Import menu item.
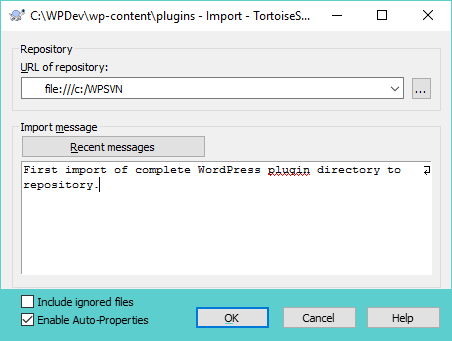
- Enter the file location of your local Subversion repository in the URL of repository field (for example, file:///c:/WPSVN), if it is not already specified.
- Write a message in the Import message field that gives an overview of the files that are being imported into the repository:

- Click on the OK button to complete the import process.
Once the import operation has started, TortoiseSVN sends all the selected files to the repository, displaying each of their names in the process. At the end of the import operation, it also displays the revision number that it assigned to this first set of files.
How it works...
Using the Import Subversion feature copies all the selected files to the repository. In addition to storing the files themselves, Subversion identifies each file with a revision number and an import message. The revision number is generated by Subversion and incremented every time a group of files is added. It is especially useful when searching through a file's history.
The import message is specified by the user and is actually optional. That being said, it is important to set meaningful import messages when adding files to a repository, as it will make it easier for you to identify what these files are, the state that they are in, and the reason they were added to the repository when performing future searches.
While these steps have led to a successful import, you may be wondering why nothing changed in the plugin directory. The reason is that the import process only makes copies of the selected files to the Subversion repository. An additional step, called the checkout process, needs to take place to start keeping track of changes and file history.
See also
- The Checking out files from a Subversion repository recipe


