Exploring threads, AsyncTasks, and Executors
There are many ways you can run tasks on the background thread in Android. In this section, you are going to explore various ways of doing asynchronous programming in Android, including using threads, AsyncTask, and Executors. You will learn how to start a task on the background thread and then update the main thread with the result.
Threads
A thread is a unit of execution that runs code concurrently. In Android, the UI thread is the main thread. You can perform a task on another thread by using the java.lang.Thread class:
private fun fetchTextWithThread() {
Thread {
// get text from network
val text = getTextFromNetwork()
}.start()
}
To run the thread, call Thread.start(). Everything that is inside the braces will be performed on another thread. You can do any operation here, except updating the UI, as you will encounter NetworkOnMainThreadException.
To update the UI, such as displaying the text fetched in a TextView from the network, you would need to use Activity.runOnUiThread(). The code inside runOnUIThread will be executed in the main thread, as follows:
private fun fetchTextWithThread() {
Thread {
// get text from network
val text = getTextFromNetwork()
runOnUiThread {
// Display on UI
displayText(text)
}
}.start()
}
runOnUIThread will perform the displayText(text) function on the main UI thread.
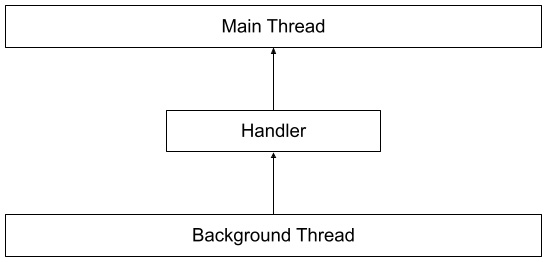
If you are not starting the thread from an activity, you can use handlers instead of runOnUiThread to update the UI, as seen in Figure 1.3:

Figure 1.3 – Threads and a handler
A handler (android.os.Handler) allows you to communicate between threads, such as from the background thread to the main thread, as shown in the preceding figure. You can pass a looper into the Handler constructor to specify the thread where the task will be run. A looper is an object that runs the messages in the thread’s queue.
To attach the handler to the main thread, you should use Looper.getMainLooper(), like in the following example:
private fun fetchTextWithThreadAndHandler() {
Thread {
// get text from network
val text = getTextFromNetwork()
Handler(Looper.getMainLooper()).post {
// Display on UI
displayText(text)
}
}.start()
}
Handler(Looper.getMainLooper()) creates a handler tied to the main thread and posts the displayText() runnable function on the main thread.
The Handler.post (Runnable) function enqueues the runnable function to be executed on the specified thread. Other variants of the post function include postAtTime(Runnable) and postDelayed (Runnable, uptimeMillis).
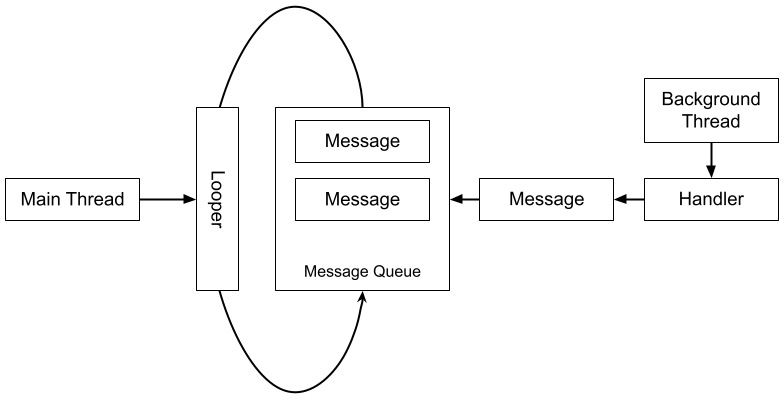
Alternatively, you can also send an android.os.Message object with your handler, as shown in Figure 1.4:

Figure 1.4 – Threads, handlers, and messages
A thread’s handler allows you to send a message to the thread’s message queue. The handler’s looper will execute the messages in the queue.
To include the actual messages you want to send in your Message object, you can use setData(Bundle) to pass a single bundle of data. You can also use the public fields of the message class (arg1, arg2, and what for integer values, and obj for an object value).
You must then create a subclass of Handler and override the handleMessage(Message) function. There, you can then get the data from the message and process it in the handler’s thread.
You can use the following functions to send a message: sendMessage(Message), sendMessageAtTime(Message, uptimeMillis), and sendMessageDelayed(Message, delayMillis). The following code shows the use of the sendMessage function to send a message with a data bundle:
private val key = "key"
private val messageHandler = object :
Handler(Looper.getMainLooper()) {
override fun handleMessage(message: Message) {
val bundle = message.data
val text = bundle.getString(key, "")
//Display text
displayText(text)
}
}
private fun fetchTextWithHandlerMessage() {
Thread {
// get text from network
val text = getTextFromNetwork()
val message = handler.obtainMessage()
val bundle = Bundle()
bundle.putString(key, text)
message.data = bundle
messageHandler.sendMessage(message)
}.start()
}
Here, fetchTextWithHandlerMessage() gets the text from the network in a background thread. It then creates a message with a bundle object containing a string with a key of key to send that text. The handler can then, through the handleMessage() function, get the message’s bundle and get the string from the bundle using the same key.
You can also send empty messages with an integer value (the what) that you can use in your handleMessage function to identify what message was received. These send empty functions are sendEmptyMessage(int), sendEmptyMessageAtTime(int, long), and sendEmptyMessageDelayed(int, long).
This example uses 0 and 1 as values for what (“what” is a field of the Message class that is a user-defined message code so that the recipient can identify what this message is about): 1 for the case when the background task succeeded and 0 for the failure case:
private val emptymesageHandler = object :
Handler(Looper.getMainLooper()) {
override fun handleMessage(message: Message) {
if (message.what == 1) {
//Update UI
} else {
//Show Error
}
}
}
private fun fetchTextWithEmptyMessage() {
Thread {
// get text from network
...
if (failed) {
emptyMessageHandler.sendEmptyMessage(0)
} else {
emptyMessageHandler.sendEmptyMessage(1)
}
}.start()
}
In the preceding code snippet, the background thread fetches the text from the network. It then sends an empty message of 1 if the operation succeeded and 0 if not. The handler, through the handleMessage() function, gets the what integer value of the message, which corresponds to the 0 or 1 empty message. Depending on this value, it can either update the UI or show an error to the main thread.
Using threads and handlers works for background processing, but they have the following disadvantages:
- Every time you need to run a task in the background, you should create a new thread and use
runOnUiThreador a new handler to post back to the main thread. - Creating threads can consume a lot of memory and resources.
- It can also slow down your app.
- Multiple threads make your code harder to debug and test.
- Code can become complicated to read and maintain.
Using threads makes it difficult to handle exceptions, which can lead to crashes.
As a thread is a low-level API for asynchronous programming, it is better to use the ones that are built on top of threads, such as executors and, until it was deprecated, AsyncTask. You can avoid it altogether by using Kotlin coroutines, which you will learn more about later in this chapter.
In the next section, you will explore callbacks, another approach to asynchronous Android programming.
Callbacks
Another common approach to asynchronous programming in Android is using callbacks. A callback is a function that will be run when the asynchronous code has finished executing. Some libraries offer callback functions that developers can use in their projects.
The following is a simple example of a callback:
private fun fetchTextWithCallback() {
fetchTextWithCallback { text ->
//display text
displayText(text)
}
}
fun fetchTextWithCallback(onSuccess: (String) -> Unit) {
Thread {
val text = getTextFromNetwork()
onSuccess(text)
}.start()
}
In the preceding example, after fetching the text in the background, the onSuccess callback will be called and will display the text on the UI thread.
Callbacks work fine for simple asynchronous tasks. They can, however, become complicated easily, especially when nesting callback functions and handling errors. This makes it hard to read and test. You can avoid this by avoiding nesting callbacks and splitting functions into subfunctions. It is better to use coroutines, which you will learn more about shortly in this chapter.
AsyncTask
AsyncTask has been the go-to class for running background tasks in Android. It makes it easier to do background processing and post data to the main thread. With AsyncTask, you don’t have to manually handle threads.
To use AsyncTask, you have to create a subclass of it with three generic types:
AsyncTask<Params?, Progress?, Result?>()
These types are as follows:
Params: This is the type of input forAsyncTaskor is void if there’s no input needed.Progress: This argument is used to specify the progress of the background operation or Void if there’s no need to track the progress.Result: This is the type of output ofAsyncTaskor is void if there’s no output to be displayed.
For example, if you are going to create AsyncTask to download text from a specific endpoint, your Params will be the URL (String) and Result will be the text output (String). If you want to track the percentage of time remaining to download the text, you can use Integer for Progress. Your class declaration would look like this:
class DownloadTextAsyncTask : AsyncTask<String, Integer,
String>()
You can then start AsyncTask with the following code:
DownloadTextAsyncTask().execute("https://example.com")
AsyncTask has four events that you can override for your background processing:
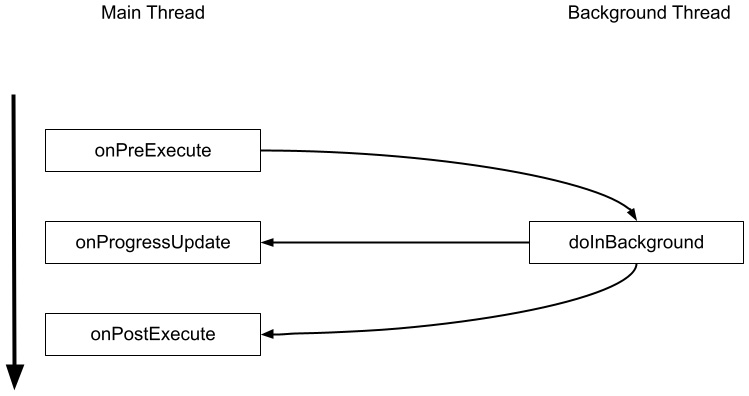
doInBackground: This event specifies the actual task that will be run in the background, such as fetching/saving data to a remote server. This is the only event that you are required to override.onPostExecute: This event specifies the tasks that will be run in the UI thread after the background operation finishes, such as displaying the result.onPreExecute: This event runs on the UI thread before doing the actual task, usually displaying a progress loading indicator.onProgressUpdate: This event runs in the UI thread to denote progress on the background process, such as displaying the amount of time remaining to finish the task.
The diagram in Figure 1.5 visualizes these AsyncTask events and in what threads they are run:

Figure 1.5 – AsyncTask events in main and background threads
The onPreExecute, onProgressUpdate, and onPostExecute functions will run on the main thread, while doInBackground executes on the background thread.
Coming back to our example, your DownloadTextAsync class could look like the following:
class DownloadTextAsyncTask : AsyncTask<String, Void,
String>() {
override fun doInBackground(vararg params:
String?): String? {
valtext = getTextFromNetwork(params[0] ?: "")
//get text from network
return text
}
override fun onPostExecute(result: String?) {
//Display on UI
}
}
In DownloadTextAsync, doInBackground fetches the text from the network and returns it as a string. onPostExecute will then be called with that string that can be displayed in the UI thread.
AsyncTask can cause context leaks, missed callbacks, or crashes on configuration changes. For example, if you rotate the screen, the activity will be recreated and another AsyncTask instance can be created. The original instance won’t be automatically canceled and when it finishes and returns to onPostExecute(), the original activity is already gone.
Using AsyncTask also makes your code more complicated and less readable. As of Android 11, AsyncTask has been deprecated. It is recommended to use java.util.concurrent or Kotlin coroutines instead.
In the next section, you will explore one of the java.util.concurrent classes for asynchronous programming, Executors.
Executors
One of the classes in the java.util.concurrent package that you can use for asynchronous programming is java.util.concurrent.Executor. An executor is a high-level Java API for managing threads. It is an interface that has a single function, execute(Runnable), for performing tasks.
To create an executor, you can use the utility methods from the java.util.concurrent.Executors class. Executors.newSingleThreadExecutor() creates an executor with a single thread.
Your asynchronous code with Executor will look like the following:
val handler = Handler(Looper.getMainLooper())
private fun fetchTextWithExecutor() {
val executor = Executors.newSingleThreadExecutor()
executor.execute {
// get text from network
val text = getTextFromNetwork()
handler.post {
// Display on UI
}
}
}
The handler with Looper.getMainLooper() allows you to communicate back to the main thread so you can update the UI after your background task has been done.
ExecutorService is an executor that can do more than just execute(Runnable). One of its subclasses is ThreadPoolExecutor, an ExecutorService class that implements a thread pool that you can customize.
ExecutorService has submit(Runnable) and submit(Callable) functions, which can execute a background task. They both return a Future object that represents the result.
The Future object has two functions you can use, Future.isDone() to check whether the executor has finished the task and Future.get() to get the results of the task, as follows:
val handler = Handler(Looper.getMainLooper()
private fun fetchTextWithExecutorService() {
val executor = Executors.newSingleThreadExecutor()
val future = executor.submit {
displayText(getTextFromNetwork())
}
...
val result = future.get()
}
In the preceding code, the executor created with a new single thread executor was used to submit the runnable function to get and display text from the network. The submit function returns a Future object, which you can later use to fetch the result with Future.get().
In this section, you learned some of the methods that you can use for asynchronous programming in Android. While they do work and you can still use them (except for the now-deprecated AsyncTask), nowadays, they are not the best method to use moving forward.
In the next section, you will learn the new, recommended way of asynchronous programming in Android: using Kotlin coroutines and flows.


