Using NOOBS to set up your Raspberry Pi SD card
The Raspberry Pi requires the operating system to be loaded onto an SD card before it will start up. The easiest way to set up the SD card is to use NOOBS; you may find that you can buy an SD card with NOOBS already loaded on it.
NOOBS provides an initial start menu providing options to install several of the available operating systems onto your SD card.
Getting ready
Since NOOBS creates a RECOVERY Partition to keep the original installation images, a 4 GB SD card or larger is recommended. You will also need an SD card reader (experience has shown that some built-in card readers can cause issues, so an external USB type reader is recommended).
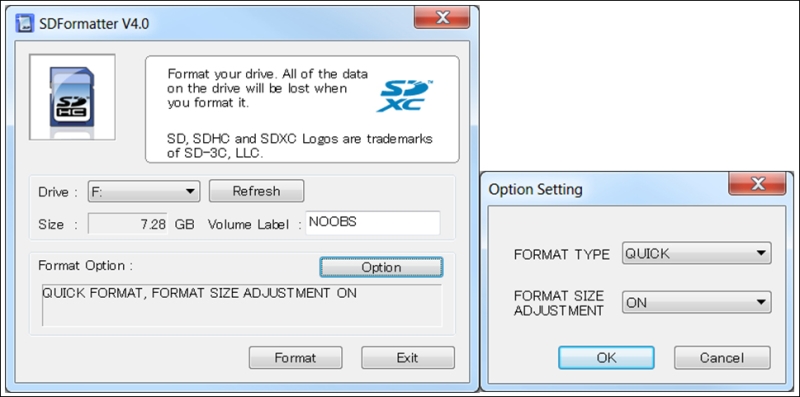
If you are using an SD card that you have used previously, you may need to reformat it to remove any previous partitions and data. NOOBS expects the SD card to consist of a single FAT32 partition. If using Windows or Mac OS X, you can use SD association's formatter, as shown in the following screenshot (available at https://www.sdcard.org/downloads/formatter_4/):

Get rid of any partitions on the SD card using SD formatter
From the Option Setting dialog box, set Format Size Adjustment. This will remove all the SD card partitions that were created previously.
If using Linux, you can use gparted to clear any previous partitions and reformat it as a FAT32 partition.
The full NOOBS package (typically around 1.3 GB) contains a selection of the most popular Raspberry Pi operating system's images built in. A lite version of NOOBS is also available that has no preloaded operating systems (although, a smaller initial download of 20 MB and a wired network connection on the Raspberry Pi is required to directly download the operating system you intend to use).
NOOBS is available at http://www.raspberrypi.org/downloads with the documentation available at https://github.com/raspberrypi/noobs.
How to do it…
By performing the following steps, we will prepare the SD card to run NOOBS. This will then allow us to select and install the operating system we want to use:
Get your SD card ready.
On a freshly formatted or new SD card, copy the contents of the
NOOBS_vX.zipfile. When it has finished copying, you should end up with something like the following screenshot on the SD card:
NOOBS files extracted onto the SD card
Note
The files may vary slightly with different versions of NOOBS, and the icons displayed may be different on your computer.
You can now place the card into your Raspberry Pi, connect it to a keyboard and display, and turn the power on. (refer to the Connecting Up the Raspberry Pi recipe for details on what you need and how to do this).
By default, NOOBS will display via the HDMI connection. If you have another type of screen (or you don't see anything), you will need to manually select the output type by pressing 1, 2, 3, or 4 according to the following functions:
Key 1 stands for the Standard HDMI mode (the default mode)
Key 2 stands for the Safe HDMI mode (alternative HDMI settings if the output has not been detected)
Key 3 stands for Composite PAL (for connections made via the RCA analogue video connection)
Key 4 stands for Composite NTSC (again, for connections via the RCA connector)
This display setting will also be set for the installed operating system.
After a short while, you will see the NOOBS selection screen that lists the available distributions that have been included. There are many more distributions that are available, but these are the ones the Raspberry Pi Foundation has selected for the NOOBS system. Click on Raspbian as this is the operating system being used in this book.
Press Enter or click on Install OS, and confirm that we wish to overwrite all the data on the card. This will overwrite any distributions previously installed using NOOBS but will not remove the NOOBS system; you can return to it at any time by pressing Shift when you turn the power on.
It will take around 10 to 30 minutes to write the data to the card depending on its speed. When it completes and the Image Applied Successfully message appears, click on OK and the Raspberry Pi will start to boot into raspi-config.
How it works…
The purpose of writing the image file to the SD card in this manner is to ensure that the SD card is formatted with the expected filesystem partitions and files required to correctly boot the operating system.
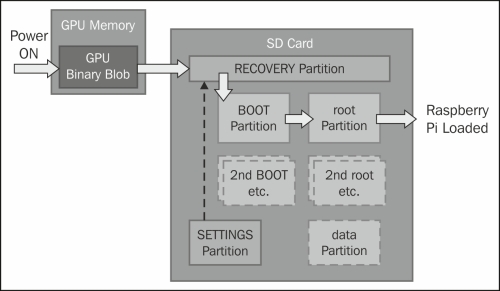
When the Raspberry Pi powers up, it loads some special code contained within the GPU's internal memory (commonly referred to as the binary blob by the Raspberry Pi Foundation). The binary blob provides the instructions required to read the BOOT Partition on the SD card, which (in the case of a NOOBS install) will load NOOBS from the RECOVERY partition. If, at this point, Shift is pressed, NOOBS will load the recovery and installation menu. Otherwise, NOOBS will begin loading the OS as specified by the preferences stored in the
SETTINGS Partition.
When loading the operating system, it will boot via the BOOT partition using the settings defined in config.txt and options in cmdline.txt to finally load to the terminal or desktop on the
root Partition, depending on what you have set up in raspi-config. Refer to the following diagram:

NOOBS creates several partitions on the SD card to allow installation of multiple operating systems and to provide recovery
NOOBS allows the user to optionally install multiple operating systems on the same card and provides a boot menu to select between them (with an option to set a default value in the event of a time-out period).
You can also choose to create an optional data Partition that allows you to keep your datafiles separate to the operating system. This makes it easier to share files between multiple systems and allows you to keep backups of just your user data.
If you later add, remove, or reinstall an operating system, ensure that you make a copy of any files, including system settings you wish to keep first as NOOBS may overwrite everything on the SD card.
There's more…
When you power up the Raspberry Pi for the first time, it will start directly into raspi-config (this only occurs for the first boot of a new install), which will allow you to perform changes to your SD card and set up your general preferences. Use the sudo raspi-config command to run it another time. When you exit this program, it will load directly by default to the terminal interface, which is the command line of the Raspberry Pi. To start a desktop session, such as Windows or OS X, use the startx command, which will load the Raspbian desktop.
Changing the default user password
Ensure that you change the default password for the pi user account once you have logged in as the default password is well known. This is particularly important if you connect to the public networks. You can do this with the passwd command, as shown in the following screenshot:

Setting a new password for the pi user
This gives greater confidence because if you later connect to another network, only you will be able to access your files and take control of your Raspberry Pi.
Ensuring that you shut down safely
To avoid any data corruption, you must ensure that you correctly shut down the Raspberry Pi by issuing a shutdown command as follows:
sudo shutdown –h now
You must wait until this command completes before you remove power from the Raspberry Pi (wait for at least 10 seconds after the SD card access light has stopped flashing).
You can also restart the system with the reboot command as follows:
sudo reboot
Preparing an SD card manually
An alternative to using NOOBS is to manually write the operating system image to the SD card. While this was originally the only way to install the operating system, some users still prefer it. It allows the SD cards to be prepared before they are used in the Raspberry Pi. It can also provide easier access to startup and configuration files (refer to the Networking directly to a laptop or computer recipe), and it leaves more space available for the user (unlike NOOBS, a RECOVERY partition isn't included).
The default Raspbian image actually consists of two partitions, BOOT and SYSTEM, which will fit onto a 2 GB SD card (4 GB or more is recommended).
You need a computer running Windows/Mac OS X/Linux (although it is possible to use another Raspberry Pi to write your card, be prepared for a very long wait).
Download the latest version of the operating system you wish to use. For the purpose of this book, it is assumed you are using the latest version of Raspbian available at http://www.raspberrypi.org/downloads.
Perform the following steps depending on the type of computer you plan to use to write to the SD card (the .img file you need is usually compressed, so before you start, you will need to extract the file).
The following steps are for Windows:
Ensure that you have downloaded the Raspbian image, as previously detailed, and extracted it to a convenient folder to obtain a
.imgfile.Obtain the
Win32DiskImager.exefile available at http://www.sourceforge.net/projects/win32diskimager.Run
Win32DiskImager.exefrom your downloaded location.Click on the folder icon and navigate to the location of the
.imgfile and click on Save.If you haven't already done so, insert your SD card into your card reader and plug it into your computer.
Select the Device drive letter that corresponds to your SD card from the small drop-down box. Ensure you double-check this is the correct device (as the program will overwrite whatever is on the device when you write the image).
Note
The drive letter may not be listed until you select a source image file.
Finally, click on the Write button and wait for the program to write the image to the SD card.
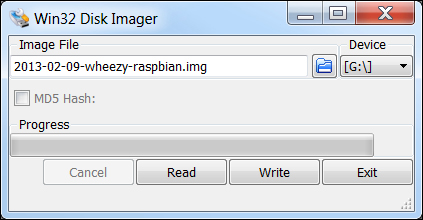
Once completed, you can exit the program. Your SD card is ready! Refer to the following screenshot:

Manually write operating system images to the SD card using Disk Imager
The following steps should work for the most common Linux distributions, such as Ubuntu and Debian:
Using your preferred web browser, download the Raspbian image and save it somewhere suitable.
Extract the file from the file manager or locate the folder in the terminal and unzip the
.imgfile with the following command:unzip filename.zipIf you haven't already done so, insert your SD card into your card reader and plug it into your computer.
Use the
df –hcommand and identify the sdX identifier for the SD card. Each partition will be displayed as sdX1, sdX2, and so on, where X will bea,b,c,d, and so on for the device ID.Ensure that all the partitions on the SD card are unmounted using the
umount /dev/sdXncommand for each partition, wheresdXnis the partition being unmounted.Write the image file to the SD card with the following command:
sudo dd if=filename.img of=/dev/sdX bs=4MThe process will take some time to write to the SD card, returning to the terminal prompt when complete.
Unmount the SD card before removing it from the computer using the following command:
umount /dev/sdX1
The following steps should work for most of the versions of OS X:
Using your preferred web browser, download the Raspbian image and save it somewhere suitable.
Extract the file from the file manager or locate the folder in the terminal and unzip the
.imgfile with the following command:unzip filename.zipIf you haven't already done so, insert your SD card into your card reader and plug it into your computer.
Use the
diskutil listcommand and identify the disk# identifier for the SD card. Each partition will be displayed as disk#s1, disk#s2, and so on, where # will be1,2,3,4and so on for the device ID.Note
If rdisk# is listed, use this for faster writing (this is a raw path and skips data buffering).
Ensure that the SD card is unmounted using the
unmountdisk /dev/diskXcommand, wherediskXis the device being unmounted.Write the image file to the SD card with following command:
sudo dd if=filename.img of=/dev/diskX bs=1MThe process will take some time to write to the SD card, returning to the terminal prompt when complete.
Unmount the SD card before removing it from the computer using the following command:
unmountdisk /dev/diskX
Refer to the following screenshot:

The boot process of a manually installed OS image
Expanding the system to fit in your SD card
A manually written image will be of a fixed size (usually made to fit the smallest sized SD card possible). To make full use of the SD card, you will need to expand the system partition to fill the remainder of the SD card. This can be achieved using the raspi-config tool.
Start the raspi-config tool with the following command:
sudo raspi-config
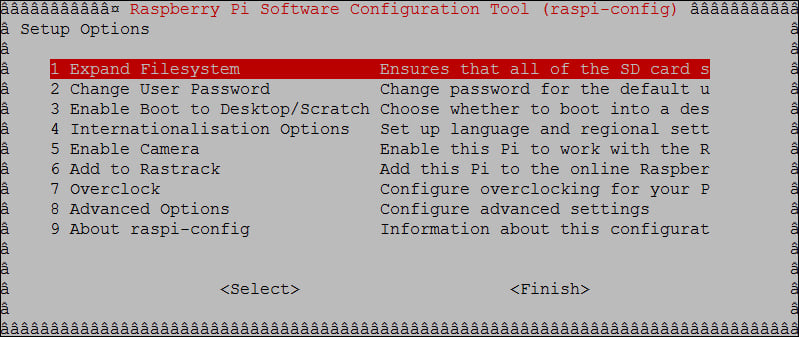
Select the menu item, 1 Expand Filesystem Ensures that all of the SD card storage is available to the OS, as shown in the following screenshot:.

The raspi-config menu
Accessing the Data/RECOVERY/BOOT partition
Windows and Mac OS X do not support the ext4 format, so when you read the SD card, only the File Allocation Table (FAT) partitions will be accessible. In addition, Windows only supports the first partition on an SD card, so if you've installed NOOBS, only the RECOVERY partition will be visible. If you've written your card manually, you will be able to access the BOOT partition.
The data partition (if you installed one via NOOBS) and the root partition are in ext4 format and won't usually be visible on non-Linux systems.
Note
If you do need to read files from the SD card using Windows, a freeware program, Linux Reader (available at www.diskinternals.com/linux-reader) can provide a read-only access to all of the partitions on the SD card.
Access the partitions from the Raspberry Pi. To view the currently mounted partitions, use df, as shown in the following screenshot:

The result of the df command
To access the BOOT partition from within Raspbian, use the following command:
cd /boot/
To access the RECOVERY or data partition, we have to mount it, by performing the following steps:
Determine the name of the partition as the system refers to it by listing all the partitions, even the unmounted ones. The
sudo fdisk -lcommand lists the partitions, as show in the following screenshot:
The partition table of a NOOBS install of Raspbian and data partition
mmcblk0p1(vfat) RECOVERYmmcblk0p2(Extended partition) contains (root, data, BOOT)mmcblk0p3(ext4) rootmmcblk0p5(ext4) datammcblk0p6(vfat) BOOTmmcblk0p7(ext4) SETTINGSIf you have installed additional operating systems on the same card, the partition identifiers shown in the preceding table will be different.
Create a folder and set it as the mount point for the partition as follows:
For the
RECOVERYpartition, use the following command:mkdir ~/recovery sudo mount –t vfat /dev/mmcblk0p1 ~/recovery
For the
datapartition, use the following command:mkdir ~/userdata sudo mount –t ext4 /dev/mmcblk0p5 ~/userdata
To ensure they are mounted each time the system is started, perform the following steps:
Add the sudo mount commands to
/etc/rc.localbeforeexit 0. If you have a different username, you will need to change pi to match.sudo nano /etc/rc.local sudo mount -t vfat /dev/mmcbblk0p1 /home/pi/recovery sudo mount -t ext4 /dev/mmcbblk0p5 /home/pi/userdata
Save and exit by pressing Ctrl + X, Y, and Enter.
Note
Commands added to /etc/rc.local will be run for any user who logs onto the Raspberry Pi. If you only want the drive to be mounted for the current user, the commands can be added to .bash_profile instead.
If you have install additional operating systems on the same card, the partition identifiers shown here will be different.
Using the tools to backup your SD card in case of failure
You can use Win32 Disk Imager to make a full backup image of your SD card by inserting your SD card into your reader, starting the program, and creating a filename to store the image in. Simply click on the Read button instead to read the image from the SD card and write it to a new image file.
The dd command can similarly be used to back up the card as follows:
For Linux, replacing
sdXwith your device ID, use the following command:sudo dd if=/dev/sdX of=image.img.gz bs=1MFor OS X, replacing
diskXwith your device ID, use the following command:sudo dd if=/dev/diskX of=image.img.gz bs=1MYou can also use
gzipand split to compress the contents of the card and split them into multiple files if required for easy archiving as follows:sudo dd if=/dev/sdX bs=1M | gzip –c | split –d –b 2000m – image.img.gzTo restore the split image, use the following command:
sudo cat image.img.gz* | gzip –dc | dd of=/dev/sdX bs=
1M


